Pixelsaurus
Chirping
- Apr 24, 2020
- 41
- 53
- 89
Inspired by a visit to Raleigh, NC and seeing a backyard chicken set-up – I hatched the idea of converting our old playhouse and raised garden bed into a Chicken Coop and Run. I know nothing about raising chickens but after a phone call to a friend I knew has had chickens for years, I felt like this was totally doable. Little did I know this was going to become a national phenomenon during this Year of COVID, but it has also became my favorite hobby. At a time when there is pretty much no sense of time in our day-to-day life (like does anyone know what day it is?), this project provided a sense of purpose and urgency as I needed to finish the projects when the chicks needed. Plus, it required me to get outside. I have actually been about to continue meeting my 10,000/day step goal and keep from walking to the refrigerator every hour.
So here is a recap of my experience converting our old playhouse to a chicken coop....


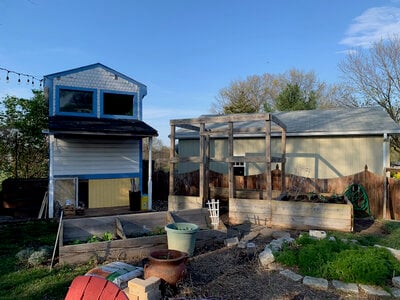
Mar 29. It started with a sketch. The playhouse was slated for demolition this Spring. We really had no use for it and had neglected it for years. Now that we are empty-nested, we thought something like a gazebo would be more functional for our needs than a playhouse. As I sketched the concept, I realized that we had so many supplies in the house: scrap wood, old windows, milk crates, hinges and hardware, yada yada. We could probably build a rocket ship between scraps in the garage and materials in my makerspace. So why not an awesome chicken coop?


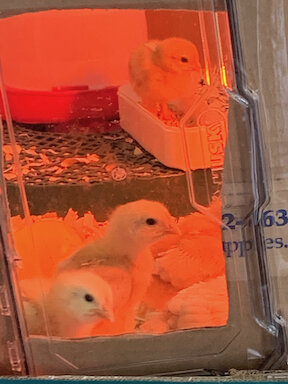
Mar 30. While I was thinking about this chicken project as an Anniversary gift, the state of Maryland was set to go on COVID lockdown March 30th. So we decided to drive to TSC and get some baby chicks and supplies so we will have chickens ready to move into the coop when we have it ready in a few weeks. We set them up in a large plastic tub in the sunroom. Zoe - our 2 year old rescue - was very curious about the new chicks.


Apr 4. A few years ago our daughter built a raised garden bed. But now that she has her own place, she doesn’t use it. With some crafty reconfiguring, we could repurpose the space using all the existing wood. Plus, we could still have a small raised bed for a few plants.

Apr 4. The inside of the playhouse required cleaning and some repairs. Holes in the floor. Paneling popping off the wall. Windows had plastic sheeting stapled in place. Some trim around the windows had rotted – but easily repaired with wood filler and scrap wood from the garage. Overall, the space is dry, has plenty of windows for ventilation, and was already painted fun colors (it was a playhouse after all). And BONUS, it has electricity!


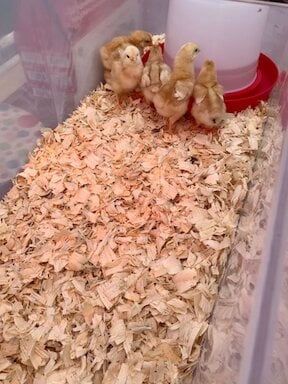
Apr 5. Meanwhile ... the chicks were about 2 weeks old and the plastic tub just didn’t seem large enough for the feeder, waterer, and 6 growing pullets. We taped together a couple large boxes from our LoveSac couch. It was a perfect size and Chris even put a window in for Zoe.


Apr 5. Cleaning out under the coop was a particularly dirty job. I am not a fan of the creepy crawlies – anything with more than 4 legs – and there were definitely a lot of spiders. But we did score some unused spare shingles and a bunch of scrap wood left over from a Girl Scout birdhouse project.

Initially I thought of running the ramp down into this crawlspace and opening up one side into the run (see sketch). I thought it would also be a cool space to escape the sun. But upon further thinking, it is not an easy space to get into and would be hard to clean or fetch chickens that run in there. Plus, it is going to work great for storing feed and supplies for the run.


Apr 6. There were also a couple areas of the floor that completely rotted through the existing tongue and groove pine flooring and chipboard subfloor. (Yes, this was quite the mansion of playhouses in its day). As simple floor fix, we covered it with ¼” plywood (first major purchase was for 2 sheets of 4’x8’ plywood). We sealed the plywood with sealer leftover from our hall bath project.


Apr 12. For the windows, we had some old storm windows used for a cold frame. Since they weren’t large enough to cover the entire window, we used some scrap wood and old glass blocks to fill up the space and keep some light. (Note: The glass blocks were from our sister-in-law whose father worked in construction in NYC. The story is that these blocks “fell of the truck” during the construction of the Empire State Building. They ended up being used for a decoration at our daughter’s wedding back in 2016, and have just been hanging around the yard since). So the bay window now has one fixed window (center) and two pop-outs. I found some drawer handles in the garage that slide into the window track. A couple of bolts screwed into the bottom corners of the window sill offer a catch to the storm door latches - so they can be securely closed. Still need to work on a mechanism to keep the windows open.


Apr 19. The window project revealed a major repair. After a rain, we noticed water coming down around one of the windows. Upon inspection, we discovered the entire top edge of the roof had rotted out and water was running down the ceiling panels into the windows. Chris was able to puzzle-piece together new plywood and replace the roofing with leftover shingles we found under the coop. We had some flashing in the garage so all we needed was some caulk and sealer to finish the job (and a mad plywood puzzling skills from Chris).

Apr 19. We didn’t have a solution yet for the two front windows, so the existing plexi-glass should be fine before it gets too hot out. Finally, a fresh coat of paint to really change the look of the place.


Apr 23. Meanwhile ... the chicks are coming along. At 4.5 weeks and an inkling of warm weather in the middle of the day, the girls were getting some outdoor recess time. Zoe continues to enjoy hanging with the chicks.


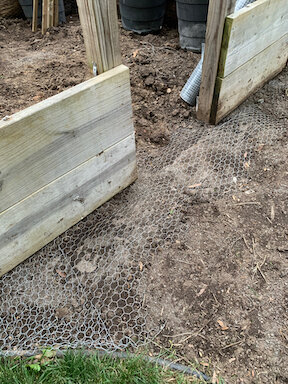
Apr 28. Back in the chicken run, Ginger was busy moving more dirt out of the raised bed area, adding chicken wire skirting around the entire run, and moving rocks to cover the wire.

Apr 29. Next came setting a post and using more salvaged pressure-treated wood from behind the garage to frame out the area between the old raised garden frame and the new coop. Some hardware cloth and staples and we had one full fence of the run complete.

Apr 30. Meanwhile ... the girls are almost 6 weeks and are over extending their stay in the sunroom. Feathers and dust are getting a bit excessive. Plus they are starting to roost on top the box and fly out on occasion adding urgency to completing the coop.


May 2. The roofing on the run consists of 3 galvanized roof panels and some joists ($150) which was the most-costly upgrade second to the hardware cloth ($160). Add to that about $80 in exterior paint, $45 in plywood, and $60 for caulk, staples and other misc, we were around $500 to “upgrade” the playhouse to a habitable coop. I say habitable because we haven’t built the coop door, roosts, or nesting boxes yet.


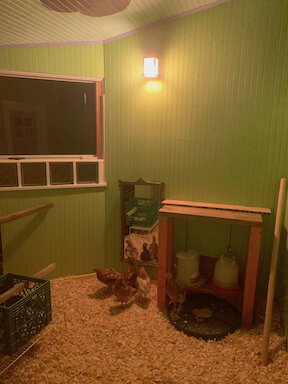
May 3. Move in time! The girls are 6 weeks and ready to move into their new space. Roosts (Version 1.0) are just some boards through milk crates. Since evenings are still a bit cool – and we have access to electricity – we set up an oil-filled space heater. Figured since there are no exposed heating elements, it should be fine for a few weeks in the coop. We don’t have a chicken door yet since the run isn’t completely secure, but the girls seemed to adjust well.
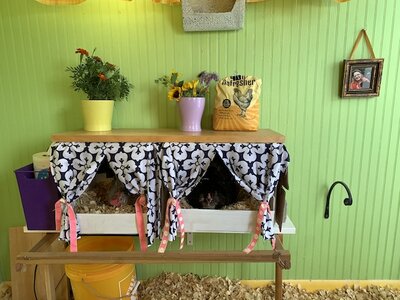
Next up finishing the run, adding a door and ramp, and perhaps start with nesting boxes.
So here is a recap of my experience converting our old playhouse to a chicken coop....
Mar 29. It started with a sketch. The playhouse was slated for demolition this Spring. We really had no use for it and had neglected it for years. Now that we are empty-nested, we thought something like a gazebo would be more functional for our needs than a playhouse. As I sketched the concept, I realized that we had so many supplies in the house: scrap wood, old windows, milk crates, hinges and hardware, yada yada. We could probably build a rocket ship between scraps in the garage and materials in my makerspace. So why not an awesome chicken coop?
Mar 30. While I was thinking about this chicken project as an Anniversary gift, the state of Maryland was set to go on COVID lockdown March 30th. So we decided to drive to TSC and get some baby chicks and supplies so we will have chickens ready to move into the coop when we have it ready in a few weeks. We set them up in a large plastic tub in the sunroom. Zoe - our 2 year old rescue - was very curious about the new chicks.
Apr 4. A few years ago our daughter built a raised garden bed. But now that she has her own place, she doesn’t use it. With some crafty reconfiguring, we could repurpose the space using all the existing wood. Plus, we could still have a small raised bed for a few plants.
Apr 4. The inside of the playhouse required cleaning and some repairs. Holes in the floor. Paneling popping off the wall. Windows had plastic sheeting stapled in place. Some trim around the windows had rotted – but easily repaired with wood filler and scrap wood from the garage. Overall, the space is dry, has plenty of windows for ventilation, and was already painted fun colors (it was a playhouse after all). And BONUS, it has electricity!
Apr 5. Meanwhile ... the chicks were about 2 weeks old and the plastic tub just didn’t seem large enough for the feeder, waterer, and 6 growing pullets. We taped together a couple large boxes from our LoveSac couch. It was a perfect size and Chris even put a window in for Zoe.
Apr 5. Cleaning out under the coop was a particularly dirty job. I am not a fan of the creepy crawlies – anything with more than 4 legs – and there were definitely a lot of spiders. But we did score some unused spare shingles and a bunch of scrap wood left over from a Girl Scout birdhouse project.
Initially I thought of running the ramp down into this crawlspace and opening up one side into the run (see sketch). I thought it would also be a cool space to escape the sun. But upon further thinking, it is not an easy space to get into and would be hard to clean or fetch chickens that run in there. Plus, it is going to work great for storing feed and supplies for the run.
Apr 6. There were also a couple areas of the floor that completely rotted through the existing tongue and groove pine flooring and chipboard subfloor. (Yes, this was quite the mansion of playhouses in its day). As simple floor fix, we covered it with ¼” plywood (first major purchase was for 2 sheets of 4’x8’ plywood). We sealed the plywood with sealer leftover from our hall bath project.
Apr 12. For the windows, we had some old storm windows used for a cold frame. Since they weren’t large enough to cover the entire window, we used some scrap wood and old glass blocks to fill up the space and keep some light. (Note: The glass blocks were from our sister-in-law whose father worked in construction in NYC. The story is that these blocks “fell of the truck” during the construction of the Empire State Building. They ended up being used for a decoration at our daughter’s wedding back in 2016, and have just been hanging around the yard since). So the bay window now has one fixed window (center) and two pop-outs. I found some drawer handles in the garage that slide into the window track. A couple of bolts screwed into the bottom corners of the window sill offer a catch to the storm door latches - so they can be securely closed. Still need to work on a mechanism to keep the windows open.
Apr 19. The window project revealed a major repair. After a rain, we noticed water coming down around one of the windows. Upon inspection, we discovered the entire top edge of the roof had rotted out and water was running down the ceiling panels into the windows. Chris was able to puzzle-piece together new plywood and replace the roofing with leftover shingles we found under the coop. We had some flashing in the garage so all we needed was some caulk and sealer to finish the job (and a mad plywood puzzling skills from Chris).
Apr 19. We didn’t have a solution yet for the two front windows, so the existing plexi-glass should be fine before it gets too hot out. Finally, a fresh coat of paint to really change the look of the place.
Apr 23. Meanwhile ... the chicks are coming along. At 4.5 weeks and an inkling of warm weather in the middle of the day, the girls were getting some outdoor recess time. Zoe continues to enjoy hanging with the chicks.
Apr 28. Back in the chicken run, Ginger was busy moving more dirt out of the raised bed area, adding chicken wire skirting around the entire run, and moving rocks to cover the wire.
Apr 29. Next came setting a post and using more salvaged pressure-treated wood from behind the garage to frame out the area between the old raised garden frame and the new coop. Some hardware cloth and staples and we had one full fence of the run complete.
Apr 30. Meanwhile ... the girls are almost 6 weeks and are over extending their stay in the sunroom. Feathers and dust are getting a bit excessive. Plus they are starting to roost on top the box and fly out on occasion adding urgency to completing the coop.
May 2. The roofing on the run consists of 3 galvanized roof panels and some joists ($150) which was the most-costly upgrade second to the hardware cloth ($160). Add to that about $80 in exterior paint, $45 in plywood, and $60 for caulk, staples and other misc, we were around $500 to “upgrade” the playhouse to a habitable coop. I say habitable because we haven’t built the coop door, roosts, or nesting boxes yet.
May 3. Move in time! The girls are 6 weeks and ready to move into their new space. Roosts (Version 1.0) are just some boards through milk crates. Since evenings are still a bit cool – and we have access to electricity – we set up an oil-filled space heater. Figured since there are no exposed heating elements, it should be fine for a few weeks in the coop. We don’t have a chicken door yet since the run isn’t completely secure, but the girls seemed to adjust well.
Next up finishing the run, adding a door and ramp, and perhaps start with nesting boxes.