Needed a pen for the birds, I really liked the design from www.QuailRanch-OK.com. But I was really worried about the wind so I emailed Lynn Webster at QuailRanch-OK "Nice Lady" and she said 65 to 70 mph winds were OK. That's about what we get rolling off the Horse Heaven Hills.
So I thought it was time to get the beer cold and give it a whirl. My wife thinks this is April Fools, just wait till she gets home.

Day 1:
First off where should I put this. So I gave that task to Cody and Dakota. And they found a good spot, the garage and fence will block some wind.

Decided to do a 20ft. flight pen so we dropped the auger on the tractor and put a few holes in the ground. At one point the Auger locked up and I could not get it pulled up from the ground. Finally after some rocking it came out. It got caught on the Water and Electric line coming from the garage, that would have ruined my day. My son gave me the business about call before you dig. LOL....Unfortunately they only do their mains, road to meter.
Sitting on a tractor is tough work so I grabbed a chair and cracked a cold one. The boys went to work dropping in the 4" PVC and running the strings to get our bearings straight. We put up the first arch to see how high this would be with a stick of 20ft 1-1/4" PVC as the arch. After cementing the 1-3/8" top rail in the 4" PVC, that 1-1/4" pvc slid right on for the arches. The 1/2" wire mesh floor will end up about 2 1/2ft off the ground. I guess time for another cold one.
The Cement work is moving right along. The pipes are right up to the strings. This is so easy a Cave Man could do it.
At this point everyone is either looking confused or ready for another homebrew. So lets call it a day, let the concrete set and get back at it tomorrow.
Day 2: The wind was brutal today after the rain so I did not get much done.
Started work on the floor by adding cedar around the perimeter. We have a sprayer that we use to seal our decks so I will spray all the cedar and get it sealed after it is all in.
Katharinad suggested the PVC will become brittle in time due to the sun. The arches will be under a rain sheild or shade cloth and are Schedule 40 which will not have sun on them. Don't use Schedule 125 to save money that will go a little quicker. FYI I have had Schedule 40 laying out back since 2003 in this god forsaken northern desert sun and it is fine. As far as the 4" if it rots away I'll be left with 4-1/2ft concrete tubes. Notice the top rail used for fencing in the bottom left corner which the PVC drops over. Tip - put a little oil or WD-40 on the top rail to make the PVC slide on easier. We fought the first one.
In the center row I could not find 20ft lumber so we layed down a 12ft section and bolted it to a 8 footer with a Strong tie. Off center is not a problem since the walk will actually be off center anyways. It all lays on the center which is what we need. Also put in the first cross brace at 4ft.
On the cross beams I'm putting in 4" galvanized nails and also screwing on Strong Tie 90 degree brackets for extra strength. Not really I just had them laying around
 .
.
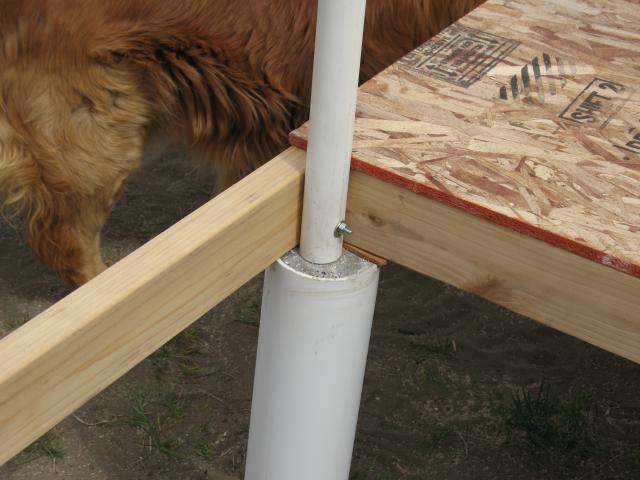
Here is a closer look at securing the floor and arches. The 4" was put in 4ft apart and filled with concrete, also the rest of the 80# bag of concrete was put in the hole for extra support. The top rail pipe was put in the 4' with a pin in it so it would not come out. The top rail was offset so the perimeter floor and cross braces layed on the concrete pipe. The arch PVC was dropped over the top rail and then we drilled and bolted the frame to the pipes. We tried to pull it out of the ground. That baby ain't goin nowhere. Wish I had done more today but the weather did not cooperate. But as soon as I cleaned up and got the camera the sun came out go figure.
Day 3: The frame is finished but the winds are back at it today gusts to 60. Feel like i'm in Kansas with Toto.
The front section is our loadout area, it is easier to get through a door from a landing area than trying to do it with boxes or supplies going up steps. We poured a 36"X30" cement pad that we will put our steps on. 4x4's were used for a door frame that will be also be made from PVC, hardware cloth and a small piece of plywood to brace it. 16ft 2x6's are used for a walkway, their just there for show right now until the wire floor goes down. We will space them apart to kinda match your walking width.
Next we start putting in the wire floor and bring it two feet up the sides. I want it all done by this weekend but the weather service has these high wind warnings and we have had to just batten down the hatches. I'm tired of chasing things around the yard. Getting to old for this.......

This is a close up to show how the frame rests across the concrete post and the toprail / pvc is off center and bolted to the frame.
See you soon
So I thought it was time to get the beer cold and give it a whirl. My wife thinks this is April Fools, just wait till she gets home.
Day 1:
First off where should I put this. So I gave that task to Cody and Dakota. And they found a good spot, the garage and fence will block some wind.
Decided to do a 20ft. flight pen so we dropped the auger on the tractor and put a few holes in the ground. At one point the Auger locked up and I could not get it pulled up from the ground. Finally after some rocking it came out. It got caught on the Water and Electric line coming from the garage, that would have ruined my day. My son gave me the business about call before you dig. LOL....Unfortunately they only do their mains, road to meter.
Sitting on a tractor is tough work so I grabbed a chair and cracked a cold one. The boys went to work dropping in the 4" PVC and running the strings to get our bearings straight. We put up the first arch to see how high this would be with a stick of 20ft 1-1/4" PVC as the arch. After cementing the 1-3/8" top rail in the 4" PVC, that 1-1/4" pvc slid right on for the arches. The 1/2" wire mesh floor will end up about 2 1/2ft off the ground. I guess time for another cold one.
The Cement work is moving right along. The pipes are right up to the strings. This is so easy a Cave Man could do it.
At this point everyone is either looking confused or ready for another homebrew. So lets call it a day, let the concrete set and get back at it tomorrow.
Day 2: The wind was brutal today after the rain so I did not get much done.
Started work on the floor by adding cedar around the perimeter. We have a sprayer that we use to seal our decks so I will spray all the cedar and get it sealed after it is all in.
Katharinad suggested the PVC will become brittle in time due to the sun. The arches will be under a rain sheild or shade cloth and are Schedule 40 which will not have sun on them. Don't use Schedule 125 to save money that will go a little quicker. FYI I have had Schedule 40 laying out back since 2003 in this god forsaken northern desert sun and it is fine. As far as the 4" if it rots away I'll be left with 4-1/2ft concrete tubes. Notice the top rail used for fencing in the bottom left corner which the PVC drops over. Tip - put a little oil or WD-40 on the top rail to make the PVC slide on easier. We fought the first one.
In the center row I could not find 20ft lumber so we layed down a 12ft section and bolted it to a 8 footer with a Strong tie. Off center is not a problem since the walk will actually be off center anyways. It all lays on the center which is what we need. Also put in the first cross brace at 4ft.
On the cross beams I'm putting in 4" galvanized nails and also screwing on Strong Tie 90 degree brackets for extra strength. Not really I just had them laying around
Here is a closer look at securing the floor and arches. The 4" was put in 4ft apart and filled with concrete, also the rest of the 80# bag of concrete was put in the hole for extra support. The top rail pipe was put in the 4' with a pin in it so it would not come out. The top rail was offset so the perimeter floor and cross braces layed on the concrete pipe. The arch PVC was dropped over the top rail and then we drilled and bolted the frame to the pipes. We tried to pull it out of the ground. That baby ain't goin nowhere. Wish I had done more today but the weather did not cooperate. But as soon as I cleaned up and got the camera the sun came out go figure.
Day 3: The frame is finished but the winds are back at it today gusts to 60. Feel like i'm in Kansas with Toto.
The front section is our loadout area, it is easier to get through a door from a landing area than trying to do it with boxes or supplies going up steps. We poured a 36"X30" cement pad that we will put our steps on. 4x4's were used for a door frame that will be also be made from PVC, hardware cloth and a small piece of plywood to brace it. 16ft 2x6's are used for a walkway, their just there for show right now until the wire floor goes down. We will space them apart to kinda match your walking width.
Next we start putting in the wire floor and bring it two feet up the sides. I want it all done by this weekend but the weather service has these high wind warnings and we have had to just batten down the hatches. I'm tired of chasing things around the yard. Getting to old for this.......
This is a close up to show how the frame rests across the concrete post and the toprail / pvc is off center and bolted to the frame.
See you soon
Last edited:


