This build is based off of the Wichita Coop design. I did a lot of research on this site to see what would work best for my back yard, and that design was perfect. The footprint fits nicely in my yard, and the design was nice enough to be part of the garden oasis theme. I'm better with tools than I am with computers, so if the layout of this thread is wonky then you know why...
As most people here are probably very familiar with the Wichita design, the only significant difference from the original is I went with 3 outer nesting boxes instead of the original 2. Also, the slope from front to back is less than the original. Other than that, why mess with perfection (the original design, not mine!)...

making the sliding coop chicken door. You can never have too many clamps!
went with a southern arizona coop look. we like the galvanized metal roofing look for this coop.
sanding and staining. The coop siding is 1X4 pine slats.
Is this the "I love staining" look or the "hand me a circular saw or I'm going to kill you" look? I mix the two up...
Hardwear cloth is like little needles at the ends, just waiting to poke and scrape you. It was a really great idea to sandwich the hardwear cloth between the studs. Not only does it make it very secure, it also makes the overall look very "clean", as the facade now is flush with the framing base.
sliding coop door for the chickens. This feature is pure brilliance. Love it.
chicken door before staining.
stained the door.
making sure it slides freely. Had to shim it a bit. The pine slat siding it is screwed to is not perfectly flat. As the frame of the sliding door is, when I attached it, it created some binding points. Shims worked perfectly.
My helper and right hand gal. She has a freakish amount of energy which is why this coop is going up in record time...
We decided not to paint it. We're going with a rustic stained look. The wood will weather nicely in the AZ sun
and take on that old, "rustic" look very quickly.
Gotta love the enthusiasm!
Coop run door made and installed.
The backside of the door.
closer detail.
more helper pics...she loves the power tools.
Coop access door made and installed.
Detail pic of the sliding door line... I put a pully wheel mounted outside the hole in the frame,
as it makes the action really smooth and no wearing of the nylon rope through the wooden frame
hole.
the sliding door is a really good idea. You can see those shims in this pic for the door frame. They are now
cut off and stained so they are no longer visible...
another angle on the sliding door.
Nest boxes going in...
Visions of easter eggs dancing in her head...
Me, installing the boxes.
from the inside of the coop...
adding some details to the nests...
framing the window above the nest boxes.
Edit: I'm thinking of making a sliding "poop board/tray" that will slide out from the coop much like one of those slide out cutting
boards you see in many kitchens. It will sit directly under the roosts to catch the stuff it needs to catch and access will be on the back side of the coop. Just pull it out like a kitchen cutting board from the outside of the coop and voila...scrap off and push it back in. I might even make it with a small border around the board to hold a thin layer of PDZ.
Updated pics:
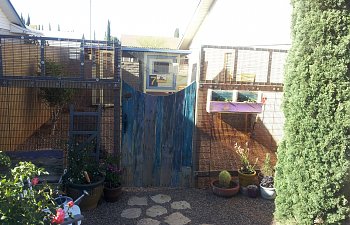
painted for the upcomming summer...
Talulah, our ameraucana.
Jezebel, one of our GLWs.
Junebug in the compost.
As most people here are probably very familiar with the Wichita design, the only significant difference from the original is I went with 3 outer nesting boxes instead of the original 2. Also, the slope from front to back is less than the original. Other than that, why mess with perfection (the original design, not mine!)...
making the sliding coop chicken door. You can never have too many clamps!
went with a southern arizona coop look. we like the galvanized metal roofing look for this coop.
sanding and staining. The coop siding is 1X4 pine slats.
Is this the "I love staining" look or the "hand me a circular saw or I'm going to kill you" look? I mix the two up...
Hardwear cloth is like little needles at the ends, just waiting to poke and scrape you. It was a really great idea to sandwich the hardwear cloth between the studs. Not only does it make it very secure, it also makes the overall look very "clean", as the facade now is flush with the framing base.
sliding coop door for the chickens. This feature is pure brilliance. Love it.
chicken door before staining.
stained the door.
making sure it slides freely. Had to shim it a bit. The pine slat siding it is screwed to is not perfectly flat. As the frame of the sliding door is, when I attached it, it created some binding points. Shims worked perfectly.
My helper and right hand gal. She has a freakish amount of energy which is why this coop is going up in record time...
We decided not to paint it. We're going with a rustic stained look. The wood will weather nicely in the AZ sun
and take on that old, "rustic" look very quickly.
Gotta love the enthusiasm!
Coop run door made and installed.
The backside of the door.
closer detail.
more helper pics...she loves the power tools.
Coop access door made and installed.
Detail pic of the sliding door line... I put a pully wheel mounted outside the hole in the frame,
as it makes the action really smooth and no wearing of the nylon rope through the wooden frame
hole.
the sliding door is a really good idea. You can see those shims in this pic for the door frame. They are now
cut off and stained so they are no longer visible...
another angle on the sliding door.
Nest boxes going in...
Visions of easter eggs dancing in her head...
Me, installing the boxes.
from the inside of the coop...
adding some details to the nests...
framing the window above the nest boxes.
Edit: I'm thinking of making a sliding "poop board/tray" that will slide out from the coop much like one of those slide out cutting
boards you see in many kitchens. It will sit directly under the roosts to catch the stuff it needs to catch and access will be on the back side of the coop. Just pull it out like a kitchen cutting board from the outside of the coop and voila...scrap off and push it back in. I might even make it with a small border around the board to hold a thin layer of PDZ.
Updated pics:
painted for the upcomming summer...
Talulah, our ameraucana.
Jezebel, one of our GLWs.
Junebug in the compost.