'Chic Urban Chicken Living'
We live in an urban location in Los Angeles with limited yard space. I wanted something that was large enough to comfortably house my chickens but fit in nicely to our yard and was pleasing to the eye. I wanted to repurpose as much as I could, so I took old windows and a door that we had stored in our garage to add some character. Bonus: they were free!
I started drawing-up some designs after researching what was needed. Since we live in a very hot part of Los Angeles, summers are upwards of 100 degrees, I wanted to place the coop and run in the most shaded spot in my yard. I also wanted to provide room under the coop for some refuge and for more run square footage since I didn't have a lot of space.
I could comfortably take over a 5'x10' area that was of legal placement by LA County ordinance. For building material ease, I opted for a 4'x4' coop design. This way I could just buy 8' stud wood. I tried to stay as methodical and efficient in my material use as to not overspend, which is easily done.
First, I dug a 5'x10' trench to create a foundation and layed cinder blocks around. The trench was about 10" deep. I pruchased 4 cement pillards with brackets for the coop to sit on, so that it could be raised.I began drawing images by hand on paper, and then making a list of measurements and cuts for the basic frame of the coop. I made all the cuts in my garage and assembled each wall there. When all 4 were done, I brought them back to the yard and assembled them in place.
Now that the basic frame was up, I began work on the siding and trim. I layed the floor of the coop, which is linoleum tiles. In retrospect, I wish I had waited until the end to lay these.
I pulled out old windows we had changed out and stored in our garage. I liked the character they added. I opted to leave them as-is and just add hinges and a handle to each. There is one on each side. I will put chicken wire on the inside to allow the windows to be propped open on hot days. I have also added two vents to allow constant air cirulation. We also added the roof, which is corrugated metal. Man, that stuff can be a pain to work with!
Next, I added the nest box and more trim. I built a a roll-out nest boxes (3), added more trim and painted the roof pink. Yes, pink.
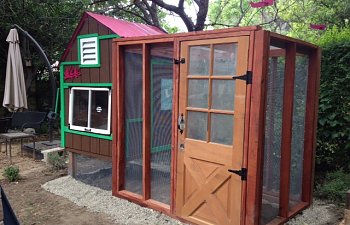
I also added the doors to the coop (people door and chicken door)
Next, I started on the run. I first wrapped chicken wire under the cinder blocks and layed out a layer of pressure treated wood on the base of the block and attached the chicken wire to it. The PT wood is below the surface, so the chickens won't be able to get to it.
I then layed redwood 4x4's along the base on top of the PT wood. I then added 4 posts of 4x4s using "L" shaped brackets. I had stained all the wood in my garage during the week and over the weekend I brought it all back to the yard and started to assemble panels with the chicken wire. I attached each panel to each side, making the run. Although you can't see it here, I also made a roof panel with chicken wire.
I took a door from my dad's garage that had been there for years. It's a rather nice French door that was cut to an odd size, so I used it! I added the door and chicken wire wrapped around the area below the coop. We then filled the trench with some gravel we had leftover from another job.
Now, all that is left is to add the PVC corrugated roof on top of the run, a chicken ramp, and I plan to lay a layer of sand inside the run. Oh, and these girls need to grow up!
I'm sure once my girls are in there I will find some changes I'd like to make, but for now I am very excited how it turned out!