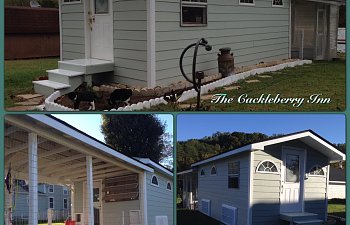
Dreams DO come True!!! The Cackleberry Inn is proof!
Oh MY! Building the Cackleberry Inn has been (and still is) one of the most fascinating projects I've ever experienced! For a long while now, I've dreamed of a chicken house that allowed me to pamper and enjoy my little flock in an easier and more relaxing manner. Finally my dream is coming true.Due to have been blessed with way too many Roosters, I have divided my little flock into 4 groups. Four mini flocks of which I prefer to keep separately. This makes life on Cackleberry Lane much more fascinating (and a lot less blood shed). Since four mini flocks call for a bit different hen house arrangement, I set out to design what has turned out to be, a Chicken "Inn" of sorts with four luxurious "Suites". I have now named these four Suites after the Roosters who will reside there. We have the "HitchCock Suite", the "Pepper Suite", the "Razor Suite", and the "Chick Sparrow Suite". Now, I will admit, I do have two more Roosters. LeeMon MayRang has found peaceful residence with Razor, and Chickasaw has grown up with Chick Sparrow since hatching. Yes, there are a hundred different ways I could handle such a dilemma, however, this is what works and pleases "us" best.
I really enjoy my quad-flock and am always looking for easier and better ways of tending them, either for their betterment or mine. As each detail is considered and studied, I've found several things that really doesn't actually agree with the average Chicken house (or coop). For example, Chickens love the ground. They love to scratch and peck the ground. They enjoy a good dust bath in soft dirt. With this in mind, I could not bare to build a house for them that placed them on a man-made floor such as wood or concrete. with that said, consideration was taken to avoid varmints digging under and into the house.
I have spent a considerable amount of time brainstorming and researching for this project. I fear to admit that I've awaken in the middle of the night with just the perfect solution to a detail, and have become a regular at Home Depot, Lowes, and Tractor Supply.
Watering my quad-flock has always been such a messy aggravation for me that I've focused on a solution that would make it easier and cleaner for our little set up. I will be addressing this more in the near future as I share the water system that I have designed.
Sufficient feed has been another issue that I had to address. Since family or work calls me out of town for a few days at a time, I needed to make sure there was always an ample supply of feed (and also water) for the dependent birds. This will be shared also in the near future.
Construction has begun! I'm so excited about the new home for my Chickens! So, as you begin this cyber tour, allow me to take this moment to say, "Welcome to the CACKLEBERRY INN."
Hang on..... LOTS of photos coming!!!
The Basic Floor Plan for the Cackleberry Inn.
The Frames arrived! This was such a delightful sight because this was the initial sign that construction had begun. I was so thrilled!!!
And.... it begins....
"Cackleberry Lane"
Found these half circle windows at a salvage store. Decided they would add a unique twist.
The front area has a floor. This will by "my room" where I will store feed and supplies. The Banty flock will have access to underneath so there will be no place for critters (aka mice/ rats, etc) to find a safe haven.
Progress... Installing the windows.
With a little photo app on my ipad, I was able to present the basic ideas I had in my head about the chicken house.
Roof going on! Yippee!!!!
Interior.
All Doors and windows (except for the half circle ones that I got at a salvage store) were repurposed from our recent home remodeling. I saved several things to use on this project. What used to by our front door, is now the front door of the Cackleberry Inn.
")
Using a little photo app, I took time to visualize how the interior would work. Chicken wire walls with Chicken wire screened doors will keep each micro-flock separate and in their designated "Suite". As you see on the photo to the left, I've blotted in where the ground area will be divided into 4 Suites. The photo on the right shows the little tunnel that will allow the front "suite" flock to exit to the back outdoor pen.
Interior planning......
Center wall brace in place now.....
View from Back of the Cackleberry Inn.
ok, See this area here? Plans for a couple of openings are being planned for ventalition as well as light. Of course, they will be covered with chicken wire...
House now covered in weather wrap... See the two vent openings? My carpenter, Dennis Rogers came up with the incredible idea to use shutters (that he found on Craigslist) as a way to open and close these openings. So, during cold weather, they can keep the chickens warmer by closing them, and during the Summer seasons, they will stay open.
Oh yeah.... I'm loving this..... it's coming together like a dream!
Walkway stones to the front door. yet another "touch" of details...
To preserve the interior wood a bit, AND to lighten up the interior, I elected to use a paint spray gun and giving a "white-wash" appearance to the inside of the Inn. By white-wash, I mean, casting a spray onto the interior but not worrying about 100% coverage. It turned out better than I expected.
My Grandson, Brycen can't wait to gather Cackleberries from the new Inn.
Interior wall framing to divide the ground area into 4 "Suites".
From the back of the "Inn" looking into it. Interior wall frames coming along nicely.
Ok, here's "the plan" for the walls inside. A Roosting Pole just below the half circle windows. Then below that, a shelf for Poop trays. Yes, Poop Trays. These Poop Trays can be removed, carrying said poop with them.
Below the Poop tray shelf another shelf is needed. This shelf will be where the nest crates will sit. This shelf will also serve as the top of the exit tunnel. (Don't you just LOVE my high tech sketches??)
Roosting pole installed! I read somewhere that a wider roost helps the chickens especially during cold seasons. So, That's why we used this style and not round limb style.
I do believe the most unusual and fun part of this project for the carpenters was planning and building the poop tray shelves. There were quite a bit of discussion as to just how wide a chicken is, how far over the roosting pole a chicken's behind hangs, and just where the poop would land on said poop trays.
Here, the back wall of the Cackleberry Inn is closed in and the large crank-out window (repurposed from our home remodeling) installed. Dennis and his son are gearing things up in preparation for the Roof covered outdoor pen that will be built behind the Inn for the chickens to enjoy a bit of fresh air.
Building a chicken house with ever present rain storms has not been completely pleasant.
I will take a moment here to share that to "Varmint proof" the chicken house from varmints digging under and into the house, I bent hardware wire (a bit stronger than chicken wire) into an L shape and stapled it to the bottom of the house walls. when heavy rains poured under the walls making a muddy mess inside, I cut heavy tarps into strips and stapled them on top of the hardware wire. This will remain permanently in place and potting soil (with plants, herbs and flowers) will be spread on top.
To my delight, I was surprised at how MUCH casting a bit of paint within the interior lightened it up!!!!
The carpenters couldn't believe it either!
Couldn't resist hanging the Welcome sign in the peak of the interior wall. Excited about the new steps leading from the floored room down into the Chicken Suites.
The Cackleberry Inn is dedicated in loving memory of my great aunt Annie V. King who lived in a tiny house behind my grandparents' home during my childhood. In honor of Annie V, I moved the chickens into the Cackleberry Inn on her 105th birthday. The Inn still has much work to be done, but it is at least capable to house most of the chickens. You will see in the photos below that they seem to like their new home.
More repurposing... Used the cabinets and door pulls from our recent home remodeling. the door pulls and the cabinets match.
My hens have always preferred milk crates to nests, so, when designing the Cackleberry Inn, I elected to have 2 milk crate nests for each "Suite". It's been my experience there is no need for half a dozen nests for each flock because once settled, they usually only use 1 or 2 nests per group. Even here, most lay in one nest only. I added Curtains (aren't they cute?) for 2 reasons; 1. gives the hens a bit of privacy. 2. keeps them from perching on the lip of the crates as a leisure resting spot. I chose cotton fabric curtains to keep the nest areas "breathable" and not stuffy.
Installed a fan in the center of the "Inn" to pull airflow through. and I couldn't resist this cute fan for me...
This is MY resting corner.
Siding going on.
Siding going on and back door hung. Front door painted white.
Front steps are finished (except painting) and the Coffee Cats (Folgers, Maxwell, Espresso, Java and Latte) are having a blast. They now call the floored front room of the Cackleberry Inn their home.
In the evenings, we can see the chickens roosting in front of the half circle windows, and it's pleasant to know they are safe. I have found keeping a light on and talk radio (not music) are the best steps to avoid invading varmints.
This is one of my favorite photos.
Coming up, more about the installation of the water and feed systems I'm installing.
"If you don't first succeed, try, try again." Well, the Feed system for the Cackleberry Inn gave me some challenges. But, after 3 failed attempts, the 4th attempt works well.
* I decided on using aluminum baby pig feeders for the troughs. I like the size and ease of mounting them by hooking on 2 screws.
* For the pipes, I chose drainage pipes, instead of regular plumbing pipes because they are lighter in weight.For ease of disassembly (for cleaning purposes, etc) I did not glue the pipes together. They stick together quite snuggly, some so snug you'd swear it WAS glued.
* I used a 2' long 6" drain pipe to start with.
* I fitted a coupler converter that attaches the 6" pipe to a 4" pipe.
* I cut a piece of 4" pipe to attach that to a 4" Y.
* I cut 2 more pieces of 4" pipe to attach the Y ends to 4" elbows. These 2 pieces had to be the right length so the space between the 2 elbows was approximately 6.5" wide (the width between the two baby pig feeder troughs).
* The bottom of each elbow, I fitted a coupler converter that attached the 4" pipe to a 3" pipe.
* I cut a piece of 3" pipe just long enough to attach the last piece of the feeder which was a coupler converter that fits a round 3" pipe to a rectangle. This rectangle fits easily into the top of the baby pig feeders.
* Of Course, I used a 6" cap for the top of this Gravity Flow Feeder.
* I secured the vertical feeder in place with Steel Hanger Tape (and screws).
I love it when a plan (FINALLY) comes together!
When the Carpenters arrive, I can’t await to see what progress they’re going to make! This weekend they were able to get the siding on the back wall as well as finish framing out the 4 tiny exit doors that will lead the chickens to their Day Pen, or shall we say… the Sun Room. And speaking of the Sun Room, the roof is being constructed on the ground and will be hoisted up and into place when it’s finished.A roof over the outdoor area (Sun Room) is important for several reasons:
Safety. Helps keep varmints out.
Shade. Hot summer days can stress chickens without sufficient shade.
Cover. Rain and winter snow are not pleasant either.
And while the guys were busy in the back, I was busy with a paint brush in the front. I am absolutely in love with this color. Paining it to match our house only adds to the sweetness of this project. It’s so thrilling to see it all come together after so much planning and dreaming (not to mention the sweat and labor)
Carpenters made great strides in building the roof of the Sun Room (outdoor day pen). This roof will be hoisted up into place, attached to the back of the Inn.
The white trim makes the color pop. With each stroke of my paint brush, the Cackleberry Inn is coming alive just as my dream of this awesome Chicken House is as well.
Next order of business was to lift up the roof to the Day Pen and hoist it into place.
This task of hoisting the roof up into position was amazing to witness.
YAY! The Day Pen Roof is in position!
Note the two vents on this side wall. more about that later...
View from the other side, of the Day Pen Roof being installed to the back of the Cackleberry Inn.
Once the Roof was installed, it was time to paint it's celling. I covered the window and back door of the Cackleberry Inn.
Just as on the inside, it was amazing to see how the white paint brightened it all up.
Now, about the time we were getting to the point of working on the "Patio" (Day Pen), I took a notion to get a couple of little pygmy goats. Precious little things. And, of course, I wanted to make a safe place for them as well. So, a revision was made on the back end of the Day Pen area. I asked they carpenters to make a "stall" area on the back side. As you see here, we boarded three walls up a couple of feet for durability and protection. Repurposed a screen door that was taken off our home several years ago. As you will see in later photos I covered the screen door and the East wall with wire.
This is a good view of the Patio Room, Goat "Suite" and the back side of the Inn. You can also see our home in the background which matches the Cackleberry Inn.
The Guys framed out the two vent areas and installed the shutters that were found on Craigslist. This works well to be able to open and close these areas for ventilation. Of course, wire was installed first.
Shutters installed. Yay!
This is a good shot that shows how it all is coming together.
One of my Pygmy goats, Ivy decides to supervise the carpenters.
Finishing the siding on the east side of the Inn was delayed due to tending to things that affected the daily upkeep of the chickens since they were already in the "Inn".
Ok, so, let's talk water…...
I took an old cabinet frame (that we removed from our house during remodeling) and cut the top so I could place one 5 gallon cooler inside and another on top. One Cooler provides water for
Removing the spout, I installed a water valve in each of the water coolers. As you see here, I cut away the wood to allow access to it into the Chicken "suites".
So, the cabinet is set pretty much in the center of the house, up against the wire wall that separates the floored feed/storage area from the chicken "suites". It is directly between the two doors that open into the first two chicken "suites". I attached water hoses to the facet valves.
I attached the hoses to chicken nipple "wands" that I made and attached to the center frame wall that runs through the chicken "Suites".
As you see, a hose runs on each side of the center structure wall frame, attaching to the water wand. Then I attached a hose to connect to the second water wand in the last two chicken "Suites".
Drip trays keep drips and excess dribbles from chickens drinking, from making a muddy mess below.
Ok, back to the outside….
I didn't want to block the view and light with boarding up the walls around the Goat "Suite" at the back of the Day Pen, so, I chose plexiglass sheets. yeah, most people use this as a form of roofing cover…
The guys worked tediously to install each panel properly and securely.
The plexiglass shields the weather from the little goats. When wind is whipping and rain is pelting, they remain nice and dry. We left the screen door and the east side open, covered only in wire for ventilation. My main concern was protection from the West which is where most weather comes from.
ok, here see the storm door that goes into the Chicken Day Pen. It too, was repurposed after being taken down from inside the home. I covered it with hardware wire, just like I did the storm door to the Goat Suite.
Not sure you can see it in these photos, but I intalled fencing wire across the open walls of the Day pen as well as the East wall of the Goat Suite. If you look closely you can see Roxi and Ivy, my two little pygmy goats are enjoying their new home.
You can't see it very well in these photos but I installed hardware wire to the inside of the plexiglass paneled walls of the the Goat suite. This helps protect the plexiglass from any goat activity (if they get an opportunity to reach that high).
Here is some better shots of Roxi and Ivy, my little pygmy goats. At the time of this photo they were 10 months old.
These two are just too cute! Their bed of straw is very snuggly. In these photos you can see the fence wire wall as well as the hardware wire that I bent in an L shape and attached all around the entire house and pen.
You can see the boards laying onto of the hardware wire. eventually the grass and daily dirt attached it to the ground.
Too short to see over the boards except to stand on a cinder block.
Here you can see the goats feeder. They spend their days in their weed patch pen, but come nighttime, their ready for an evening in their Cackleberry suite with a little goat pellet feed. I made this feeder for the chickens and it worked great but decided it was perfect for the goats.
Me, the last day the Carpenters worked. Their part completed. I still had much to do.
Painting and landscaping continues. I found a bed of pebbles and stones around the base of the Cackleberry Inn works really well. It holds down the hardware wire and secures it from needless weeds and critter digging. Then I added another row of scolloped edging stones (and since I couldn't find them in white, I sprayed them white myself!)
See the milkman? well that was strategically placed there as a step up for the coffee cats to enter through their window. The window is covered with hardware wire with a square hole cut out of one corner. This is how the coffee cats enter and exit during the day and enjoy "their" area of the Inn (the floored feed and storage area).
It was late in the season, but I had to put something in the new little flower bed. A trio of mums at least took out the bare appearance.
Repurposed an old chest of drawers into a brooder. More to be done on this but had to hurry and get it useable since 2 hens insisted on setting. I use the drawer below the area the chicks are in for a catch basin, catching poop, straw and feed that falls through the hardware wire bottom.
Welcome 5 baby chicks!
Now for the front steps.
I originally painted the base green and the top of the steps white. However, I knew immediately that white steps was not going to cut it here. too much traffic from not only MY feet, but also critters like the coffee cats. To break up all of the "green", I kept the white edges and painted green in the middle. Then, to dress it up a bit, I stenciled a little white on top. This gives it a nice welcoming appearance yet endures a bit of footprint dirt without looking horrible. I also slapped a coat of polyurethane over the step tops just for durability.
I think all 5 of the Cackleberry Coffee Cats approve. Shown here: Latte, Espresso, Java, Maxwell and Folgers (on the bottom step).
I cannot tell you how much joy this photo brings me. When the shadows grow long, it's time for things to calm down from the day's hustle and bustle. The chickens enjoy a little scratch and peck in the "Sun room". And I find a bit of calmness in this crazy world we live in.
Eventually I intend to divide the "Sun Room" so more than one group of chickens can enjoy it at a time.
Right now, only one of the 4 tiny chicken doors are open at a time.
As I finish painting all of the trim work I find I have an assistant. Espresso, the most curious of all the Coffee Cats. Always in the middle of any activity on the place. Espresso lives up to his name as being full of way too much energy.
As the Cackleberry Inn nears completion you can see how it matches our home.
Life on Cackleberry Lane continues. It's a fun place and a peaceful place to hang out at.
As with all things, there will always be additions, and improvements, but for now, I can say the Cackleberry Inn is a successful project. Home to chickens, guineas, the Coffee Cats and the Cackleberry Kids.
Life is good on Cackleberry Lane.
For More about the Cackleberry Inn, I've added a page on my website; www.sharidenise.com.