We started planning for our chicken coop as soon as we moved out of our HOA controlled neighborhood and into the relative quiet of our new one. Several drawings later (and a couple lively debates regarding design), we landed on what we wanted to build. So now we have the idea, time to implement it!
My fiancee surprised me one day coming home with a large shipping crate in the back of the truck. Perfect! This saved us a ton of time getting the walls and flooring built. Just a few modifications, and boom! a warm, snug home for our new girls. As you can see, we moved one of the crate walls to create a lopsided structure. This would give us the angle for the roof later on.

Next we built a frame to elevate the crate. This way we can extend the run underneath the coop to allow for shade and shelter.
We live on a sloped lot and picked the most level area of our yard to build, but we still had to do some major leveling. AS you can see, we had to nearly bury one of the deck blocks to get this level. It looks funny, but it's level.
Before we put the crate onto the frame, we decided to floor it with some leftover vinyl flooring that we had in the garage. It's not added yet in this photo, but we later drilled a hole in the bottom of the coop and installed a drain for easy cleaning. Then we hefted the box down the hill and onto the frame.
Now for the doors! This step ended up taking a lot longer than we had hoped, but as neither one of us is anywhere close to being an accomplished carpenter, I think we did alright in the end. Just a lot of trial and error.
We cut the doors out from the side of the crate and framed them in using 2x2s.
Then on goes the hardware.
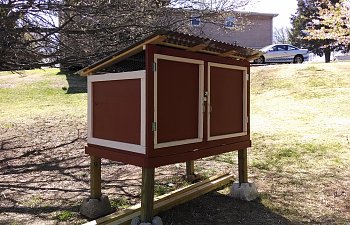
Both doors finished. The second door went much faster now that we had an idea of what we were doing!
Framing in the hen door.
Framed in door and hardware. In case you're wondering about the hen door's funny shape, we wanted to hinge it upwards during the day, and since this side of the coop is shorter, we had to make the door shorter to compensate.
Now for the roofing! We used some old lumber we had laying around for the main frame, then laid 1x2s across those to attach the metal roofing.
Lookin' good! The sides underneath the roof will be left open for ventilation and wired over for the chickens safety.
Keep your eye peeled for the next installment of the Crate to Coop! Up next: painting and building the run.
Chapter 2: Paint and Pen
Found a nice reddish stain and seal in the "Oops" section at Lowe's for cheap. Though I couldn't resist getting a trim color, and bought a quart at full price to match. Painting took a full afternoon - I was less than halfway through the second coat by the time the hubby got home! The result? Not a bad lookin' coop if I do say so myself!
Over the Easter weekend, the hubby and I built the run. We attempted to level it, but the slope proved a bit complicated, so we left it a tad lopsided. We partially buried 2x4s to discourage digging predators, and used 2x4s for the supports. To save on lumber (and prevent from having to cut down some beautiful tree limbs), we made the run 4 feet tall and used PVC hoops to support the wire over the top. We used PVC caps to secure the hoops to the run. The caps were drilled off center so as to create the angle you can see in the photos.
These guys were no help! They supervised from the bamboo forest.
It was a little tricky getting the run cover started, but once we got the first strip of wire done, the rest of the cover went smoothly. The hex wire was 4' wide, so we had to use multiple strips to cover the 10' long run. We used cage clips to attach the strips of fencing to each other, and wire to secure the hex fencing to the PVC hoops.
First inspection of the run:
Now that the cover is finished, on to the main walls. Another reason we made the run 4' tall: the fencing we bought was 4' wide. We were able to run the fencing around our frame and it fit perfectly. Turns out my man is an expert at stretching fencing!
Last but not least, we needed a people door into the run. We framed one using 1x2s and secured it with a bolt latch. We also installed a door stop, so it won't swing inwards.
Well, the coop and run are now livable!
When the girls started getting old enough, it was finally time to start building the nest boxes. Luckily, this part of the project went together much easier and quicker than the rest of the coop and run. We were able to get the nest boxes done in an afternoon.
Our original plan was to have the boxes side by side on the outside of the coop, but when we started measuring, we realized that we didn't have enough space for that. So we decided that we would have to do the extra work to put a nest box on each side of the coop. And we figured the chickens wouldn't mind having the boxes that separated.
First we framed out the boxes using 2x2's. Then we covered the frame with OSB board.
As you can see, we cut the OSB so that the final box would have an angled roof. We made the nest boxes approximately 1 1/2 foot by 1 foot. So far, that dimension seems to give the girls plenty of room. I've heard no complaints!
After we have the frame assembled, and the outside walls and floor attached to the frame, it was time to attach the boxes to the coop. We used a sawzall to cut out the coop walls where the boxes would attach. We then lined the new box up to the opening and screwed it into the walls of the coop. Another piece of OSB was used for the lid to the boxes with 2 hinges for easy access to the eggs. Both boxes are latched with hook and eye latches (the type with the spring to make it harder to open).
Here's how the nest boxes look mounted onto the coop.
View of the boxes from inside the coop.
Closer view of the nest box. You can also see the watering system that we put together. No more dirty muddy chicken water!
The watering system uses chicken water nipples that we bought at TSC. The whole system cost less than $10! We purchased a bucket from Lowe's and some PVC fasteners. We already had the rest of the PVC tubing from the leftovers from making the top of the run. From there we just had to drill a few holes and assemble!
Close up of the watering nipples.
Eventually we did paint the net boxes to protect the wood and blend the whole coop together. However, it appears that at the moment I don't have any current pictures of the paints boxes handy. Overall, this just about covers our adventure from crate to coop!
My fiancee surprised me one day coming home with a large shipping crate in the back of the truck. Perfect! This saved us a ton of time getting the walls and flooring built. Just a few modifications, and boom! a warm, snug home for our new girls. As you can see, we moved one of the crate walls to create a lopsided structure. This would give us the angle for the roof later on.
Next we built a frame to elevate the crate. This way we can extend the run underneath the coop to allow for shade and shelter.
We live on a sloped lot and picked the most level area of our yard to build, but we still had to do some major leveling. AS you can see, we had to nearly bury one of the deck blocks to get this level. It looks funny, but it's level.
Before we put the crate onto the frame, we decided to floor it with some leftover vinyl flooring that we had in the garage. It's not added yet in this photo, but we later drilled a hole in the bottom of the coop and installed a drain for easy cleaning. Then we hefted the box down the hill and onto the frame.
Now for the doors! This step ended up taking a lot longer than we had hoped, but as neither one of us is anywhere close to being an accomplished carpenter, I think we did alright in the end. Just a lot of trial and error.
We cut the doors out from the side of the crate and framed them in using 2x2s.
Then on goes the hardware.
Both doors finished. The second door went much faster now that we had an idea of what we were doing!
Framing in the hen door.
Framed in door and hardware. In case you're wondering about the hen door's funny shape, we wanted to hinge it upwards during the day, and since this side of the coop is shorter, we had to make the door shorter to compensate.
Now for the roofing! We used some old lumber we had laying around for the main frame, then laid 1x2s across those to attach the metal roofing.
Lookin' good! The sides underneath the roof will be left open for ventilation and wired over for the chickens safety.
Keep your eye peeled for the next installment of the Crate to Coop! Up next: painting and building the run.
Chapter 2: Paint and Pen
Found a nice reddish stain and seal in the "Oops" section at Lowe's for cheap. Though I couldn't resist getting a trim color, and bought a quart at full price to match. Painting took a full afternoon - I was less than halfway through the second coat by the time the hubby got home! The result? Not a bad lookin' coop if I do say so myself!
Over the Easter weekend, the hubby and I built the run. We attempted to level it, but the slope proved a bit complicated, so we left it a tad lopsided. We partially buried 2x4s to discourage digging predators, and used 2x4s for the supports. To save on lumber (and prevent from having to cut down some beautiful tree limbs), we made the run 4 feet tall and used PVC hoops to support the wire over the top. We used PVC caps to secure the hoops to the run. The caps were drilled off center so as to create the angle you can see in the photos.
These guys were no help! They supervised from the bamboo forest.
It was a little tricky getting the run cover started, but once we got the first strip of wire done, the rest of the cover went smoothly. The hex wire was 4' wide, so we had to use multiple strips to cover the 10' long run. We used cage clips to attach the strips of fencing to each other, and wire to secure the hex fencing to the PVC hoops.
First inspection of the run:
Now that the cover is finished, on to the main walls. Another reason we made the run 4' tall: the fencing we bought was 4' wide. We were able to run the fencing around our frame and it fit perfectly. Turns out my man is an expert at stretching fencing!
Last but not least, we needed a people door into the run. We framed one using 1x2s and secured it with a bolt latch. We also installed a door stop, so it won't swing inwards.
Well, the coop and run are now livable!
When the girls started getting old enough, it was finally time to start building the nest boxes. Luckily, this part of the project went together much easier and quicker than the rest of the coop and run. We were able to get the nest boxes done in an afternoon.
Our original plan was to have the boxes side by side on the outside of the coop, but when we started measuring, we realized that we didn't have enough space for that. So we decided that we would have to do the extra work to put a nest box on each side of the coop. And we figured the chickens wouldn't mind having the boxes that separated.
First we framed out the boxes using 2x2's. Then we covered the frame with OSB board.
As you can see, we cut the OSB so that the final box would have an angled roof. We made the nest boxes approximately 1 1/2 foot by 1 foot. So far, that dimension seems to give the girls plenty of room. I've heard no complaints!
After we have the frame assembled, and the outside walls and floor attached to the frame, it was time to attach the boxes to the coop. We used a sawzall to cut out the coop walls where the boxes would attach. We then lined the new box up to the opening and screwed it into the walls of the coop. Another piece of OSB was used for the lid to the boxes with 2 hinges for easy access to the eggs. Both boxes are latched with hook and eye latches (the type with the spring to make it harder to open).
Here's how the nest boxes look mounted onto the coop.
View of the boxes from inside the coop.
Closer view of the nest box. You can also see the watering system that we put together. No more dirty muddy chicken water!
The watering system uses chicken water nipples that we bought at TSC. The whole system cost less than $10! We purchased a bucket from Lowe's and some PVC fasteners. We already had the rest of the PVC tubing from the leftovers from making the top of the run. From there we just had to drill a few holes and assemble!
Close up of the watering nipples.
Eventually we did paint the net boxes to protect the wood and blend the whole coop together. However, it appears that at the moment I don't have any current pictures of the paints boxes handy. Overall, this just about covers our adventure from crate to coop!