I've had my coop now for two years, and have been a member here for 2 years. being that we just updated our coop last weekend, I've decided it's time to post some coop pics!
I don't have a lot of pics of my coop as we built it, but heres a rundown of how it began:
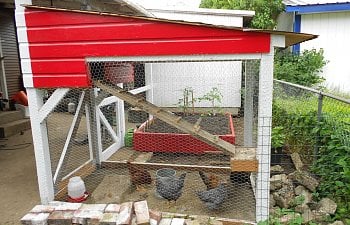
We had an empty area in the yard. Too big for the small amount of chickens we wanted, so my hubby and I decided to keep it simple. We designed our little coop to fit under one 8' x 4' sheet of plywood. We built it onto our back patio (specifically one existing post). To prevent neighbor kids from messing with our girls or feeding them something they shouldn't eat, we did not extend our coop back to the fence. One advantage of having the coop built here, is I can run out to gather eggs without putting on my shoes, even when it's raining (not that that's ever stopped me from running around without my shoes!). Here's my coop.
It's made with mostly recycled materials. The siding, 3-tab roofing, and almost all of the non-pressure-treated lumber came from a neighboring house that was being torn down. Free is a great price! Some of the other lumber was just scraps lying around from previous projects (and the ramp is actually made from an old waterbed side board). The coop measures 4' wide by 7' long and tall enough that I can stand in the main part of the run, with room enough for a young chicken on my head (Long story). I'm 5'6". The coop is fully covered, and I've run a light to the hen house. The hen house is small, measuring only 2' tall by 4' wide by 2' deep. There are 4 nesting boxes with removable dividers (removable in 6 pieces for easy cleanup) and a roosting bar.
Next to my little coop we built a fenced raised garden area (also made from recycled materials, including the bricks). My girls love this as they get all the weeds and quite a bit of the greens. And after the final harvest, we mix composted chicken manure into the garden box when it can continue to break down until we're ready to plant in the spring!
After doing some reading on BYC, I've added river sand to the bottom of the coop, but they like to scratch in it and it makes a mess around the outside of the coop. But we have a plan for that! Here's a view of the coop freshly sanded!
Now I've been told that you're supposed to replace half your flock every year to keep egg production up, so being that the girls are 2 years old now, I bought two more chicks to do exactly that... but really how can you get rid of healthy chickens? so we started planning to expand... And then we had to put one of our girls down. In our grief, we decided to get another chick to bring our flock back up to 6. We brought home another Americauna. My daughter claimed the chick and lovingly named her Bacon. And then we discovered Bacon was part ninja, and her name became Ninja Bacon (Ninja Bacon loves to ride on someone shoulders... or head... and will get there herself even when you insist otherwise... as I said- she's part Ninja.
The plan was simple, add another 4' x 7' section to the coop. Step one, dig post holes. Luckily for me, I had the help on my nieces (ages 2 3/4 and 4 3/4). We dug nice holes. But the dirt from them lacked any good bugs apparently.
We put in some recycled 4x4's (complete with concrete already attached), framed out the new section, and removed the wire from one side of the coop (although we saved this to be reused as well)
Sember the Welsummer, Aubical the Blue Andalusion, and Ninja Bacon were all just happy it was sunny and warm out. Although they were great help removing the plantlife and bugs from the areas we were working in.
Another angle, including Ginger, my other helper.
At this point, we've shortened the posts, reattached the upper wire by the ramp, added some support for the roof, and my hubby is helping me to install corrugated acrylic roofing. This will keep the coop dry, but still allow the ladies to bask in the sunshine! (our city has an ordinance that if your neighbors complain about your chickens, you must get rid of them. I cannot take chances with a muddy coop, as I'm in Oregon and it rains most of the year)
We put the wire on and added flashing to make sure the rain doesn't get under the roofing. We also started installing a concrete backer-board skirting to keep the sand IN the coop. Ginger was a very good supervisor.
We added another strip of flashing at the end of the roof too.
So for the time being, this is how my coop looks
") I'd like to add some more paint when I get the chance. Maybe I'll update pics then!
I'd like to add some more paint when I get the chance. Maybe I'll update pics then!