Our coop was heavily influenced by SittyChick's Urban Coop
First let's start with my chicks-
Altogether we've got 14 New Hampshires. Fingers crossed that we've got 4-6 pullets in there somewhere!
Shortly after being put into the incubator, it was build time. I removed some raised beds along our backyard fence, moved more dirt than I care to remember and mocked out the construction site for my better half's approval. The green light was given and here is a photo progression of the work that ensued:
Day One:
You can see the piles of dirt removed from where the raised beds once ran along our fence (upper right of photo). I began by digging out the base between 4" and 6" in preparation for the sand / pavers that will become our foundation.
Once the fun of digging and transporting the dirt to the rear of the yard was through, I used a hand tamper to flatten the soil.
I installed multiple layers of chicken wire screening into the base, up the sides and over the lip and onto the grass. We'll eventually border the entire coop with decorative boulders or maybe even small planter boxes, but for now...I'm not worried about predator infiltration!
Many bags of sand were deposited and then tamped with a motorized vibration plate. So much easier than hand tamping!
The framing was completely constructed from 2X4's using a Kreg pocket hole jig. This tool is really the best thing since slice bread and made the construction job of joinery so much more accurate and easy!
After putting the sides where they need to go I screwed them all together into a nice rectangle box. Our coop was modified in height and length. The total inside area of the run is 4' X 10' with a height of 6 1/2' and the coop itself is 4' X 4' inside and is off the ground by about 28" (or so).
You should be able to spot the pocket holes made by the Kreg jig where there is a meeting of 2X4's.
Now that the frame is "completed", it is a perfect time to apply some stain to those areas that won't be easy to reach once more progress is made.
At this point, the coop was moved into place and rested on level stone pavers. The chicken wire extends up and underneath the perimeter of pavers and onto the grass...I'm guessing that might good insurance against predators getting to my girls? I mocked up a rafter from a 2"X6"X8ft-er and then used it as a model to be repeated multiple times. These rafters were set in place to ensure a good fit and the look we were after and then removed.
Here you can see they are removed. While my wife stained them on the lawn, I began to install the hardware cloth. This stuff is razor sharp once cut and I believe the galvanized coating is not good in the open wounds the metal creates either, it burns like you wouldn't believe!
With just enough time before a passing rainstorm unleashed its fury, I got the rafters in place, installed and tarped.
Installation of the hardware cloth involved a liberal quantity of screws and washers. An added benefit of using screws is the cloth can be removed in the event we decide a future addition is needed on the adjacent wall.
Here you can see how I extended the roof rafters out a foot on either side and created an overhang. I did this for two reasons, one was protection from the elements and shade, but the other was to meet the required width for metal roofing panels which come in 3'. With the extensions on either end I have a perfect 12' of roof decking.
In goes the framing for the walls and the coop's floor joists. I created a sliding chicken door by using the router and channeling out grooves for the panel to follow vertically.
As I built, the wifey followed behind and stained. As a team, we're pretty unstoppable!
A nice shot of the dado that was routered into the wood to accept the sliding door.
We're probably a few days into construction at this point and you can see that the door has been framed and stained. Also, the underside access door is laying in the bottom of the coop across the floor joists.
Instead of tacking many small strips of board to create ramp for the girls, I used the router again and notched the grooves for them to get a grip. It is a bit steep, so I'm interested in seeing if this incline will cause a problem. If it does, I'll change the angle slightly and create a landing with an additional ramp leading up at a 90 angle at the bottom end. The entry door is now on its hinges in this photo.
In this shot you can see that I've added the interior walls to the coup made from 1/2" plywood and they've been painted. The router did a great job of cutting out the vent holes that can be found on all four walls. After reading the article about providing adequate ventilation, we're not going to have a problem in our coop!
You can see the router cuts clearly in this photo. They produce a fairly uniform edge and the decorative notch in the corners is a result of the bit and base following a square template on the opposite side.
The 2X4 framing surrounding the vents provided a guide for the router to follow. It also produced an interior frame stop for the windows that will be placed on their hinges and closed securely without gaps of any kind.
Above is the before and below is the after of the frames that will house the tinted windows being sized up and installed. There are several more on the ground on the left with stain drying in the sun.
Hardware cloth covers all vent openings and was secured in the interior of the coop by screw and washer.
I decided that reaching the rear of the coop was a stretch so I fabricated a door to facilitate easier cleaning. It wasn't in the original plans, but no one will ever guess. Inside the coop, laying down, you can see the window frames with their tinted lucite "glass" installed in them.
The large front door got a vent as well.
Using the table saw, after the frames were mocked into place to ensure a good fit, I cut small grooves to accept the thickness of the plexiglass and then reassembled them.
Coming along now. See the interior door jam? I made sure that I built the bottom edge quite a bit taller than the rest of the border. One of a thousand helpful tips that I picked up through other's submissions. Isn't this site awesome!?
The windows are now installed in place and with 3.5" hinges. I needed to trim a bit of the bottom edge on a few because the fit ended up being just a tad too tight!
A lot of work up to this point and much more to go!
At this point, I'm just going to show a couple different angles. The metal roofing is on order and within a couple weeks I'll have no use for the tarp!
I couldn't forget the hanging flower baskets. Well, truthfully...my wife wouldn't let me forget! I'm thinking that I might surprise her with some planter boxes along the base. I bet that will really dress it up.
At the bottom left, you will notice the square door. This has a function. I will be building and attaching a tunnel that will connect the run to a "chicken playground" AKA the yard clipping's compost pile.
I created these garden planter boxes this past holiday weekend. A few feet away from the Chicken Coop Mahal is a horse shoe shaped subterranean irrigation planter box arrangement (another gift to the wife) that has a 7' X 12' play area in the interior for the chickens to scratch and pick through when free ranging. The metal stakes are for eventual chicken wire and opening between the two long planters will have a 2"X4" framed wall with hardware cloth. Once the chickens proceed through the tunnel and make their way to this area, we'll have the ability to lock them inside for safety and security. Are these birds spoiled or what?! If you're not familiar with subterranean irrigation, Google it. It makes watering your garden a thing of the past or at least it may seem that way.
So what's left to do?
- Fabricate up the "play area's" walls, door and connecting tunnel
- Install the metal roof
- Install the roosting pole
- Install the poop tray
- Install the rope and pulley door setup
- Fabricate and install nipple feeder watering system
- Fabricate and install gravity fed chicken feed system
For fall:
- Dig trench for electrical feed.
- Wire up an outlet inside the coop
Update posted 06.22.2013:
Well, I've got the (generation I) water and feed systems in place. There were more elaborate plans envisioned for the water delivery system, but decided upon a simple food grade 5 gallon bucket with 5 nipple feeders in the bottom instead. I thought I'd better try out this method first, see how the chickens take to it and then revise accordingly.
Well I'm happy to report that once my first born (Big Sal) was gently coerced into trying to peck at the metal posts of the nipple feed nozzles and figured out that water was "in there", the rest of the flock took to drinking this way in a matter of minutes. It is funny how "monkey see - monkey do" these birds are sometimes!
The second update to the coop was the 4" feed tube assembly. At first my plans called for it to be run through the metal hardware allowing it to be refilled from outside, but then I determined that if I felt so inclined down I might just leave that for upgrade number two. How it is positioned now works perfectly and I'm happy with it. The vertical tube is approximately 52" tall before the 90 degree elbow. Just about 18#'s of feed can be packed into the entire system including the horizontally slotted "trough" tube.
I decided after everything was assembled, supported and screwed into place to use the last remaining piece of tinted lexan plastic left over from the DIY windows and fashion it as a rain deflector. Then I got to thinking that there might be a time that I want to close off the trough completely, so I used the last few feet of 4" tube to
fashion a more protective cover that snaps into place. It
is stored on the vertical tube when not in use. I do plan on painting the vertical tube and the 5
gallon bucket the same color as the coop to hide their presence as their current color sticks out like a sore thumb and is visually distracting in my opinion.
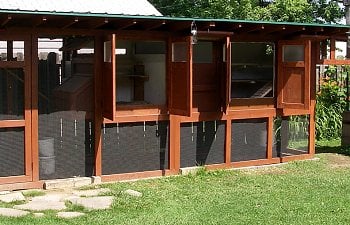
Here's a photo of the coop complete with metal roofing installed:
I've also included a few pictures of my favorites. Louisa (our last born and smallest) and Big Sal (our first born and biggest). We've got a couple others that we've named that include BA (bad attitude, our twisted beak), Chatter-Box (loves to get pet, but chirps up a storm the entire time)...There's Piccatta, Parmesana, Nugget, and a bunch more that my wife named because we all are under the impression that we've got far fewer pullets than cockerels from this hatch of 14! One of which is most certainly a cockerel (Big Sal). The family is praying that he'll be a quite rooster and hope that someone because of his stature and demeanor with us that he'll be able to keep quiet enough to remain part of the flock and not meet another end...the stock pot.
Finally put the finishing touches on "The Free Ranger Plaza". Using 1" plastic electrical conduit, some recycled planter timber and a ton of chicken wire I enclosed the inside of the horseshoe formed by the raised bed/subterranean irrigation planters. There's plenty of headroom for us and plenty of foraging room for the birds. I also installed a 1.5X4" board across the rear span to give them a place to roost. Once the connecting tunnel is completed, no more chasing birds around the yard as they'll have a secure pathway from the run of the coop to the free range plaza!
Updated 12.02.2013-
Some update photos of the Coop Mahal (in its winterized state). Because our backyard receives a fairly focused West to East winter wind, I felt it necessary to add panels of frosted lucite to act as a brake and shield the ladies from the cold arctic blast and snow drifts that are yet to hit us in force here in NE Ohio. They're just around the corner though...
I've added quite a few things since my last update, they are:
LED 480 Lumens overhead light just in front of the entrance door.
Two nesting boxes, Ador automatic door, electricity and timer
Digital thermometer w/humidity, a stairway to the nosebleed roosting pole and an automatic 500 watt bird bath water heater (cord can be barely seen feeding through the lid of the bucket at bottom) for the 5 gallon nipple feeding water tank. This works just well enough to keep them hydrated. A couple weeks ago, we several days that were in the 20's and although the metal needles of the nipples got frosty, they still allowed water to feed out when tapped a few times.
PVC tube feeder (poop shield affixed to top of horizontal feeding trough). I can fit 1/3 of a bag of feed in this apparatus which saves me the hassle of having to feed them all the time. The water and feeding capacity also comes in handy when we wish to head to camp for a long weekend, no more bugging our neighbors to help with our birds. I think I can make it just under a week when both of them are topped off. Also, a oyster shell dispenser (in white).
2X4 roosting pole, two openings (complete with makeshift drapes) for the laying boxes. They prefer the 11X13X16" high box over the larger, 13X13X16" version.
I've got the interior timer for the light set to come on at 4pm and then off at 5:30pm. Then it comes back on at 5am and off at 7:45am. The light above the door comes on when it gets dark out and turns off at sunrise. Both have the red lenses over their LED's. The are just too bright without them.
Here's my girls. We got our first egg about a month ago which came from the only hen that doesn't match the bunch. I can't decided whether she looks more like a golden sex link or golden nugget, she's very plump and blond in color. I'll have to post a good photo of her one of these days. All in all, I've got 5, 6.5 month old New Hamphires (supposedly) and within the last two weeks all are now producing nice sized, dark brown eggs daily except for my last born and smallest Louisa. It won't be too much longer for her, I'm sure.
Updated 06.28.2014-
Dj's Chicken Coop Mahal 2.0!
With the addition in both enclosed roosting and protective run area and the allowance of "free range" time in the backyard, the new and improved Coop Mahal 2.0 can house the mixed flock of 15 layers comfortably. I laughed when I first heard the term "chicken math" thinking that it was indicative of a certain lack of self control not realizing that it represented something much more sinister and severe...an infection almost. In one year my flock has grown from 5 New Hampshire to 15 made up of Barred Rocks, Black Australorps, and Araucana (or whatever the variant breed is here in the US). In two weeks, the pick should be a dozen - dozen 1/2 of eggs ranging in color from pale pink to deep green/blue. We are very excited!
Here's a shot of the inside of the addition. Plenty of roosting space, venting in both the ceiling and the end wall and a large dadoed board for entry/exit. Notice in the bottom left the holes for the nesting boxes (4 of them) have not been routered. I'm planning on doing this is the next week or so as the girls are quite close to being ready to laying.
Here's a shot with the doors open.
A view of the tunnel into the free range plaza.
Another shot of the overhead tunnel to the free range plaza. On the side wall, you can see the wide door that will access the yet to be put in place nesting boxes. All in all, we'll have 6 nesting boxes, 4 internal and 2 external and both protected from the elements.
It is almost not noticeable, but I've got an Ador chicken door mounted inverted at the base of the ramp leading out of the coop into the overhead tunnel. I mounted it with an external sensor and so far, because the entrance is protected from the elements with the metal roof overhang, it has worked wonderfully.
Big ramp. I was initially worried that they would find the angle too steep...but it was not an issue in the least. The notches dadoed every three inches into the ramp give them more than enough grip to make the climb without slipping.
A shot from the original coop. The underside run has been expanded quite a bit. I believe the new coop measures 21' X 4.75'.