So we are on year two of our chicken raising adventure, we have learned so much - and we love having backyard chickens! Over the past two years our chicken coop has had to evolve to hold our ever expanding flock. Our current coop is so different from what we started out with that it needed a whole new page! Our first coop was titled Chickie Pie Place, but it has grown so much I think Chickie Pie PALACE is probably now more appropriate lol. If you would like to read about how our chicken journey got started - and see the beginnings of our coop, with lots of pictures - click here to see our original coop design page
Long story short, about 2 1/2 years ago (May 2012) I thought it might be fun to raise chickens. Having ZERO experience with chickens I read all I could on this wonderful website and decided to dive right in. We went to the feed store and got 4 fluffy little chicks and built them a simple 4x4 coop with external nest boxes and an attached 8 x11 run. See below:
Things were going great for a few months when I spied a beautiful Easter Egger at the feed store so we brought her home and now we were up to 5 chickens. That was it, that was our limit - no more chickens! Then late winter rolled around, and the hatchery catalogs came in the mail lol..............there are so many BEAUTIFUL chicken breeds! In April 2013, 2 Silkies, a Polish and another Easter Egger arrived. We knew we needed to expand. That same summer (2013) our Buff Orpington went broody (it was our first broody hen!). It was adorable and as a mom, I felt bad for her, this poor chicken wanted babies!! So, we ordered her some fertilized eggs off Ebay (Lavender Orps). Four fluffy little babies hatched, it was amazing for my kids (and the adults!) to watch the whole process. We let her raise them for a couple weeks, but we didn't have room to keep them all - we picked out one to keep - and this is how we arrived at our current flock of 10 lovely ladies!
she was such a patient momma hen, never getting annoyed that my kids wouldn't leave her & her babies in peace lol
So obviously, a 4 x 4 coop was not going to cut it anymore. We had already invested in the other coop & run and it was only a year old, so starting from scratch seemed like a horrible waste. We decided to just build the exact same set up and connect the two. As I stated on our original coop page, we are not the most handy people in the world, and my step father had built the original coop for us. We decided to tackle this one ourselves.
We started with a simple frame. The old coop had a long vent in the back just over the nest boxes. This seemed great to a novice chicken keeper, until we realized the vent was at the same level as the only roost and the cold air was blowing in at the chickens all night. So this time we decided to do the vent at the highest point (the front side), so no chilly drafts!
The backside of the coop faces the south so we planned to do a large window there. We also wanted a window in the front so it would match the old coop. The left side would have an access door for cleaning, and the right side would connect to the old coop. We installed, waterproofed and painted plywood for the exterior. My daughter painted on a cute chicken mural
") You can see the old coop in the background below - yes we built the new coop and then had to pick it up and move it next to the old one lol. Not something I would recommend. We didn't want to disturb the chickens with construction
You can see the old coop in the background below - yes we built the new coop and then had to pick it up and move it next to the old one lol. Not something I would recommend. We didn't want to disturb the chickens with construction 
Finally came connection day! The hatchery chicks were quickly outgrowing their brooder so we decided to put chicken wire up across the connection so the little ones could be in the new half of the coop and the big girls in the old half.
"What is out there?" Little did we know then that this little one was plotting the first of many escape attempts lol
After we took down the wire between the coops we put up two roosts in the new section. They are nice and sunny and they like to look out the big back window
So now the girls had a decent size 8 x 4 coop (plus nest boxes), it was time to enlarge the run. I had lots of help building the run framing
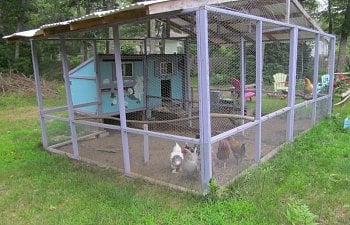
The old run was 8 x 11 (plus under the coop), so we decided to use the same idea as the coop and just build the same exact run next to it and connect the two. So now they have an 11 x 16 run (plus under the coops). When we connected the runs we left the wire up in between the two runs except in one section. We figured in the future if we ever need to separate new chickens or anything we can just close up the one section and we'll have two separate runs! You can see the opening "doorway" here, the new section is the part that still has grass (until they demolished that lol):
The girls really like to hang out under the coop, especially when it rains. But the rain tends to blow in and get them wet anyway - so under the new coop we put up some boards on three sides (but left a gap so they can peak out!).
Ok, so now we have twins coops that became one and twin runs that became one, but there was one more thing I wanted to do. The old run "roof" was just standard chicken wire. Heavy winter snows had caused it to sag horribly, and there were a couple storms where snow had piled so heavy on the wire I was afraid it would collapse. So while we contemplated affordable roof options, we left the new run section open at the top
Remember that sweet little Easter Egger looking out the window? Several times a day she would scale the 6 FOOT WIRE WALL to escape her pen. We would just find her wandering about the yard happy as could be lol. No one else would try to escape, but I was worried about predators getting in. We decided a solid, slanted roof was the best option so we got to work with the framing. Most of the frame was made from scrap wood we had, so the only real cost was the panels. I am happy to say it has worked out wonderfully! This past winter (2013/2014) had records amount of snow and it held up just fine. Of course snow still blew in the run, but MUCH less than having an open top. The run doesn't get muddy anymore when it rains, so the chickens (and hence the coop & eggs) stay much cleaner. And the chickens are happy, they can still come out in the rain and are not stuck huddled inside or under the coop. We added a couple outdoor roosts made from fallen branches and covered the coop roof in leftover panels from the run's roof - and I think we are done.......for now
my veggie garden is right next to the coop
view from "old" section access door with hanging feeder
view from "new" section access door - the Silkies are broody more often than they are not, at least they don't take up nest boxes, they usually just set up in the corner of the coop. And they always are broody together, it is so adorable!
thanks for visiting our page!