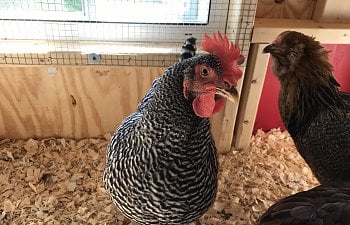
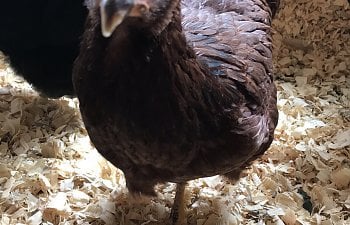
Our adventure with chickens started in April 2018 when we picked up our first chicks from Meyer Hatchery. We started with two white Silkies, two Mille Fleur d'Uccles, two Easter Eggers, a Plymouth Barred Rock, an Australorp, and a Buckeye. One Silkie failed to thrive and was replaced with a Blue Cream Smooth Silkie from a local breeder the same age as the other chicks.
We decided to buy the Daisy Coop plans published by CleanCoops.com. It's a 4'x8' raised coop with doors that open across the back, removable roost boxes for easy poop scooping and cleaning, six nest boxes total (three on each side), and an attached run that is 8'x12' (8’x16’ if you utilize the space under the coop as well). It cost close to $2000 when we were done (including blocks and gravel and the "extras" - like the run - that are not part of the plans). We built the coop primarily on weekends when the weather cooperated, and it took significantly longer than we had planned.
We started the coop build at the end of April after tearing down an old dog kennel and shed. We added dirt to raise up and even out the coop and run area.

At the end of April, the beginnings of the frame went up.
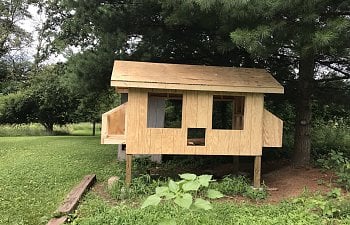
And the first week of May we had the walls framed and the front and back walls attached.
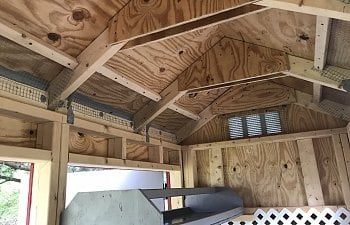
Weather and busy schedules intervened for most of May, but by the end of the month, the windows and door holes were cut out, the roof added, and the side walls attached.
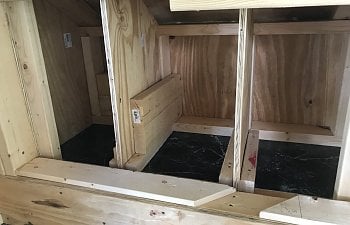
Life got busy again and the nest boxes were a bit more complicated, but by the end of June, we had the nest boxes attached! We decided to keep the right side one for storage and didn't divide it out into the three nest boxes and are just using the left side one for actual nest boxes.

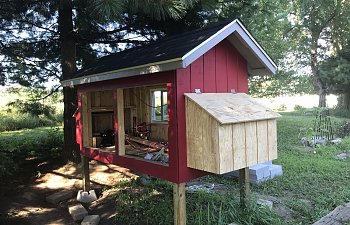
Toward the end of June, we started painting what we had up (we ran out of plywood siding for the nest box, so that part had to wait).

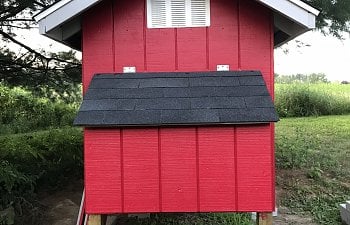
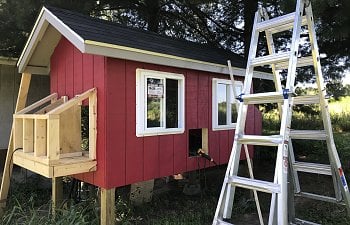
In early July the nest box got finished, nest box roofs added, shingles put on all the roof pieces and the windows were installed.

We put together the doors and one of the two roost bars/boxes in the garage in mid-July. The roost box got painted inside and out and we laid vinyl self-stick tiles in the bottom. We deviated from the written plans and used a 2x3 instead of a dowel rod for roosting since it gets cold here and wanted the chickens to have more protection for their feet from frostbite. They are removable for easy cleaning, and the 2x3 definitely added a lot of weight to the already heavy "boxes."
The next step was cutting out vent holes above the nesting boxes and attaching the vent covers.
Then it was on to attaching the doors!
By the end of July, the coop was looking pretty close to done...but we still had to get started on the run and do all the finishing up on the inside of the coop.
We measured, dug, and leveled the base of the run using concrete blocks.
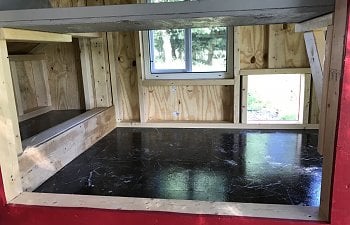
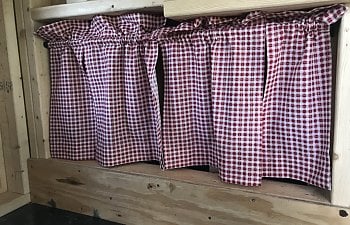
Toward the end of August, I was really ready for the chickens to head out to their new home, (and we got our first egg from one of our Easter Eggers, Lily!), so we finished up the inside of the coop by putting 1/2" hardware cloth on all the windows, vents, and open soffit areas. We used peel and stick vinyl tiles on the floor, cut an extra piece of plastic fencing to cover the nest box area we are using for storage, and even added curtains to the next boxes we want the chickens to use!
Whew! Finally, time for the chickens to move in! They got to live exclusively in the coop for about a month until the run was finished. We have pretty much every predator on our property from minks to coyotes to hawks and eagles. Having seen all of these up close to the house in the area we were going to put the coop, we decided our chickens would not be free-ranging.

We spent September building, painting, and attaching 1/2" hardware cloth to the walls of the run in the garage.
When they were completed, we took them out one by one and placed them on the blocks we had laid out. They got attached to the coop, the blocks, and each other to ensure sturdiness. Each wall also had an extra 18" of hardware cloth on the bottom that we folded out like a skirt around the base of the run so digging predators would have to get past that and under the concrete blocks. There is a top piece on the run that is also covered in hardware cloth. (The extra gray pieces on the back wall we added because the run is right up against a hill and we are hoping those pieces will keep dirt from eroding into the run there.)
After getting the run put together, we finished it off by putting hardware cloth around the base of the coop.
Here are the chickens enjoying their first adventure in the run! We saved pine needles from our property to use as bedding in the run so it won't be a muddy mess.
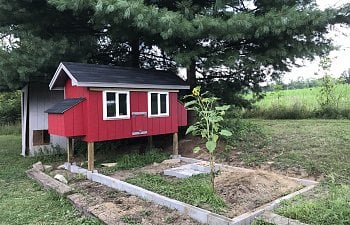
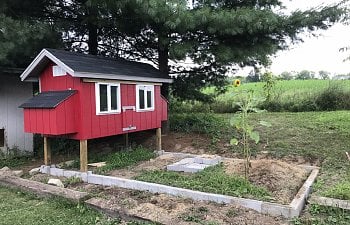
The final step (for now) in mid-November was completing the landscaping around the run by adding more dirt in the back and filling up the entire area with 3-4" of gravel. We also covered the section under the coop with plastic to give the chickens a wind barrier and will add more around the entire run before the bitter cold of winter really sets in.
And of course, we decorated for the holidays!
People always seem curious about the roost boxes, so here are a couple of pics of them in use. I fill them with Sweet PDZ and scoop out the poop daily like cat litter (although it could go longer, I like being in the habit of keeping things as clean as possible). I toss it in that white bucket behind the coop, then dump that in the black trash can until it gets about 1/3 full (any heavier and I can't move it), and then take it down to the garden to add to the compost bins!
You can see in those pics that we also added a painted 2x6 in the back of the coop (not attached, just wedged in) and a 2x4 in front of the chicken door so that we could fill the coop with more shavings for the winter. In the summer we'll just remove those pieces and go back to a smaller layer of shavings. The hanging bowls by the waterer are grit and oyster/eggshells. We also usually keep the food and water outside, but this was a freezing rain day so we kept the chickens in.
This coming Spring we plan to finish adding trim around the windows, nest boxes, and where the run pieces connect just to "finish" it as well as add an extra layer of security to the hardware cloth on the run. So far we are loving not only the looks of the coop but also how easy it is to keep clean without a lot of effort. It is super sturdy and we've seen no evidence of predators attempting to get in yet (but have had hawks land on or next to the run about once weekly). I'll update the article when we are done!
We decided to buy the Daisy Coop plans published by CleanCoops.com. It's a 4'x8' raised coop with doors that open across the back, removable roost boxes for easy poop scooping and cleaning, six nest boxes total (three on each side), and an attached run that is 8'x12' (8’x16’ if you utilize the space under the coop as well). It cost close to $2000 when we were done (including blocks and gravel and the "extras" - like the run - that are not part of the plans). We built the coop primarily on weekends when the weather cooperated, and it took significantly longer than we had planned.
We started the coop build at the end of April after tearing down an old dog kennel and shed. We added dirt to raise up and even out the coop and run area.
At the end of April, the beginnings of the frame went up.
And the first week of May we had the walls framed and the front and back walls attached.
Weather and busy schedules intervened for most of May, but by the end of the month, the windows and door holes were cut out, the roof added, and the side walls attached.
Life got busy again and the nest boxes were a bit more complicated, but by the end of June, we had the nest boxes attached! We decided to keep the right side one for storage and didn't divide it out into the three nest boxes and are just using the left side one for actual nest boxes.
Toward the end of June, we started painting what we had up (we ran out of plywood siding for the nest box, so that part had to wait).
In early July the nest box got finished, nest box roofs added, shingles put on all the roof pieces and the windows were installed.
We put together the doors and one of the two roost bars/boxes in the garage in mid-July. The roost box got painted inside and out and we laid vinyl self-stick tiles in the bottom. We deviated from the written plans and used a 2x3 instead of a dowel rod for roosting since it gets cold here and wanted the chickens to have more protection for their feet from frostbite. They are removable for easy cleaning, and the 2x3 definitely added a lot of weight to the already heavy "boxes."
The next step was cutting out vent holes above the nesting boxes and attaching the vent covers.
Then it was on to attaching the doors!
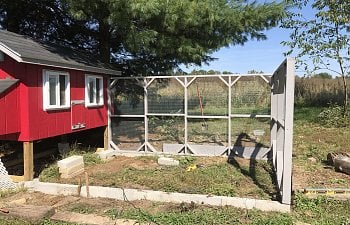
By the end of July, the coop was looking pretty close to done...but we still had to get started on the run and do all the finishing up on the inside of the coop.
We measured, dug, and leveled the base of the run using concrete blocks.
Toward the end of August, I was really ready for the chickens to head out to their new home, (and we got our first egg from one of our Easter Eggers, Lily!), so we finished up the inside of the coop by putting 1/2" hardware cloth on all the windows, vents, and open soffit areas. We used peel and stick vinyl tiles on the floor, cut an extra piece of plastic fencing to cover the nest box area we are using for storage, and even added curtains to the next boxes we want the chickens to use!
Whew! Finally, time for the chickens to move in! They got to live exclusively in the coop for about a month until the run was finished. We have pretty much every predator on our property from minks to coyotes to hawks and eagles. Having seen all of these up close to the house in the area we were going to put the coop, we decided our chickens would not be free-ranging.


We spent September building, painting, and attaching 1/2" hardware cloth to the walls of the run in the garage.
When they were completed, we took them out one by one and placed them on the blocks we had laid out. They got attached to the coop, the blocks, and each other to ensure sturdiness. Each wall also had an extra 18" of hardware cloth on the bottom that we folded out like a skirt around the base of the run so digging predators would have to get past that and under the concrete blocks. There is a top piece on the run that is also covered in hardware cloth. (The extra gray pieces on the back wall we added because the run is right up against a hill and we are hoping those pieces will keep dirt from eroding into the run there.)
After getting the run put together, we finished it off by putting hardware cloth around the base of the coop.
Here are the chickens enjoying their first adventure in the run! We saved pine needles from our property to use as bedding in the run so it won't be a muddy mess.
The final step (for now) in mid-November was completing the landscaping around the run by adding more dirt in the back and filling up the entire area with 3-4" of gravel. We also covered the section under the coop with plastic to give the chickens a wind barrier and will add more around the entire run before the bitter cold of winter really sets in.
And of course, we decorated for the holidays!
People always seem curious about the roost boxes, so here are a couple of pics of them in use. I fill them with Sweet PDZ and scoop out the poop daily like cat litter (although it could go longer, I like being in the habit of keeping things as clean as possible). I toss it in that white bucket behind the coop, then dump that in the black trash can until it gets about 1/3 full (any heavier and I can't move it), and then take it down to the garden to add to the compost bins!
You can see in those pics that we also added a painted 2x6 in the back of the coop (not attached, just wedged in) and a 2x4 in front of the chicken door so that we could fill the coop with more shavings for the winter. In the summer we'll just remove those pieces and go back to a smaller layer of shavings. The hanging bowls by the waterer are grit and oyster/eggshells. We also usually keep the food and water outside, but this was a freezing rain day so we kept the chickens in.
This coming Spring we plan to finish adding trim around the windows, nest boxes, and where the run pieces connect just to "finish" it as well as add an extra layer of security to the hardware cloth on the run. So far we are loving not only the looks of the coop but also how easy it is to keep clean without a lot of effort. It is super sturdy and we've seen no evidence of predators attempting to get in yet (but have had hawks land on or next to the run about once weekly). I'll update the article when we are done!