I have wanted to raise chickens for several years. I decided to take the plunge this spring, when the local TSC had some chics available, and purchased my flock of 8. There was one major issue; I didn’t have a coop or the slightest idea as to what I was going to do for one. We seemed to have an extra-long winter this year, the temperature outside was still hanging between the 20's and 30's, and I figured that I had several weeks to determine what to do for a coop and set up the brood in the garage. I started looking at coops for sale on the internet and finally made the decision to have one built. I liked the option of being able to customize the look, size and feel of the coop.
Taking the extreme cold weather and the size of the tiny chics into consideration, I figured that I had some time to get the coop built. Those that have raised chickens before can appreciate my next statement. Anyone that told you chics grow fast lied; they grow faster. I even had to build a bigger pen in the garage for them while the coop was being worked on. I changed my mind on various components as the coop was being built, but here is the general gist.
Breaking Ground: I cleared some area in the woods for the coop and the run. The floor of the coop is 18-24 inches off the ground. I wanted to get the floor up off the ground to help insulate it from the ground and from attracting critters from below.

The frame of the floor is covered with 1/2 inch hardwire cloth. I do not want anything digging up through the floor. The base of the floor is 8 X 6 feet. On top of the hardwire cloth is a piece of 3/4 inch plywood and on top of that is a piece of vinyl flooring (easier to clean; no splintering).
The walls were framed to a height of 6 feet. This leaves enough room to move around inside the coop with a little comfort.
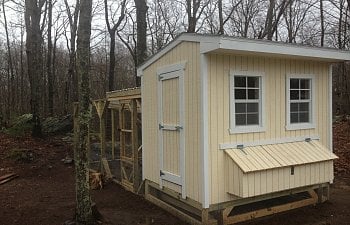
The outside was covered with T-111 board and painted.
We used “tree house windows” that are supposed to be “shatter proof”. Inside of the coop we covered the window opening with “deer wire”. This is to help prevent the predators from coming in and the girls from getting out while the windows are open.
In addition to the roof vents the side has a vent that is covered with 1/2 inch hardwire cloth.
Around the base of the coop we dug over a foot deep and placed a 3 feet wide piece of hardwire cloth up to the base of the floor. The hardwire cloth was curled out in order to deter digging. The base is covered on three sides (open towards the run). The backside was left open to allow the girls to explore under the coop and get some shade during the summer months. The run is attached directly to the backside of the coop.
The run ended up being 8 x 16 feet. The front wall is 6 feet high and the back is 5 feet high. The walls are covered with “deer wire” (I wanted something strong as we have a lot of fox, coyote, skunk, opossum and other large predators in the area). Just as we had around the base of the coop we dug down 12-18 inches around the frame of the run. This was to allow us to also place a 3 feet wide piece of hardwire cloth around the base of the run (2 feet above ground and 1 foot underground). The overlap along the base is to prevent predators from sticking their arms in and grabbing at the girls.
The run is covered sold for the first 6 feet (allow cover from sun, snow, and rain) and the covered with hardwire cloth for the last 10 feet (yes we have a lot of hawks; my neighbor lost their entire flock to hawks).
I added “natural” perches, rock and other interesting things to the run. I wanted to make sure that they had enough room and enough to keep themselves occupied.
The girls seem to love their home and I can only hope that they are safe from predators.
Update 06/13/13:
Add a little time, rain and grass seed and this is the coop with the woods filled in.
Taking the extreme cold weather and the size of the tiny chics into consideration, I figured that I had some time to get the coop built. Those that have raised chickens before can appreciate my next statement. Anyone that told you chics grow fast lied; they grow faster. I even had to build a bigger pen in the garage for them while the coop was being worked on. I changed my mind on various components as the coop was being built, but here is the general gist.
Breaking Ground: I cleared some area in the woods for the coop and the run. The floor of the coop is 18-24 inches off the ground. I wanted to get the floor up off the ground to help insulate it from the ground and from attracting critters from below.
The frame of the floor is covered with 1/2 inch hardwire cloth. I do not want anything digging up through the floor. The base of the floor is 8 X 6 feet. On top of the hardwire cloth is a piece of 3/4 inch plywood and on top of that is a piece of vinyl flooring (easier to clean; no splintering).
The walls were framed to a height of 6 feet. This leaves enough room to move around inside the coop with a little comfort.
The outside was covered with T-111 board and painted.
We used “tree house windows” that are supposed to be “shatter proof”. Inside of the coop we covered the window opening with “deer wire”. This is to help prevent the predators from coming in and the girls from getting out while the windows are open.
In addition to the roof vents the side has a vent that is covered with 1/2 inch hardwire cloth.
Around the base of the coop we dug over a foot deep and placed a 3 feet wide piece of hardwire cloth up to the base of the floor. The hardwire cloth was curled out in order to deter digging. The base is covered on three sides (open towards the run). The backside was left open to allow the girls to explore under the coop and get some shade during the summer months. The run is attached directly to the backside of the coop.
The run ended up being 8 x 16 feet. The front wall is 6 feet high and the back is 5 feet high. The walls are covered with “deer wire” (I wanted something strong as we have a lot of fox, coyote, skunk, opossum and other large predators in the area). Just as we had around the base of the coop we dug down 12-18 inches around the frame of the run. This was to allow us to also place a 3 feet wide piece of hardwire cloth around the base of the run (2 feet above ground and 1 foot underground). The overlap along the base is to prevent predators from sticking their arms in and grabbing at the girls.
The run is covered sold for the first 6 feet (allow cover from sun, snow, and rain) and the covered with hardwire cloth for the last 10 feet (yes we have a lot of hawks; my neighbor lost their entire flock to hawks).
I added “natural” perches, rock and other interesting things to the run. I wanted to make sure that they had enough room and enough to keep themselves occupied.
The girls seem to love their home and I can only hope that they are safe from predators.
Update 06/13/13:
Add a little time, rain and grass seed and this is the coop with the woods filled in.