My dad works at a company that gets shipments in big, wooden crates. When I was thinking about getting chickens I talked to my dad about helping me build a coop and he said that a guy he works with used a crate for his coop and it worked out well. So, that was where we started. The bottom of the crate was 4x6, so that was our floor of the chicken coop. Then we started building the frame. We needed to have a slanted roof for the rain and snow to run off, and we needed to have air vents around the top as well, but first, we had to bring in some dirt and level out the area where the coop was going to be.
We didn't want the floor of the coop to rest on the ground so we set it up on bricks. That's my dad and husband making sure it's level. And, after we got the coop mostly built we realized there was too much space between the coop and the floor and that the chickens would go under the coop, so we added more bricks and turned them so they made a wall so chickens couldn't get under there.

Now we have the frame built!
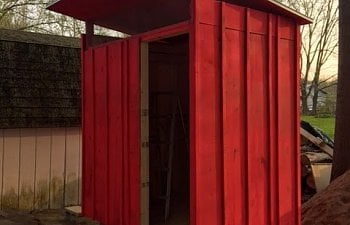
And, basically, we just sort of put the crate back together with a few modifications for the air vents and the slanted roof, as I mentioned above. We also framed out the door with some 2x4's. I would say the inside of the coop is probably 7 feet tall and we only made it that tall because that's what we had to work with. On the roof we put a matting as roofing material (something else my dad got from work) to keep the wood from rotting in the elements.

We also bought some furring strips to put over the small openings between each board that we put up. The purpose was to help seal it all up a little better from drafts and my dad said it will also make it look less like a shipping crate! We put hardwire cloth around the top for the venting and secured it with U nails to, hopefully, make it predator proof. We also painted it red, like a barn (my young daughter's choice), and we put up the "people" door with hinges and a latch to lock it.
We made the nesting boxes. These are about 12x12x12, but a life hack I figured out last year was I can put a $1 plastic dish drainer/bin in the nesting boxes and it makes them easier to clean since they are removable, however, those $1 bins are a bit bigger than 12 inches, so they don't fit that great, I needed to make the nesting boxes a bit longer to fit the bin. We also made the roof slanted to keep the chickens from hanging out on the roof (it only sort of worked, they stood up there on the slant anyway).
Then we installed roosts and the nesting box. The nesting box is secured with a bolt that went through the back of the coop to make sure they were secure and attached well. This is the only thing in the coop that is not easily removable. The roosts are 2x4's and are installed so I can just lift them up and out to clean. We added a poop deck that can also be lifted up and out to clean. (Take note, DO THIS, don't secure anything in the coop because it's so much easier to remove them and pressure wash them, or replace them, if they aren't secured in with screws or bolts.) Also, the poop desk is a must, it keeps my coop floor clean and is easy to go in daily and just coop up the chicken poop with little effort.
Oh, and last, but not least, we needed a chicken door. We cut a 12x12 hole in the coop and framed out a door for it. We put the door on a pulley so I could open and close it from outside of the coop. It works perfectly! (though, I'd love an automatic chicken door opener/closer).
That's the coop. Now for the chicken run. I don't live in an area where the chickens can free-range (mostly because of dogs in the neighborhood), so we needed to keep them secure in a chicken run. I found someone who was selling a 7x12 dog pen and we managed to pick it up and get it home, and up and over the chicken coop (it actually was easier than I thought it would be).
This is us putting it on the trailer and going to attempt to drive it the 45 minutes back to my house. It made it. Barely.
We trenched around the outside of the pen and added chicken wire around the pen and into the trench as extra protection.

The other thing I did (not pictured) is put chicken wire from the top of the coop all down and around the top of the dog pen. We put 2x4's over the top of the dog pen as a stabilizer and covered the whole thing in chicken wire. And, that was it for year 1.
The following year I decided to get more chickens so we needed to expand the run. I also wanted a roof on the entire run. I had added a tarp over the original chicken run area and it helped to keep the rain and snow out of the run for them and kept it less messy.
There was really only one direction we could expand the run, but there was a tree in the way. We didn't let it stop us though! My dad had an old frame for a car port, which was about 7 feet wide and 12 feet long. He brought that over and we put it over the existing coop and run as well as the new area. This was going to make a great roof for the chicken run!

My dad framed out a "people" door again for this side of the run because we were going to cut a small hole in the old run for the chickens to get through, but nothing big enough for a person to go through. Then we wrapped the whole thing in fencing, and again, trenched around the run and wrapped chicken wire around the bottom part (the chicken wire isn't on yet in the picture below).
Again, we framed up a door to make a chicken door between the two runs. I wanted to be able to close off either side as needed to separate chickens if they needed to be separated, or, I could put them in one side so I could do my Spring and Fall cleaning of the coop without chickens trying to "help".
I tried to be cheap and use some old tarps that I had in the shed to make the roof to the chicken run, and it worked, mostly, but it wasn't pretty... (also, I apparently can't take a straight picture, it is on a bit of a hill, but not that sloped). Also, notice we cut a hole in the tarp for the tree and tried to use "tarp tape" to keep the tarp together when we cut it (tarp tape didn't work that well, I should have used duct tape).
Now, year 3 upgrades (this year). The tarps didn't work well on the run. They leaked in the winter and held water and were just ugly. So, we bought galvanized steel panels that were 12 feet long. They needed to be cut in half to be used for the roof. We started out by putting 2x4's on the carport frame so the steel panels could be attached . And, of course, the big tree in the way...

My dad cut out an area for the tree and was able to put the panels up around it. It looks much better now, and there are no roof leaks!

And, that's my coop and my run. It's taken 3 years and a lot of work to get it to this place and I know I will have more improvements along the way as I keep tweaking things that don't work.
Here are some other fun things I've done with the coop/run.
Pooper scooper! Just some hard wire cloth attached to a pitchfork with zipties. Our chicken run is all sand (this is another must. Use construction sand in the run and coop, it's so easy to clean up and keeps the smell down too!) This scoops up the clumps and allows the sand to stay in the run.
Feeder! This is my all time favorite because it can hold 1 1/2 bags of chicken feed and I don't have to constantly go out and fill it up! Pretty simple concept, I just used a drill with a 3 inch hole cutter on the feed container and then just pushed the elbows in. They fit snug and I didn't have to use any glue or cement to keep them in place. I like the white feed container because I can see the feed level and know when it needs filled without having to remove the lid. The black pipes with the caps are put on the elbows at night to close up the feed to keep animals out.
Chicken swing. This is in the first chicken run area and I attached it to one of the 2x4's that goes over the dog fence where the chicken wire roof is. The chickens don't use it much, but I get excited when I see one of them on there!

And, my newest addition, I made a chicken tunnel out into my yard for them to get fresh grass and to give a little extra room!
The frame for the chicken tunnel is the base from the 12 foot galvanized steel roofing material we had purchased. Then I bought 25ft coil of half inch plastic piping that we were easily able to cut into hoops and attach with plastic brackets.

Next, we added plastic chicken wire (because it was easier to work with and not sharp), and attached it with zipties along the top and U nails to the wooden frame. We left some of the plastic chicken wire overhang at the bottom so we could put rocks on it to keep the chicken from being able to dig under and out of the tunnel
And, of course, we framed up another chicken door from the chicken run that I can close and open as needed to block off the tunnel.
I attached the tunnel with additional plastic chicken wire because I wanted to be able to move it around in an arch from the chicken door, so I didn't want it fastened where it wasn't movable. It only takes the chickens about 2 days to eat all the grass in one spot, so then I just move it over to the next spot. They get an entire arch outside of the chicken coop, and they are happy chickens. When I move the tunnel I use a hand tiller and till the area and add quick growing grass seed and some special chicken grass mix that has other types of grasses in it for the chickens to enjoy. It grows full again in less than 10 days, and then we start over at the top of the arch. The chickens love this.
The best thing about the coop and the run and the chickens is there is always something new to do or try. I want my chickens to be happy and continue to give me wonderful eggs, so I'm always trying to come up with new ideas to amuse them (and myself). Hope this gave you some ideas, or at least was interesting enough to read! Hit me up with any questions/suggestions. I'm always looking for new ideas!