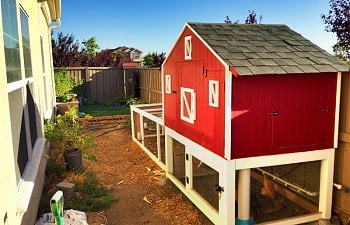
This was the first attempt at a chicken coup. It is self designed, with a LOT of ideas coming from various coops on this site. Because I learned so much from this site in preparations for the construction, I've decided to share the finished product. While it turned out nicely, it's not perfect and there were many things learned along the way. While we DO love taking out the chickens daily, i'm sort of lazy when it comes to food and water so I ended up automating these. They both work well, but in the warm weather some ice/cold packs are definitely needed.
The main coop is 4 foot by 6 foot, though a portion is taken up by a storage cabinet which houses the reservoirs for the automated water system and feeder. The bottom and run is 4 feet by 14 feet and has 24 square feet of cover/shade for the critters.
I built in an access door to get the eggs.
This (semi) hidden door is for the storage of food/water.
The blue tank is a 7 gallon water tank outfitted with a float valve. The float valve is fed by 1/2 inch poly tubing that is integrated into the sprinkler system. At 6am each morning, the sprinkler valve activates and tops off the reservoir with cold water. The reservoir feeds a 3/4 inch PVC line that goes down to the bottom floor and is outfitted with 5 drinking nipples. The garbage looking bin (with flip top) is a storage bin for the food which is screwed to the floor. A 4 inch PVC feeder comes through the bottom floor and opens into the food bin allowing additional capacity for food. So far, filling it once has lasted over a month (for feeding 5 critters).
The PVC portion of the feeder was learned from this site: http://www.the-chicken-chick.com/2011/05/my-pvc-chicken-feeder-diy-instructions.html
I modified it slightly and integrated it with the larger storage bin above. In back you can see the series of water nipples that are gravity fed by the upper reservoir.
There are two working doors on the front of the coop. The larger of the two is a door within a door (the larger providing access for cleaning).
Picture of the doors open with hardware cloth installed.
There are three doors (with hardware cloth as well) on the south side of the coup which allow some control of the temperature. Three planters are below, though haven't been planted yet.
Various perches above the poop trays. You can also see the siding that I used for the project: pine tongue and groove panels each custom cut and nailed in. The panels gave the barn look that I was aiming for and were fairly cost friendly.
I made removable trays for the interior of the coop. I went with sweet pdz for the medium and it's been great so far and really easy to clean.
A door at the end of the run allows an easy out during outside playtime.
An additional door was installed to access the feeder/water and allow multiple access points for cleaning. A big thanks to all the others who have built and shown their coops.