UNDER CONTRUCTION (THE PAGE, NOT THE COOP!)
These pictures were not taken when the coop was originally built, but when the coop was taken to pieces to be sprayed with insecticide (we got red mite) in June 2008. The coop was originally built in 2004 for around £100 ($200) although I'm sure prices have gone up since then. The majority of this cost was actually in chicken wire, mainly because we opted for small holes in the wire rather than the more traditionally sized stuff. We came to be thankful for our decision when the bird flu hype started - we know that wild birds cannot get inside our run.
The coop is built in panels, because we knew that it would have to be transported in the back of our hatchback car at least once a year, and also that the only real entrance / exit to our garden is about 2 foot wide due to being inbetween the garage and the house. These are the panels, shown in as much detail as possible.
We were also intending that we would change where the run was every so often. For this reason, we made both the pophole and nesting box sides of the coop almost identical so that they could be swapped over with the minimum of fuss. However, in reality we have never actually done this, but we still could if we wanted to as the features remain.
I would definitely recommend building the coop on stilts to anyone. It has been a huge success because:
- It gives them extra space in a small city garden
- Rain does not reach that part of the ground, meaning that the have a permanent dustbath, even here where the climate is relatively rainy (1236mm, or 48.7 inches a year).
- Rats do not like to live under there - this can become a problem with coops that are only a few inches off the ground
- I don't have to bend down to reach the coop, which saves backache (something I am very prone to due to having had scoliosis surgery) and muddy knees.
- If you are in an area where hawks and other birds of prey are a problem then it gives them an extra place to hide. Even if you are not, then I find that the birds are more likely to shelter underneath the coop than in it when it is raining.
This coop has been designed to live in a country (England) where the only real predators are foxes and badgers, and the occasional bird of prey in the countryside. We do not seem to have a stray dog problem which is anything like that of America (and anyway, stray dogs seem to be concentrated in deprived neighbourhoods rather than the countryside. We certainly do not have predators with opposable thumbs (raccoons), bears, wolves etc. If you are building a similar coop in the US then please consider this fact. For example, relatively flimsy corrugated plastic may not be such a good idea for roofing in such situations.

This is where the coop is situated (note the run to the left)
This is the nestbox side of the coop, shown from the inside.
This is the same panel, shown from the other side.
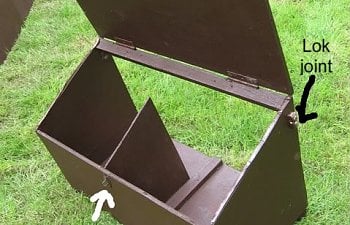
The nestboxes, which attach on externally to the panel above. They are fixed on using what are called "lok joints" - one half is attached to the nestbox, the other to the panel. The bottom also rests on the edge of the floor. Much of this nestbox was made from offcuts of plywood.
A lok joint. They retail for around 24p (48¢) each.
The door side. The two doors are made from plywood, with a hinge each at the top and bottom. One problem with these doors has been that because our garden is on a slope, over the years the doors have started to not quite match up properly. However, this can usually be sorted with a bit of shoving and / or propping the lower two legs up a bit.
The back wall of the coop - just a plain piece of plywood.
This is the panel which holds the pophole, shown from the inside. In retrospect, because we have never put the nestbox on this side, I would make the pophole smaller - around 12x12 inches.
This is the floor of the coop which pretty much just slots in and sits on the batons indicated above. It was cobbled together from scrap bits of plywood, but has done the job fine.
This is the roof. It is made of two pieces of corrugated plastic (we couldn't find any wide enough) screwed onto the coop at 6 points. Having a translucent roof is great because it means that they get the maximum number of natural daylight hours available to them, which maximises egg laying, but it can have a tendency to act as a bit of a greenhouse in the summer.
This is how the coop is assembled. The two panels are bolted together, with the bolts going through the posts which also act as stilts. You can see the bolts within the red circles in the picture above.
These are some of the bolts which we use to hold the whole thing together.

This is where the coop is situated (note the run to the left)

This is the nestbox side of the coop, shown from the inside.

This is the same panel, shown from the other side.

The nestboxes, which attach on externally to the panel above. They are fixed on using what are called "lok joints" - one half is attached to the nestbox, the other to the panel. The bottom also rests on the edge of the floor. Much of this nestbox was made from offcuts of plywood.

A lok joint. They retail for around 24p (48¢) each.

The door side. The two doors are made from plywood, with a hinge each at the top and bottom. One problem with these doors has been that because our garden is on a slope, over the years the doors have started to not quite match up properly. However, this can usually be sorted with a bit of shoving and / or propping the lower two legs up a bit.

The back wall of the coop - just a plain piece of plywood.

This is the panel which holds the pophole, shown from the inside. In retrospect, because we have never put the nestbox on this side, I would make the pophole smaller - around 12x12 inches.

This is the floor of the coop which pretty much just slots in and sits on the batons indicated above. It was cobbled together from scrap bits of plywood, but has done the job fine.

This is the roof. It is made of two pieces of corrugated plastic (we couldn't find any wide enough) screwed onto the coop at 6 points. Having a translucent roof is great because it means that they get the maximum number of natural daylight hours available to them, which maximises egg laying, but it can have a tendency to act as a bit of a greenhouse in the summer.

This is how the coop is assembled. The two panels are bolted together, with the bolts going through the posts which also act as stilts. You can see the bolts within the red circles in the picture above.

These are some of the bolts which we use to hold the whole thing together.