The finished coop and run as of April 25, 2020:


A panorama of my backyard chicken area:
Being a Navy family (Hooyah Deep Sea is my husband's "battle cry") had prevented us from setting down roots and having chickens in the past (we both grew up on small family farms), but once we knew we were going to retire at this particular command in Washington, we bit the bullet and got chickens. Well, honestly, I got chickens . My husband was not into it and thought they would be another thing to have to deal with. So I took it upon myself to entirely build everything on my own, without his help. Of course, now that we have them, he dotes on them more than me and says they are "his" chickens, LOL.
We are the epitome of what I think of "backyard chickens" as being: A small lot in the city with enough of a backyard to get into trouble.
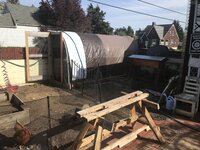
Here is our backyard before the chickens:

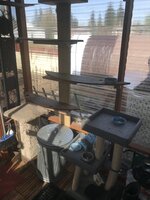
This is our "catio" before the chickens:

I knew that it had to be easy for me to build on my own, and I wanted to spend as little money as possible on it because we are always in flux and I didn't know how it would all turn out or even if I would love the chickens like a thought I would (stupid me).
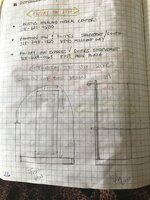
I started off with plans:


I wanted to use my existing wall because it provided security and protection and would save me money on material. I loved the idea of a hoop coop due to ease of building and cost savings. I wanted to use cattle panels, but at the time we didn't have a truck and I couldn't think of how to get cattle panels home. So I used PVC piping and 1/4" hardware cloth instead. I went as cheap as possible and bought the least expensive 2x4s (untreated pine),and the cheapest PVC (not UV resistant).


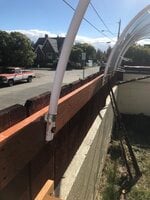
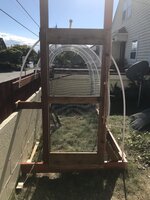
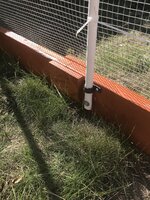
I had Thompson's Waterproof Sealant from another project which I used multiple coats of on all the wood. I secured the PVC to the 2x4s using star-head exterior wood screws, with washers and brackets as needed. I spaced out the PVC "ribs" so that the width of the hardware cloth would match almost perfectly. I had excellent advice from other BYC members throughout all this and where the seams of hardware cloth met I reinforced with thin strips of hardware cloth so that there were absolutely no gaps a raccoon could wile its grubby little hand through. It was cheaper for me to buy two 6 foot lengths of 2x4s, so where they butted together I used wood I had to secure them. I initially used plastic zip ties to tie the hardware cloth to the PVC, but once the metal zip ties arrived from Amazon, I used them everywhere!


I also added an 18" hardware cloth skirt all the way around the perimeter:
 (See the hardware cloth below Bunny?)
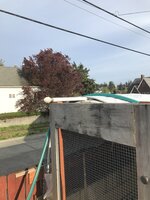
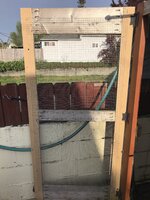
The door was tricky. My husband cut the top of those 2x4s off (that are sticking straight up) after I had them installed (don't ask me why I didn't do it beforehand--and, yes, my husband did pitch in after a while!). Also, I used one PVC pipe straight down the middle of the top of the coop for support and ran an old curtain rod with finial into it for decoration and to add rigidity:

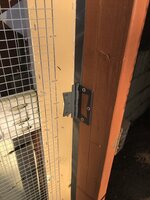
The top of the door had to be below that. I have a neighbor with a full woodshop in his basement, and he connected all the pieces of the door together after my husband and I cut all the wood down from an old cedar cabinet that came with the house we had dissembled. I stapled the hardware to the inside of the door and attached three hinges:


Most of the "planning" at this part was on the fly as I saw fit. I basically just made it all work. There was a gap under the door that needed shoring up so I added a piece of wood there too.
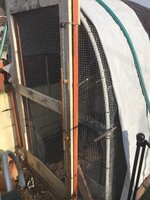
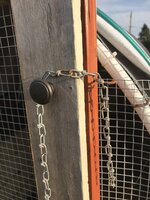
Probably the hardest thing was figuring out how to latch the darned door. Due to the way I built it, I couldn't attach a standard latch. So again, I improvised. I used what I had: Kitchen cabinet knobs, copper piping, chain and cup hooks and a cabinet latch. It works.


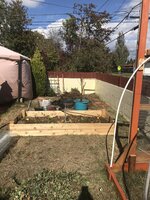
At the same time I built a 4x8 raised garden bed that I did use cedar wood on because I knew it would be permanent (as permanent as can be, natch).


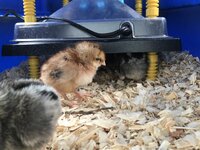
Here are the chicks inside the house as they waited for me to finish the coop. It was "Chick TV" for weeks:

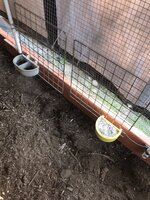
I keep the coop as simple as possible. I originally had a poop board with sweet PDZ used with a kitty litter scoop, but I got rid of it after I realized it was redundant and unnecessary as I had a dirt floor and was using the Deep Litter Method (DLM). I keep their water bowl outside and their feeder hanging inside (I don't like things on the floor because it makes it harder to turn the dirt over when I need to). I attached two grids to the hardware cloth to hang containers with oyster shell and grit.


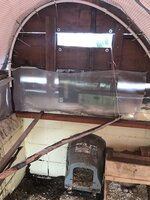
I put plastic on the open areas around their roost to prevent the draft from hitting them. I will eventually replace the plastic with plexiglass.


Their roost is a vintage tree pruner that came with the house, and a branch, and their 2 nests are one I bought and one my husband made:


There is a gap along the whole bottom of the side of the coop where air gets in. It just kind of turned out that way because of where the tarps ended. It doesn't seem to bother the chickens, it gives them a view, and it provides air flow even though it is down low (in the winter I put plastic over the whole door too, except for the top 6 inches, for air flow as well).

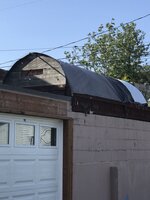
Here is what the coop looks like from the street:


I keep the chicken feed in a metal can in the catio:

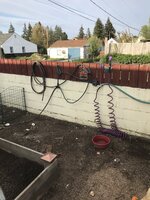
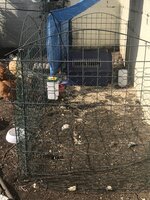
I did eventually reorient the raised garden, and recently added an outdoor brooder for 5 new chicks. I used vinyl coated 1 inch chicken wire to keep the chicks in, but the little buggers can squeeze through!!! I ended up creating a gap that they can easily get through if the big girls chase after them, but the big girls don't seem to care much about them, thankfully. Where the gate is, I plan on putting a wooden arbor and I will eventually replace all of the plastic fencing as well with wood. I really do love this fencing for its practicality and I recommend it as it is easily moveable and does the job. I did eventually get a cattle panel that I am growing a passionflower vine on. It is separated from the chickens by the same movable black plastic fencing. I have rubber irrigation hoses on timers going to my raised garden and to the passionflower.


I bought a crop cage for the garden which I haven't installed yet https://www.gardeners.com/buy/crop-cage-4x8/8596539.html#start=3. I also just bought a top bar beehive off of craigslist which I will get honeybees for next year.
 (The hive is right next to the coop on the right)
The fencing, irrigation hoses and accessories are all from www.gardeners.com (I wait for sales) and the gate is from Lowes.
As far as DLM goes, I tore up all the grass inside the coop (broke it up as good as I could, turning it over) and threw a ton of fallen maple leaves, pine needles, pine cones and chicken pine shavings in with it. For the first year I would go in about once a week to turn it all over and every once in a while add more "stuff". I got the chickens in September of 2018 and around October 2019 I stopped turning altogether until last week. There was no smell and most of what I had initially added in had decomposed. I took out a bunch of this soil last week to plant roses with. As far as the "run" goes, I also added in a ton of the same stuff, but didn't break up the grass before hand. The chickens have done a pretty good job and digging it all in. For the raised garden, I didn't break up any of the grass either and used the lasagna method (cardboard, newspaper, fallen apples and pears from around the neighborhood, maple leaves, pine needles, lots of used free coffee grounds-Washington State!-, , letting it all stew together over the winter and planted tomatoes, zucchini, and other veggies in it last summer.
As for what I have learned and what I would change...
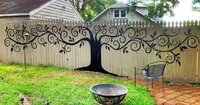
I had expected that in two or three years the hoop coop would fall apart and I would have to replace it. I love the design and concept of the Woods Coop, so that was what I planned to replace it with. However, even though the hoop coop isn't beautiful, its simplicity and actual sturdiness has astounded me and I think that once the wood and PVC wears out I will simply replace the 2x4s with cedar and maybe replace the PVC hoops with cattle panels. My husband and I are not carpenters and we have other projects going on, so the idea of a Woods Coop, while nice, is too lofty for us in reality. It has been nearly two years already and it still looks exactly like it did when I built it. To make it look cuter, I will eventually paint the door and replace the vinyl tarps with waterproof canvas. I also want to repaint the run walls with this mural:

My ultimate goal is to have a permaculture setup: using what we have and having the chickens do the work tilling and fertilizing the earth and eating the beetles that are detrimental to the bees, and having the bees pollinate the plants. My husband and I recently bought a 5 acre off-grid property in the woods about 45 minutes away, which is where we may retire, and the work I am doing here will continue on that property at some point. If you have gotten this far, thank you for reading and I hope this will be of some help to you


A panorama of my backyard chicken area:
Being a Navy family (Hooyah Deep Sea is my husband's "battle cry") had prevented us from setting down roots and having chickens in the past (we both grew up on small family farms), but once we knew we were going to retire at this particular command in Washington, we bit the bullet and got chickens. Well, honestly, I got chickens
 . My husband was not into it and thought they would be another thing to have to deal with. So I took it upon myself to entirely build everything on my own, without his help. Of course, now that we have them, he dotes on them more than me and says they are "his" chickens, LOL.
We are the epitome of what I think of "backyard chickens" as being: A small lot in the city with enough of a backyard to get into trouble.
Here is our backyard before the chickens:

This is our "catio" before the chickens:

I knew that it had to be easy for me to build on my own, and I wanted to spend as little money as possible on it because we are always in flux and I didn't know how it would all turn out or even if I would love the chickens like a thought I would (stupid me).
I started off with plans:


I wanted to use my existing wall because it provided security and protection and would save me money on material. I loved the idea of a hoop coop due to ease of building and cost savings. I wanted to use cattle panels, but at the time we didn't have a truck and I couldn't think of how to get cattle panels home. So I used PVC piping and 1/4" hardware cloth instead. I went as cheap as possible and bought the least expensive 2x4s (untreated pine),and the cheapest PVC (not UV resistant).



I had Thompson's Waterproof Sealant from another project which I used multiple coats of on all the wood. I secured the PVC to the 2x4s using star-head exterior wood screws, with washers and brackets as needed. I spaced out the PVC "ribs" so that the width of the hardware cloth would match almost perfectly. I had excellent advice from other BYC members throughout all this and where the seams of hardware cloth met I reinforced with thin strips of hardware cloth so that there were absolutely no gaps a raccoon could wile its grubby little hand through. It was cheaper for me to buy two 6 foot lengths of 2x4s, so where they butted together I used wood I had to secure them. I initially used plastic zip ties to tie the hardware cloth to the PVC, but once the metal zip ties arrived from Amazon, I used them everywhere!

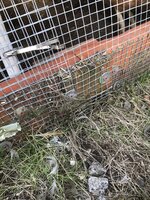
I also added an 18" hardware cloth skirt all the way around the perimeter:
 (See the hardware cloth below Bunny?)
The door was tricky. My husband cut the top of those 2x4s off (that are sticking straight up) after I had them installed (don't ask me why I didn't do it beforehand--and, yes, my husband did pitch in after a while!). Also, I used one PVC pipe straight down the middle of the top of the coop for support and ran an old curtain rod with finial into it for decoration and to add rigidity:
The top of the door had to be below that. I have a neighbor with a full woodshop in his basement, and he connected all the pieces of the door together after my husband and I cut all the wood down from an old cedar cabinet that came with the house we had dissembled. I stapled the hardware to the inside of the door and attached three hinges:
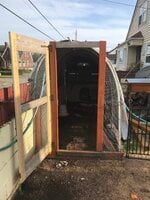
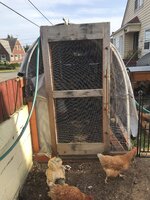

Most of the "planning" at this part was on the fly as I saw fit. I basically just made it all work. There was a gap under the door that needed shoring up so I added a piece of wood there too.
Probably the hardest thing was figuring out how to latch the darned door. Due to the way I built it, I couldn't attach a standard latch. So again, I improvised. I used what I had: Kitchen cabinet knobs, copper piping, chain and cup hooks and a cabinet latch. It works.

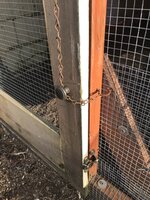

At the same time I built a 4x8 raised garden bed that I did use cedar wood on because I knew it would be permanent (as permanent as can be, natch).

Here are the chicks inside the house as they waited for me to finish the coop. It was "Chick TV" for weeks:

I keep the coop as simple as possible. I originally had a poop board with sweet PDZ used with a kitty litter scoop, but I got rid of it after I realized it was redundant and unnecessary as I had a dirt floor and was using the Deep Litter Method (DLM). I keep their water bowl outside and their feeder hanging inside (I don't like things on the floor because it makes it harder to turn the dirt over when I need to). I attached two grids to the hardware cloth to hang containers with oyster shell and grit.

I put plastic on the open areas around their roost to prevent the draft from hitting them. I will eventually replace the plastic with plexiglass.
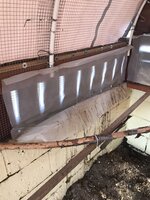
Their roost is a vintage tree pruner that came with the house, and a branch, and their 2 nests are one I bought and one my husband made:


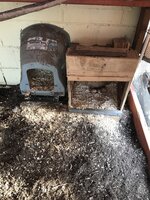
There is a gap along the whole bottom of the side of the coop where air gets in. It just kind of turned out that way because of where the tarps ended. It doesn't seem to bother the chickens, it gives them a view, and it provides air flow even though it is down low (in the winter I put plastic over the whole door too, except for the top 6 inches, for air flow as well).

Here is what the coop looks like from the street:


I keep the chicken feed in a metal can in the catio:
I did eventually reorient the raised garden, and recently added an outdoor brooder for 5 new chicks. I used vinyl coated 1 inch chicken wire to keep the chicks in, but the little buggers can squeeze through!!! I ended up creating a gap that they can easily get through if the big girls chase after them, but the big girls don't seem to care much about them, thankfully. Where the gate is, I plan on putting a wooden arbor and I will eventually replace all of the plastic fencing as well with wood. I really do love this fencing for its practicality and I recommend it as it is easily moveable and does the job. I did eventually get a cattle panel that I am growing a passionflower vine on. It is separated from the chickens by the same movable black plastic fencing. I have rubber irrigation hoses on timers going to my raised garden and to the passionflower.


I bought a crop cage for the garden which I haven't installed yet https://www.gardeners.com/buy/crop-cage-4x8/8596539.html#start=3. I also just bought a top bar beehive off of craigslist which I will get honeybees for next year.
 (The hive is right next to the coop on the right)
The fencing, irrigation hoses and accessories are all from www.gardeners.com (I wait for sales) and the gate is from Lowes.
As far as DLM goes, I tore up all the grass inside the coop (broke it up as good as I could, turning it over) and threw a ton of fallen maple leaves, pine needles, pine cones and chicken pine shavings in with it. For the first year I would go in about once a week to turn it all over and every once in a while add more "stuff". I got the chickens in September of 2018 and around October 2019 I stopped turning altogether until last week. There was no smell and most of what I had initially added in had decomposed. I took out a bunch of this soil last week to plant roses with. As far as the "run" goes, I also added in a ton of the same stuff, but didn't break up the grass before hand. The chickens have done a pretty good job and digging it all in. For the raised garden, I didn't break up any of the grass either and used the lasagna method (cardboard, newspaper, fallen apples and pears from around the neighborhood, maple leaves, pine needles, lots of used free coffee grounds-Washington State!-, , letting it all stew together over the winter and planted tomatoes, zucchini, and other veggies in it last summer.
As for what I have learned and what I would change...
I had expected that in two or three years the hoop coop would fall apart and I would have to replace it. I love the design and concept of the Woods Coop, so that was what I planned to replace it with. However, even though the hoop coop isn't beautiful, its simplicity and actual sturdiness has astounded me and I think that once the wood and PVC wears out I will simply replace the 2x4s with cedar and maybe replace the PVC hoops with cattle panels. My husband and I are not carpenters and we have other projects going on, so the idea of a Woods Coop, while nice, is too lofty for us in reality. It has been nearly two years already and it still looks exactly like it did when I built it. To make it look cuter, I will eventually paint the door and replace the vinyl tarps with waterproof canvas. I also want to repaint the run walls with this mural:
My ultimate goal is to have a permaculture setup: using what we have and having the chickens do the work tilling and fertilizing the earth and eating the beetles that are detrimental to the bees, and having the bees pollinate the plants. My husband and I recently bought a 5 acre off-grid property in the woods about 45 minutes away, which is where we may retire, and the work I am doing here will continue on that property at some point. If you have gotten this far, thank you for reading and I hope this will be of some help to you

