I named this article after the motto that emerged for this coop, the thing we said to each other every time we worked on it: "It's just a chicken coop!". Both hubby and I can be a little perfectionist, and we often found ourselves waffling about what would be the *best* thing to do. At those times, we would remind ourselves of our motto and forge ahead. "just a chicken coop" meant that it didn't have to be up to the standards of human dwellings for squareness, uniformity of material, or sturdiness. We still obviously wanted it to meet all of the chickens' needs.
We also did that thing that everyone on here (me included) will tell you not to do, and that is that we bought the chickens before we even started on the coop. My excuse for this is that it probably never would have even been started if we hadn't had small baby birds cheeping at us as a constant reminder.
From planning to completing the run took about 3 months, with most of the work being done on evenings and days off. We used as much recycled materials as we could, but there are some things you just have to buy. This build is about half pallet wood and half new wood, with some renovation leftovers thrown in. My initial plans do not look much like the finished coop; I had originally planned for the nesting box to be conveniently accessible from our deck, before realizing the roosting bar would need to be even higher than that!
I tried to draw the plans to scale as much as possible so that I could plan how much wood I would need to collect/buy. It wasn't perfect, but I did save myself many additional trips to the hardware store this way.

And these are the "final" plans, still not totally accurate to the final coop!You will notice that the run got much longer. What was mostly accurate was the general shape and how much hardware (handles, hinges, locks) I would need to buy. I gathered as many of these finishing materials in advance as I could.
The plan we settled on was for a 4'x6' footprint coop with 4' walls and a slanted metal roof, with a gap between the roof and the walls spanned by hardware cloth for maximum airflow. We have pretty constant coastal winds coming through here. The original plan for the run was for 3'x12', but we ended up with a 4'x16' run. This was a big deal because we had to remove the asphalt that the previous owners had covered the back yard in!
We ended up clearing this asphalt by hand with a pickaxe. Thankfully it was both old and thin, if it had been newer we would have needed to rent a specialized saw to cut it into manageable pieces. You can usually take this stuff to a recycling center for free or cheap.

We built the frame for the base in an admittedly haphazard way, but we reminded ourselves it's "just a chicken coop"! We were working with leftover lengths of wood that were too short, so there were some funky angles. The plywood sheathing helped stabilize the whole thing. The most important thing to me was that it was as close to level as possible
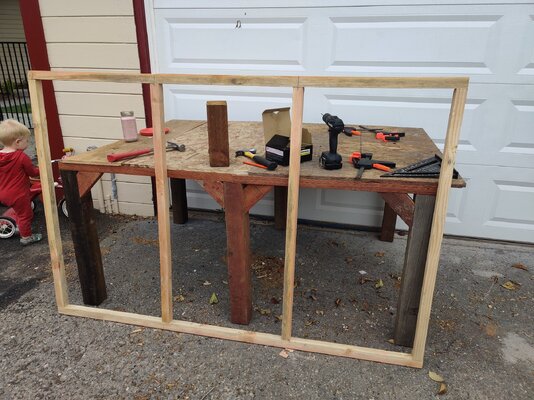
Then a couple weeks passed while the chicks were in the brooder and life got busy. And then framing! I used 2x2 boards (instead of 2x4) for their price and because it's "just a chicken coop!". I used a drill and common nails for this, with mostly positive results. I had issues with the boards splitting when I drove the nails in, I think I would have either used a longer drill bit or smaller nails. A squaring tool and clamps narrowly made this a one person job. I placed the "studs" 2 ft on center by measuring where to place them on the longer boards, then I clamped them into place, pre-drilled the holes, and drove two nails into each joint. I used a chop saw to cut the boards to length as well.
When there were bad splits I made homemade wood filler out of sawdust and wood glue. Taking it apart and starting over in those cases wasn't an option because despite the wood splitting I still couldn't get the joints back apart again! Another example of "it's just a chicken coop" logic at play. I also framed out the hole where the nesting box would go in one of the walls because I wanted it to be a sturdy as possible.
We applied the plywood for the walls to the frames before hoisting them up onto the base and using wood screws to attach them to each other. In general I would recommend wood screws over nails, though you still ought to pre-drill the holes when you need to be precise. The plywood was in 8'x4' sheets, so having the walls of the coop be 4' minimized the number of cuts needed. I didn't have a table saw so I used a track saw for the big cuts, and a jigsaw for the smaller holes for the doors, windows, and nesting box.
We also made a foundation of leveled pavers in sand. The sand is mostly for the chickens to dust bathe in, which they do frequently. This was a handy way to make sure the coop base was level as well. The pavers were what we had lying around, and the sand is "all purpose" sand from the hardware store.
The next steps were painting and putting on the roof and the doors. I don't have many picture of these steps as they mostly happened at night, in the dark, after our littles were asleep. The paint for the interior was from the "oops paint" section of the hardware store, an exterior paint and primer mix. This saved us both time and money so I recommend it. For the outside we did end up buying new paint though, as we wanted the color to match the trim on the house.
The gaps between walls and roof were tricky due to some math mistakes, so this is another example of "just a chicken coop" logic. I tried to be as efficient as possible when doing this but there were a few spots I had to "weave" together with wire later to secure them properly. The main intruders I'm worried about here are rats and maybe raccoons. I also followed some common advice to use a staple gun for the hardware cloth, but the staples frequently buckled. I realized too late that I needed "super heavy duty" staples that could only be ordered online. Oh well, it's "just a chicken coop"!
Here you can also get a view of the design for the interior; the shelf under the roosting bar is filled with sand for easy cleanup where they poop the most frequently. I had made a shallow pan out of wood that could in theory slide out, but the sand was so heavy that later I just nailed some wood across the front of the shelf to hold the sand in. The sand is the same "all purpose" sand from the hardware store as what's under the coop.
The nesting boxes have not yet been used but I'm planning to line them with plastic bins before it gets to that point. They're 1 foot square per box. You can also barely make out the door that will eventually lead to the run. The floor of the interior is lined with some thick foam backed linoleum we got secondhand. I made sure it came up the walls at least 6 inches, as we're doing deep litter, which is working out well so far. I just use a shovel when I need to change out the litter.
Here are some outside shots from around the same time. You can see the little door set under the shelf; the intention was to be able to turn that bit of the coop into an outdoor brooder, and it's currently in use to good effect. You can also see some progress on the run, as well as an outside view of the nesting box. The nesting box is plywood with fence plank scraps nailed to the outside. The intention was to improve looks, insulation, and water-proofing. We don't get a lot of rain here, and never snow, or else I probably would have shingled it. It's got a hasp latch on it for security.
The "pop" doors to the brooder and the main coop are both just set into a track made with narrow planks and 1/2"x1/2" sections of board. The doors slide smoothly and they're quite sturdy. The one to the brooder has a hasp latch on it now as it's not protected inside the run.
The next steps were adding "siding" made of pallet wood and fence scraps, and the chickens, who were very ready for more space. I also impulsively cut a window just in line with the roost so we could check on them from our deck, and it's been a wonderful addition!
You can also see the doors to the front of the coop, which are about 2'x3.5'. On the right-hand door there are bolt lock top and bottom to hold it sturdy, and then a hasp latch across the two doors. Usually we only open the left-hand door, but we can have both open for easier access. The hasp is high up to keep it out of reach from both raccoons and little humans. I made them with hardware cloth instead of solid wood to maximize airflow through the coop.
There's a time skip where I admittedly forgot to take photos, but we finished the siding and painted the coop, pre-painted the boards for the run, and then erected the run and added the hardware cloth. We used pier blocks as the base for the posts, which got away from us and ended up being 4x4's. Not very "just a chicken coop", but it IS very sturdy. The hardware cloth was stapled to the outside, and we also left a skirt of 10-12", currently held down by pavers but will eventually all be buried.
The reason for using pier blocks was to minimize the amount of wood touching the ground directly, and to avoid permanent solutions like setting the posts into the ground with concrete. The angle of the sides of the blocks made routing the hardware cloth a bit tricky, but overall it's secure and I think it was worth it.
We finished the ground in the run with a mix of sand and cheap garden mulch in an attempt to prevent the run from turning muddy when we do occasionally get rain.
Finishing touches on the run include a staircase with a landing into the coop, a hanging waterer in the coop with their big bucket in the run, and a high platform in the run for the chickens to greet us from while we're on the deck. I have plans for a roosting ladder as well, but it's on hold for now.
I made the staircase using fenceboard offcuts for the sides and 2x4 scraps for the steps. They're a bit crooked, but it's "just a chicken coop". I tried to make the landings large enough that the chickens could just use those instead of the steps if they wanted, and I often see them sunning themselves there. the waterer's hanger is just a piece of scrap screwed into a stud, so it's a bit precarious, I need to add a brace to it. The platform I made by first screwing scraps into the wall and 4x4, and then I set a piece of pallet wood on the scraps and screwed it into place. Then I used finishing nails to nail the boards into the pallet wood.
You can also make out the piece of cotton rope we use to raise and lower the pop door into the coop. I used nails to run the rope over, and it ties to a nail outside the run that we can reach from the deck. it works surprisingly well, and when it inevitably frays I'll just replace it with a new section of rope.
Finally, pictures of the second batch of babies I bought, after re-homing our rooster, living it up in the built-in brooder. They're separated from the coop by a utility lid modified with hardware cloth and an extra board, attached to the shelf with screws and zip ties. When it's time for them to mingle with the big girls the board will be opened a bit, and then eventually both board and lid will be removed. The first picture is a screenshot from the webcam we have in their brooder, the second is the view of the brooder from the main section of coop.

Things I want to change or add:
- A large roosting ladder in the run
- possibly a chicken swing in the run
- Insulation in the roof
- Plastic tub liners in the nesting boxes
- Curtains for practical and aesthetic purposes
- Framed silly art inside the coop
- A door in the roof of the run to make it easier to drop treats in from the deck
- A permanent sun shade in the run somewhere
What I Learned
- Making a 100% reclaimed material coop and run is impractical
- Power tools make a world of difference
- Sometimes not even double checking your math will save you
What I would do different
- 2x3's instead of 2x2's for the coop; the 2x2's were usually warped very prone to splitting
- make at least one section of the run roofed instead of having it all be hardware cloth
- gather more recycled materials ahead of time
What I think you ought to do
- Finish the coop before you buy the chicks (lol)
- Use as many power tools as possible
- Use thick gloves when handling hardware cloth
- Remember that it's "Just a Chicken Coop"!