Our little MODern Coop!
Already I can see that this Coop page may prove above my technical abilities, but ever the optimist, I'll give it a try!
It all began innocently, with me asking my Dad in a hopeful email, whether or not he'd be willing to help me build a chicken coop for our little backyard. I just wanted something simple. You know, four walls and some mesh, and maybe a little roof to keep them dry.
I forgot that Dad can't do anything "simply" when it comes to building. He's an architect, and any chance to put the skills to use is too tempting, so here's is what he delivered to my house within a week. Pretty sweet! But alas..... all the angles. This was not for me to build solo, he'd have to lead the way with the saw. But I loved it, so onward we went! Mom was in on it, and we decided we'd be a team of three. This project ended up being the most fun I've had with my parents in years! Lots of coffee, laughter, problem-solving, eating, more laughing and a little wine later, we've bonded AND done something cool. Chickens can unite us man........

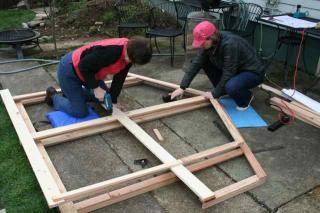
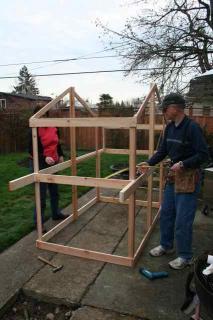
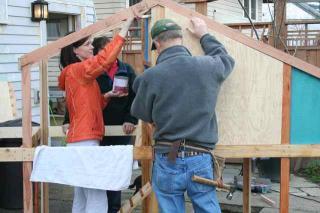
Here's DAY ONE. We decided to lay out one side of the coop and build the framework. This went fairly smoothly actually. Next we lay down the other side on top of it, mirror-image style. This way we knew we had all the pieces for each side identical. I haven't build a whole lot before, but I can sew, and it's similar to putting pattern pieces together. Anyway, we glued each joint and overlap to add structural support as we went. Notice we used the lightest weight wood we could find. If this thing is supposed to be portable, you just can't use anything too heavy.
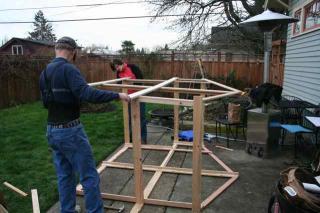
After lunch we were ready to assemble the end pieces and get this thing upright! We put one sidewall on the ground, interior side facing up, and added the end pieces. Lastly, we attached the opposing side wall. Everything fit. I guess we were doing alright!
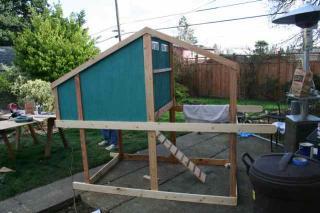
Once we had all four walls assembled, we set the coop upright and began measuring our for flooring. But first we had to use a lot of 1x2 stripping to form all the necessary supports for the floors and walls. It took some figuring to get this right, because we wanted the plywood floor to be completely even with the cleanout door when finished.
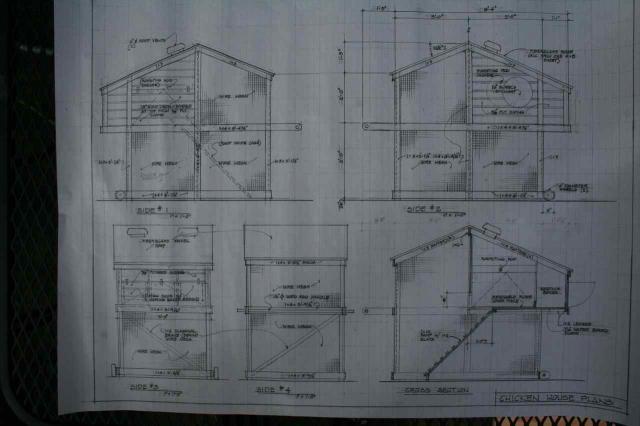
Next we installed the roosting rod. Originally we had planned to have it run straight across the coop, but soon realized that we did a full "cleanout door" on one side, the rod would be in the middle of the door! (see plans.) SO, I decided to have the rod run at an angle, and it still has plenty of room for four hens to perch without being too crowded. Dad build a nifty little support for the door end of it, and we had solved our problem.
In this photo we're measuring for ventilation. I found some cheap metal vents at the lumber yard, and they'll be a good start for now. I may add another down low on the backside later, but will wait until the weather warms and the chicks are a bit older. We also built a "summer door" to replace the main cleanout door during warm months. It's just a simple frame with hardware cloth on it. It will make the upper coop like a screened-in porch to make the hottest summer days more bearable. When cool nights return, the solid door will too.
Here you can see the ventilation and some of the floor supports going in. And Dad of course!
Here's Dad working on the door. The nesting boxes have gone in too. The next day we made them deeper so they'll keep the nesting hay in place better. Notice we used 1/4 inch plywood for the whole thing. It's very lightweight, but structurally strong enough for a small coop like this. Our mantra was "keep it light!"
Here's Dad still working on the door. Tricky, tricky. My sister stopped by to help paint. We coated all exterior plywood with a really good gel primer from Pittsburgh Paints before doing the color. All the wood trim and supports I coated with a kid & pet-friendly soy-based stain. Chickens will eat anything, including wood and paint chips, so I decided to use this stuff even though I'm sure it won't hold up as well and I'll be re-staining annually. Oh well. At least I can sleep at night knowing reduced some toxins they're exposed to.
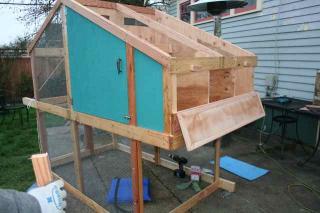
You can see here that we got the drop-down ramp installed. It's on a pulley system so it's easy to pull up at night and hook the rope onto a cleat. The ramp is a little steep, but the chickens don't seem to mind at all. Food or heat seem to be all the motivation they need to flap their way up or down.
Here is the nesting box door. We decided to make it flap down so that little kids who do the egg collecting won't have to deal with holding the door up while retrieving them. We put two turn locks just in case little hands leave one undone!
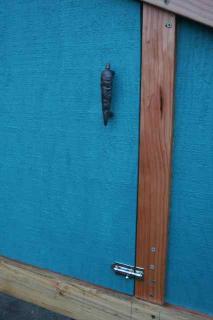
Reuse/recycle, right? Along with using whatever wood we could find around my house and Dad's shop, we found two cute carrot pulls in our basement that the previous owners left years ago. OK, so it's not a rabbit hutch, but they're cute, no? They rusted in two days, so now they're orange, but they're fine. We had to buy a fair amount of materials for the project too. I searched Craigslist and free ads, but there wasn't much out there.
Here you can see a better shot of the back side. We didn't quite have the pulley system finished, so were tying it on, but you get the idea. The two long, rounded parts of the frame sticking out will be where a rod handle goes across the width of the coop. There will be wheels on the other end (where the two short pieces hang out,) and it will be simple to lift and roll it around the yard. The heavy end is supported by the wheels, so it's really quite light to lift!
Last day of work! I primed and painted the inside of the coop at the last minute. I couldn't help but think that the thin plywood would rot quickly with water and poop on it inside the coop. So i did the whole thing up to the 10" mark inside. Easier to clean...... or so the theory goes.
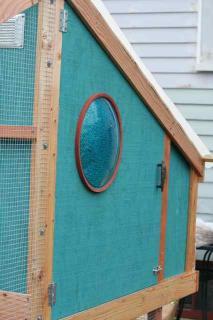
I scratched my head for weeks trying to figure out WHERE in the world I was going to find a small round window to bring Dad's architectural vision to life. I found the answer in the Archie McPhee oddities store in Seattle, and for only $4! It's an old traffic signal lens. Green light! It even came with the great rubber double-wall seal around it. It was installed in a matter of minutes. I like it. Looks like the bubble window in Scooby Doo's van!
You can also see that I installed the 1/2 inch hardware cloth with screws and washers. It makes for a secure fasten! We ran the fasteners up the exterior of the coop on the vertical supports, and on the interior of the coop on the horizontal supports. This required notching the corners and some cursing (yes it did), but it made for a nice, clean look overall.
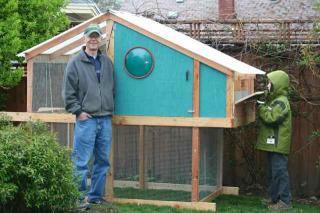
Here's Grandpa Don with his finished work, and Nigel checking the egg door for practice. I think he'll have a few more months of disappointing checks before finding the first egg since the girls are only five weeks old.
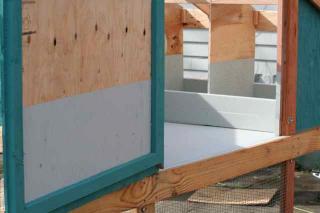
You can see that our roofing is just opaque, white, corrugated plastic. It will help reflect heat, but still permit lots of light to come in. We used the wavy trim they sell to go with it so there aren't huge air spaces all around at the ridge and bottoms. A simple galvenized ridge piece worked great too. Cheap and functional.
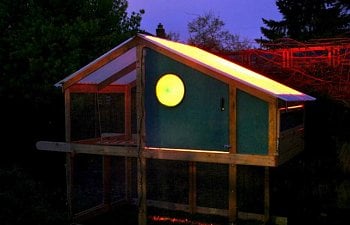
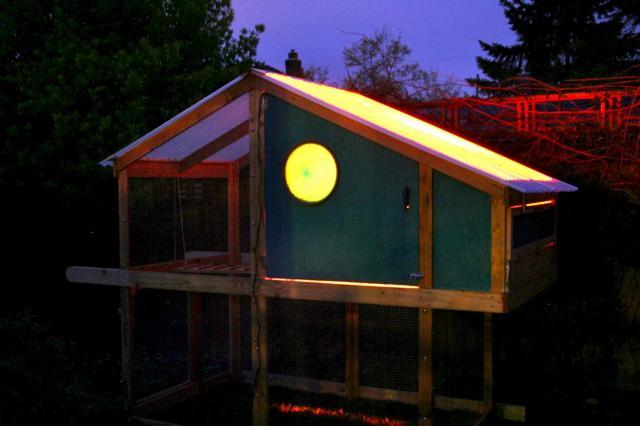
Here's the coop at night. We hooked the heat lamp up inside, making sure it was safe and couldn't fall and cause a fire of course. The girls went out on the first night since the weather here is mild this week! I love how the red light glows through the traffic signal lens and the roof! It makes the whole yard prettier at night! Every night's a full moon in the backyard now.
Well, that's about it! I still need to add the wheels and handle, and I think it might be nice to add a perch up high in the tall, open half of the coop. The hanging waterer and feeders will go in later down below. I'm still keeping their food and water up in the coop until they're a little bigger. Babies seem to need to eat all night long. (I know mine did!) I'll update this page as I find things I would have changed about the coop. We did a LOT of research, but I'm sure I missed something. I enjoyed learning from all the wonderful BYC coop pages! Especially took lessons from those who used gate latches for the coop doors and trapped themselves inside! Terrifying stuff!")
Thanks for looking at our little coop. And thanks for sharing all yours too!
Elissa
Portland, OR
Already I can see that this Coop page may prove above my technical abilities, but ever the optimist, I'll give it a try!
It all began innocently, with me asking my Dad in a hopeful email, whether or not he'd be willing to help me build a chicken coop for our little backyard. I just wanted something simple. You know, four walls and some mesh, and maybe a little roof to keep them dry.
I forgot that Dad can't do anything "simply" when it comes to building. He's an architect, and any chance to put the skills to use is too tempting, so here's is what he delivered to my house within a week. Pretty sweet! But alas..... all the angles. This was not for me to build solo, he'd have to lead the way with the saw. But I loved it, so onward we went! Mom was in on it, and we decided we'd be a team of three. This project ended up being the most fun I've had with my parents in years! Lots of coffee, laughter, problem-solving, eating, more laughing and a little wine later, we've bonded AND done something cool. Chickens can unite us man........
Here's DAY ONE. We decided to lay out one side of the coop and build the framework. This went fairly smoothly actually. Next we lay down the other side on top of it, mirror-image style. This way we knew we had all the pieces for each side identical. I haven't build a whole lot before, but I can sew, and it's similar to putting pattern pieces together. Anyway, we glued each joint and overlap to add structural support as we went. Notice we used the lightest weight wood we could find. If this thing is supposed to be portable, you just can't use anything too heavy.
After lunch we were ready to assemble the end pieces and get this thing upright! We put one sidewall on the ground, interior side facing up, and added the end pieces. Lastly, we attached the opposing side wall. Everything fit. I guess we were doing alright!
Once we had all four walls assembled, we set the coop upright and began measuring our for flooring. But first we had to use a lot of 1x2 stripping to form all the necessary supports for the floors and walls. It took some figuring to get this right, because we wanted the plywood floor to be completely even with the cleanout door when finished.
Next we installed the roosting rod. Originally we had planned to have it run straight across the coop, but soon realized that we did a full "cleanout door" on one side, the rod would be in the middle of the door! (see plans.) SO, I decided to have the rod run at an angle, and it still has plenty of room for four hens to perch without being too crowded. Dad build a nifty little support for the door end of it, and we had solved our problem.
In this photo we're measuring for ventilation. I found some cheap metal vents at the lumber yard, and they'll be a good start for now. I may add another down low on the backside later, but will wait until the weather warms and the chicks are a bit older. We also built a "summer door" to replace the main cleanout door during warm months. It's just a simple frame with hardware cloth on it. It will make the upper coop like a screened-in porch to make the hottest summer days more bearable. When cool nights return, the solid door will too.
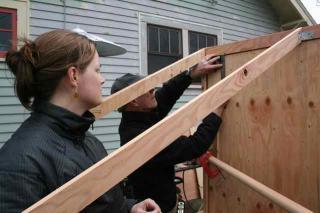
Here you can see the ventilation and some of the floor supports going in. And Dad of course!
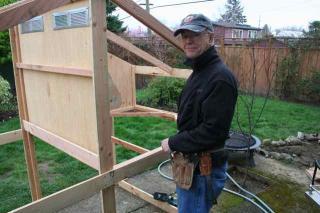
Here's Dad working on the door. The nesting boxes have gone in too. The next day we made them deeper so they'll keep the nesting hay in place better. Notice we used 1/4 inch plywood for the whole thing. It's very lightweight, but structurally strong enough for a small coop like this. Our mantra was "keep it light!"
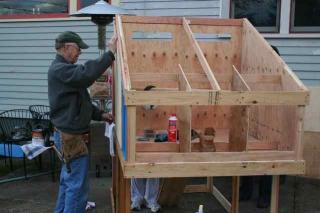
Here's Dad still working on the door. Tricky, tricky. My sister stopped by to help paint. We coated all exterior plywood with a really good gel primer from Pittsburgh Paints before doing the color. All the wood trim and supports I coated with a kid & pet-friendly soy-based stain. Chickens will eat anything, including wood and paint chips, so I decided to use this stuff even though I'm sure it won't hold up as well and I'll be re-staining annually. Oh well. At least I can sleep at night knowing reduced some toxins they're exposed to.
You can see here that we got the drop-down ramp installed. It's on a pulley system so it's easy to pull up at night and hook the rope onto a cleat. The ramp is a little steep, but the chickens don't seem to mind at all. Food or heat seem to be all the motivation they need to flap their way up or down.
Here is the nesting box door. We decided to make it flap down so that little kids who do the egg collecting won't have to deal with holding the door up while retrieving them. We put two turn locks just in case little hands leave one undone!
Reuse/recycle, right? Along with using whatever wood we could find around my house and Dad's shop, we found two cute carrot pulls in our basement that the previous owners left years ago. OK, so it's not a rabbit hutch, but they're cute, no? They rusted in two days, so now they're orange, but they're fine. We had to buy a fair amount of materials for the project too. I searched Craigslist and free ads, but there wasn't much out there.
Here you can see a better shot of the back side. We didn't quite have the pulley system finished, so were tying it on, but you get the idea. The two long, rounded parts of the frame sticking out will be where a rod handle goes across the width of the coop. There will be wheels on the other end (where the two short pieces hang out,) and it will be simple to lift and roll it around the yard. The heavy end is supported by the wheels, so it's really quite light to lift!

Last day of work! I primed and painted the inside of the coop at the last minute. I couldn't help but think that the thin plywood would rot quickly with water and poop on it inside the coop. So i did the whole thing up to the 10" mark inside. Easier to clean...... or so the theory goes.
I scratched my head for weeks trying to figure out WHERE in the world I was going to find a small round window to bring Dad's architectural vision to life. I found the answer in the Archie McPhee oddities store in Seattle, and for only $4! It's an old traffic signal lens. Green light! It even came with the great rubber double-wall seal around it. It was installed in a matter of minutes. I like it. Looks like the bubble window in Scooby Doo's van!
You can also see that I installed the 1/2 inch hardware cloth with screws and washers. It makes for a secure fasten! We ran the fasteners up the exterior of the coop on the vertical supports, and on the interior of the coop on the horizontal supports. This required notching the corners and some cursing (yes it did), but it made for a nice, clean look overall.
Here's Grandpa Don with his finished work, and Nigel checking the egg door for practice. I think he'll have a few more months of disappointing checks before finding the first egg since the girls are only five weeks old.
You can see that our roofing is just opaque, white, corrugated plastic. It will help reflect heat, but still permit lots of light to come in. We used the wavy trim they sell to go with it so there aren't huge air spaces all around at the ridge and bottoms. A simple galvenized ridge piece worked great too. Cheap and functional.
Here's the coop at night. We hooked the heat lamp up inside, making sure it was safe and couldn't fall and cause a fire of course. The girls went out on the first night since the weather here is mild this week! I love how the red light glows through the traffic signal lens and the roof! It makes the whole yard prettier at night! Every night's a full moon in the backyard now.
Well, that's about it! I still need to add the wheels and handle, and I think it might be nice to add a perch up high in the tall, open half of the coop. The hanging waterer and feeders will go in later down below. I'm still keeping their food and water up in the coop until they're a little bigger. Babies seem to need to eat all night long. (I know mine did!) I'll update this page as I find things I would have changed about the coop. We did a LOT of research, but I'm sure I missed something. I enjoyed learning from all the wonderful BYC coop pages! Especially took lessons from those who used gate latches for the coop doors and trapped themselves inside! Terrifying stuff!
Thanks for looking at our little coop. And thanks for sharing all yours too!
Elissa
Portland, OR