Chicken Coop Specifications
Location: Colorado Springs, Colorado
Dimensions:
Interior Space:
Construction Details:
The Beginning
Our coop journey began in 2016 when my wife declared she wanted backyard chickens. Up until then, we had plenty of experience gardening in Colorado’s unpredictable climate, but chickens would be an entirely new challenge.
What We Knew Going In
Just a few months before construction began, strong winds had taken down several sections of our aging privacy fence. The fence dated back to the home's original build in 1984, and the cedar pickets were far thicker than the flimsy ones sold at big box stores today, ranging from ½" to ¾" thick, with a beautifully weathered patina.

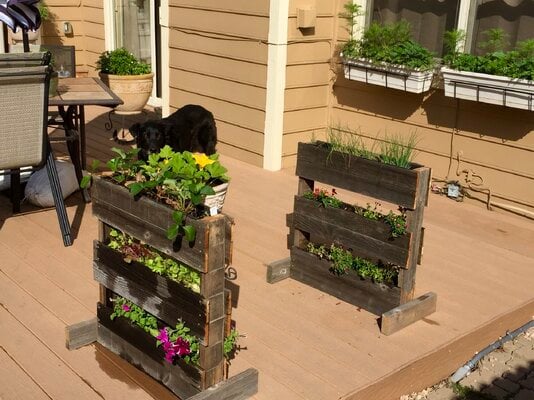
After cutting into a few of the downed boards, we found the core wood was still solid and usable. That sealed it, we were determined to salvage and repurpose the pickets in our coop build. We had already put some to good use in making planters, and the rest were destined to become part of our chicken fortress.


The Build Begins
After tossing around several ideas and sketching out a few rough concepts, we landed on a design that balanced function and footprint, a medium-sized coop with a slanted roof and a full-size door for easy access and cleaning. While we were starting with just three hens, we wanted to build with enough space and flexibility to expand the flock in the future.
With the plan in place, both cars were pulled out of the garage to make room for the build, and construction officially began in July 2016, starting with the raised foundation.

To keep ourselves motivated and on track, we picked up our first three chicks from the local farm store, Buff Orpingtons we initially planned to name after The Golden Girls. But as their personalities started to shine through, they quickly named themselves. Instead of Blanche, Dorothy, and Rose, we ended up with Tiny, Big Momma, and T-Rex.

Just one week into construction, Mother Nature delivered a harsh reminder of what it means to build in Colorado. A freak storm that had been brewing all day hit that evening with a vengeance, unleashing a brutal hailstorm. It destroyed our gardens, flattened the raised beds, dented the roof, gutters and siding, cracked windows, and, of course, totaled both of our cars, which were parked outside to free up the garage for coop construction.


After a pause in construction to clean up the hail damage, work on the coop had to resume, ready or not, the chicks were growing fast. Between dealing with the insurance company (not the most pleasant experience, horrible to deal with) and trying to coordinate with overwhelmed contractors, it quickly became clear we couldn’t wait for everything else to settle before getting back to the build.
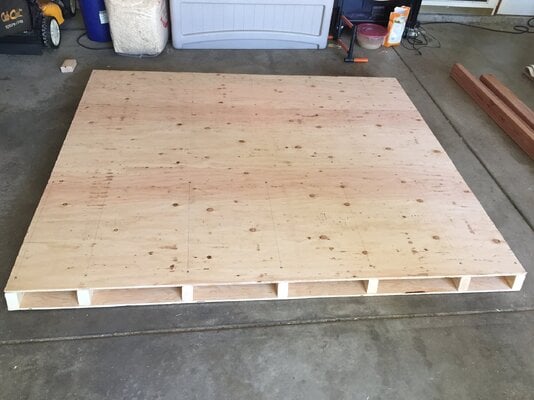
With the raised foundation complete, framing began. We installed linoleum on the floor, easily one of our best decisions, and added a slanted poop board for easier cleanup. Next came the roof, built with a fluted design and topped with corrugated metal sheeting. The fluted structure not only provided durability but also created natural air gaps, which we hoped to insulate later to help with Colorado’s extreme temperatures. It also opened up the possibility for some creative roof ventilation, more on that later.


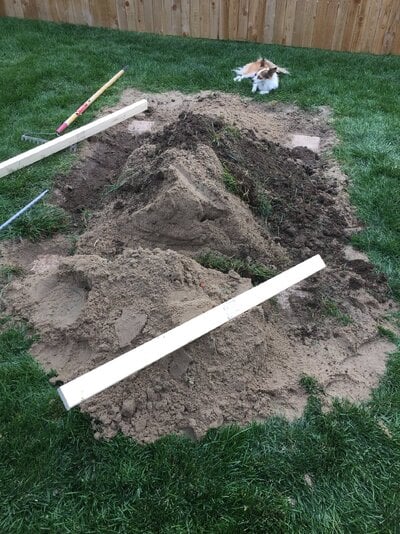
At the same time, we began prepping the area in the backyard where the coop would eventually sit, placing footer stones to help level the ground and support the raised foundation.

With the framing and roof completed, both sections were moved to the backyard. The roof was then securely mounted using high-strength screws, an essential step, knowing the structure would need to withstand Colorado’s relentless winds.

At this point, we realized the slanted poop board design wasn’t making the best use of space. We decided to scrap it, but chose to move forward with the rest of the build and revisit that detail later.
Plywood sheeting was then installed, and a two-bay, externally accessible nesting box was framed out, complete with linoleum flooring for easy cleaning, with a little "help" from the future inhabitants.


Knowing the reclaimed siding would leave some gaps, we decided to wrap the coop in roofing felt to protect the plywood sheeting underneath. Tyvek wasn’t cost-effective for the small amount we needed, so roofing felt served as a more economical alternative.

Next came the meticulous process of cutting and attaching the reclaimed fence pickets as siding. With the walls in place, we installed the main door, nesting box access door, pop door, and all the necessary hardware. Metal roofing was added to the nesting box for extra durability, and a new ladder was built to provide easy access through the pop door entrance.
Additional pieces of wood were later added inside the nesting box to help keep the straw and shavings in place when opening the access door, they’re just not visible in these photos.


The original ventilation setup included a main vent above the main door that could be closed as needed. We also added two under-eave vents, which aligned with two of the fluted roof channels to promote upward airflow. Inside the coop, additional vents were installed above the roosting area to encourage circulation while avoiding direct drafts across where the hens sleep.

Chicken Run 1.0 and Roosting Area Upgrades
With the primary coop build finished, it was time to move on to the run and circle back to updating the poop board and nesting area.
The new wraparound run was framed using 1"x1" lumber, with 2"x4" pressure-treated boards for ground contact. Once the framing was complete, the entire structure was enclosed with chicken wire on all sides.


Electricity was run to the coop with a GFCI breaker for safety. For lighting, a lizard terrarium fixture was hung from the ceiling using an eye hook and carabiner, allowing for easy removal and cleaning as needed. Initially, we used 40-watt incandescent bulbs, but with the rise in LED options, we later switched to a 9-watt Edison-style LED bulb. It provides plenty of light and is much safer and more energy-efficient than the original incandescent setup.
The light is also connected to a timer, providing supplemental lighting to encourage laying when needed and also helping guide the hens into the coop at night. Once they're in, we close the pop door every evening without fail to protect them from predators.
The interior of the coop was insulated about three-quarters of the way up, primarily to block drafts around the nesting area and help regulate temperatures during Colorado’s unpredictable weather. We also implemented a new poop board design and installed a lower roost, better suited for our Buff Orpingtons. As larger birds, it’s important they aren’t jumping down from high roosts to avoid potential leg injuries.
The new poop board was built using pre-finished white board, which makes cleanup much easier. For some reason, we initially didn’t add pine shavings to the board, but once we gave it a try, we never looked back. In our setup, adding pine shavings has made cleanup significantly easier and more manageable.

Over the years, our three Buff Orpingtons proved to be excellent layers, though we did lose T-Rex early on, most likely due to a genetic heart issue. In time, a few new members joined the flock. The coop’s construction, utility, and overall flexibility have held up wonderfully. We’re constantly making small tweaks and improvements to enhance functionality and make daily care easier for both hens and humans. One such addition was placing straw bales around the raised foundation to act as a wind block, giving the hens extra protection from the elements.

While our hens did use the run, they spent most of their time free-ranging throughout the backyard. We were fortunate to have dogs, cats, and chickens that all got along, and would often be found lounging or roaming together during the day. Our shepherd mix naturally took on the role of flock protector, keeping a watchful eye on his free-range hens. We're also fairly certain they all held secret meetings to plot against us humans.


The Passing of the Guard, Chicken Run 2.0 and Ventilation Upgrades
As with all living things, time moves on. Our shepherd mix, Murphy, had begun to show his age, and we knew it was time to bring a new pup into the mix while he was still with us, so the newcomer could learn the ways under his gentle guidance.
Enter the Corgi-Beast.

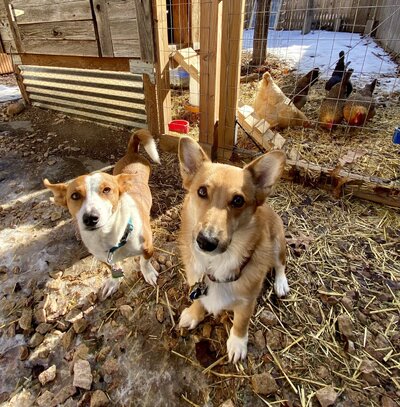
Murph did his best to teach the little one the ways of the chicken watcher. But anyone who’s spent time around a Corgi knows, they’re relentless herding machines and four-legged vacuum cleaners. Unfortunately, that herding instinct proved too intense for the flock, and the constant snacking on chicken poop quickly became a nasty habit.
Something had to change.


In April of 2021, the old wraparound run was removed, and construction of Chicken Run 2.0 officially began. The new design would provide the flock with ample space to roam, while also keeping the Corgi-Beast out of trouble.


With the new run completed, we added enrichment to keep the hens active and engaged. Wood piles, a cinder block and 2x4 roost, a kiddie pool for dust bathing, the occasional bale of straw, and various obstacles provided plenty of stimulation. These elements continue to evolve, with new additions rotated in regularly. Not only does it keep the flock busy throughout the day, but it also makes introducing new members much easier.
We’ve also added multiple water and feed stations, designed for quick swaps using ropes to lift them over the fence, saving us from having to enter the run every time.


We also introduced a new poop board design and added extra ventilation, key upgrades that allow us to safely maximize our flock size (because, well… egg prices and growing demand from friends and family). The updated design also supports lower roosts, which are especially helpful for our older or larger hens.


Tiny, one of the original Buff Orpingtons and head hen, is still going strong at 9 years old. These days, she needs a little help getting up and down from the roost, so we’ve added stacked paver stepping stones in a few places to make her daily routine a bit easier.

Our most recent update was finally enclosing the raised foundation with corrugated metal, eliminating the need for straw bales as a wind block. On the south-facing side, we used clear corrugated plastic to let in sunlight, providing both warmth and natural light beneath the coop when the flock is hunkered down during rough weather.

This summer, we plan to reduce more of the lawn and add a stone path along the full length of the run for easier access and maintenance. We’re also planning to add a small storage area for chicken supplies in the inset portion of the run.
We recently welcomed some new members to the flock. Thanks to the thoughtful run design and the strategic placement of kennel fencing and other obstacles, introducing the pullets has been smoother than ever. The layout provides escape routes and features separate feed and water stations that the larger hens can’t access, reducing stress and minimizing competition. So far, it’s been our easiest and most successful flock integration to date.

A 2x6 board was added beneath the poop board inside the coop to offer the new pullets, and one cockerel, until he’s rehomed, a protected space and lower roosting option while they acclimate to the rest of the flock. For the past two nights, everyone has slept on the main roost together.

And there you have it, the epic journey of our ever-evolving Colorado BurbCoop. It’s hard to believe it’s been nine years, and writing this has been a nostalgic trip down memory lane. My wife and I often sit out on the back deck in the mornings with our coffee, reminiscing about the wild ride this little coop has taken us on.
We look back fondly on all the flock members and friends who’ve come and gone, and we’re grateful for those still with us. It’s been a journey full of trials, tribulations, frustrations, and plenty of joyful, hard-earned successes along the way.
Oh, and as for the Corgi-Beast, he’s all grown up now and has a new buddy to pal around with. He still tries to herd the chickens every chance he gets.

Final Thoughts for New Chicken Owners
Raising backyard chickens is a rewarding experience, but it definitely comes with its share of learning curves. If you're just getting started, here are a few pieces of advice we’ve picked up over the years:
Location: Colorado Springs, Colorado
Dimensions:
- Footprint: 4' Deep x 5' Wide x 5' Tall
- Total Height: Over 6' tall with raised foundation
Interior Space:
- 20 sq ft of floor space
- 10 sq ft poop board with integrated roost
Construction Details:
- Framing: 2"x3" wood frame
- Foundation: Raised 4"x4" and 2"x4" pressure-treated lumber for ground contact
- Siding: Reclaimed cedar fence pickets from the 1980s
- Roofing: Corrugated metal panels
- First Iteration: 52 sq ft fully enclosed run
- Second Iteration: 361 sq ft non-enclosed run
The Beginning
Our coop journey began in 2016 when my wife declared she wanted backyard chickens. Up until then, we had plenty of experience gardening in Colorado’s unpredictable climate, but chickens would be an entirely new challenge.
What We Knew Going In
- City regulations in Colorado Springs allow up to eight hens per household, no roosters permitted.
- The weather here is notoriously wild. High winds, extreme temperature swings, snow, hail, rain, and sunshine can all hit in the same day.
- Predators were a serious concern. We had to plan for hawks, eagles, owls, foxes, coyotes, raccoons, skunks, and even neighborhood cats. While unlikely, encounters with bears or mountain lions weren’t completely off the table on our side of town.
Just a few months before construction began, strong winds had taken down several sections of our aging privacy fence. The fence dated back to the home's original build in 1984, and the cedar pickets were far thicker than the flimsy ones sold at big box stores today, ranging from ½" to ¾" thick, with a beautifully weathered patina.
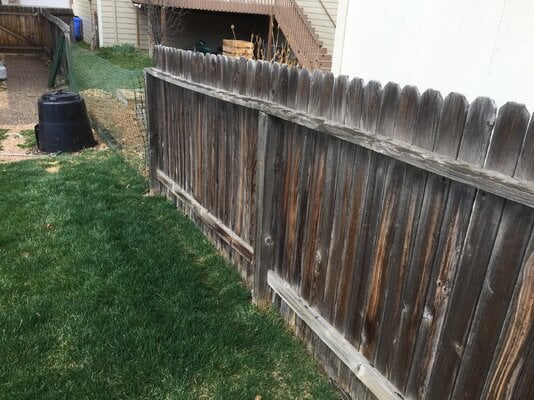
After cutting into a few of the downed boards, we found the core wood was still solid and usable. That sealed it, we were determined to salvage and repurpose the pickets in our coop build. We had already put some to good use in making planters, and the rest were destined to become part of our chicken fortress.

The Build Begins
After tossing around several ideas and sketching out a few rough concepts, we landed on a design that balanced function and footprint, a medium-sized coop with a slanted roof and a full-size door for easy access and cleaning. While we were starting with just three hens, we wanted to build with enough space and flexibility to expand the flock in the future.
With the plan in place, both cars were pulled out of the garage to make room for the build, and construction officially began in July 2016, starting with the raised foundation.

To keep ourselves motivated and on track, we picked up our first three chicks from the local farm store, Buff Orpingtons we initially planned to name after The Golden Girls. But as their personalities started to shine through, they quickly named themselves. Instead of Blanche, Dorothy, and Rose, we ended up with Tiny, Big Momma, and T-Rex.

Just one week into construction, Mother Nature delivered a harsh reminder of what it means to build in Colorado. A freak storm that had been brewing all day hit that evening with a vengeance, unleashing a brutal hailstorm. It destroyed our gardens, flattened the raised beds, dented the roof, gutters and siding, cracked windows, and, of course, totaled both of our cars, which were parked outside to free up the garage for coop construction.


After a pause in construction to clean up the hail damage, work on the coop had to resume, ready or not, the chicks were growing fast. Between dealing with the insurance company (not the most pleasant experience, horrible to deal with) and trying to coordinate with overwhelmed contractors, it quickly became clear we couldn’t wait for everything else to settle before getting back to the build.
With the raised foundation complete, framing began. We installed linoleum on the floor, easily one of our best decisions, and added a slanted poop board for easier cleanup. Next came the roof, built with a fluted design and topped with corrugated metal sheeting. The fluted structure not only provided durability but also created natural air gaps, which we hoped to insulate later to help with Colorado’s extreme temperatures. It also opened up the possibility for some creative roof ventilation, more on that later.



At the same time, we began prepping the area in the backyard where the coop would eventually sit, placing footer stones to help level the ground and support the raised foundation.
With the framing and roof completed, both sections were moved to the backyard. The roof was then securely mounted using high-strength screws, an essential step, knowing the structure would need to withstand Colorado’s relentless winds.
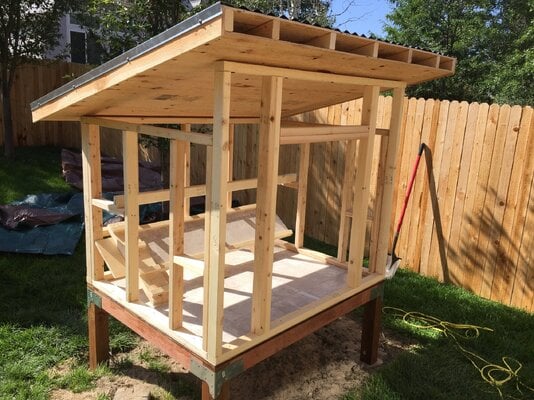
At this point, we realized the slanted poop board design wasn’t making the best use of space. We decided to scrap it, but chose to move forward with the rest of the build and revisit that detail later.
Plywood sheeting was then installed, and a two-bay, externally accessible nesting box was framed out, complete with linoleum flooring for easy cleaning, with a little "help" from the future inhabitants.


Knowing the reclaimed siding would leave some gaps, we decided to wrap the coop in roofing felt to protect the plywood sheeting underneath. Tyvek wasn’t cost-effective for the small amount we needed, so roofing felt served as a more economical alternative.

Next came the meticulous process of cutting and attaching the reclaimed fence pickets as siding. With the walls in place, we installed the main door, nesting box access door, pop door, and all the necessary hardware. Metal roofing was added to the nesting box for extra durability, and a new ladder was built to provide easy access through the pop door entrance.
Additional pieces of wood were later added inside the nesting box to help keep the straw and shavings in place when opening the access door, they’re just not visible in these photos.


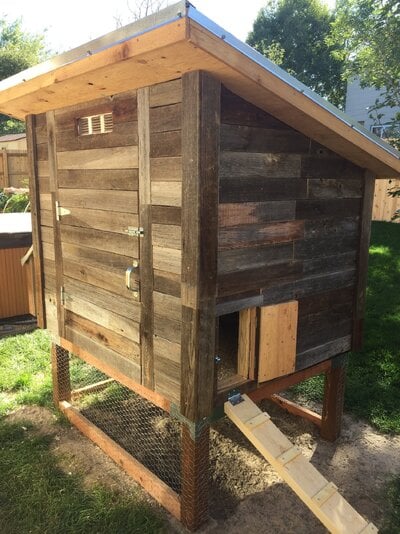
The original ventilation setup included a main vent above the main door that could be closed as needed. We also added two under-eave vents, which aligned with two of the fluted roof channels to promote upward airflow. Inside the coop, additional vents were installed above the roosting area to encourage circulation while avoiding direct drafts across where the hens sleep.

Chicken Run 1.0 and Roosting Area Upgrades
With the primary coop build finished, it was time to move on to the run and circle back to updating the poop board and nesting area.
The new wraparound run was framed using 1"x1" lumber, with 2"x4" pressure-treated boards for ground contact. Once the framing was complete, the entire structure was enclosed with chicken wire on all sides.
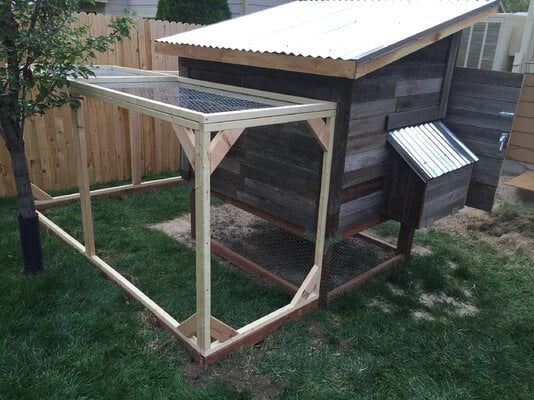

Electricity was run to the coop with a GFCI breaker for safety. For lighting, a lizard terrarium fixture was hung from the ceiling using an eye hook and carabiner, allowing for easy removal and cleaning as needed. Initially, we used 40-watt incandescent bulbs, but with the rise in LED options, we later switched to a 9-watt Edison-style LED bulb. It provides plenty of light and is much safer and more energy-efficient than the original incandescent setup.
The light is also connected to a timer, providing supplemental lighting to encourage laying when needed and also helping guide the hens into the coop at night. Once they're in, we close the pop door every evening without fail to protect them from predators.
The interior of the coop was insulated about three-quarters of the way up, primarily to block drafts around the nesting area and help regulate temperatures during Colorado’s unpredictable weather. We also implemented a new poop board design and installed a lower roost, better suited for our Buff Orpingtons. As larger birds, it’s important they aren’t jumping down from high roosts to avoid potential leg injuries.
The new poop board was built using pre-finished white board, which makes cleanup much easier. For some reason, we initially didn’t add pine shavings to the board, but once we gave it a try, we never looked back. In our setup, adding pine shavings has made cleanup significantly easier and more manageable.
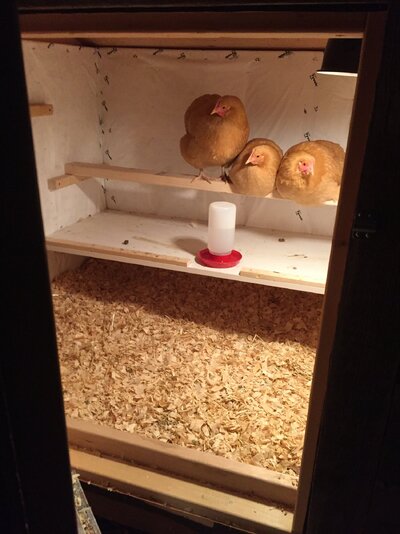
Over the years, our three Buff Orpingtons proved to be excellent layers, though we did lose T-Rex early on, most likely due to a genetic heart issue. In time, a few new members joined the flock. The coop’s construction, utility, and overall flexibility have held up wonderfully. We’re constantly making small tweaks and improvements to enhance functionality and make daily care easier for both hens and humans. One such addition was placing straw bales around the raised foundation to act as a wind block, giving the hens extra protection from the elements.
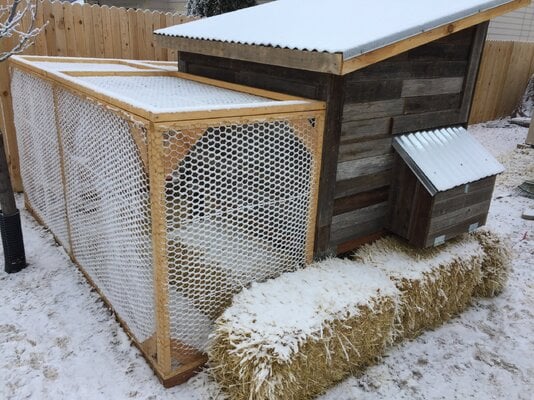
While our hens did use the run, they spent most of their time free-ranging throughout the backyard. We were fortunate to have dogs, cats, and chickens that all got along, and would often be found lounging or roaming together during the day. Our shepherd mix naturally took on the role of flock protector, keeping a watchful eye on his free-range hens. We're also fairly certain they all held secret meetings to plot against us humans.


The Passing of the Guard, Chicken Run 2.0 and Ventilation Upgrades
As with all living things, time moves on. Our shepherd mix, Murphy, had begun to show his age, and we knew it was time to bring a new pup into the mix while he was still with us, so the newcomer could learn the ways under his gentle guidance.
Enter the Corgi-Beast.

Murph did his best to teach the little one the ways of the chicken watcher. But anyone who’s spent time around a Corgi knows, they’re relentless herding machines and four-legged vacuum cleaners. Unfortunately, that herding instinct proved too intense for the flock, and the constant snacking on chicken poop quickly became a nasty habit.
Something had to change.


In April of 2021, the old wraparound run was removed, and construction of Chicken Run 2.0 officially began. The new design would provide the flock with ample space to roam, while also keeping the Corgi-Beast out of trouble.


With the new run completed, we added enrichment to keep the hens active and engaged. Wood piles, a cinder block and 2x4 roost, a kiddie pool for dust bathing, the occasional bale of straw, and various obstacles provided plenty of stimulation. These elements continue to evolve, with new additions rotated in regularly. Not only does it keep the flock busy throughout the day, but it also makes introducing new members much easier.
We’ve also added multiple water and feed stations, designed for quick swaps using ropes to lift them over the fence, saving us from having to enter the run every time.

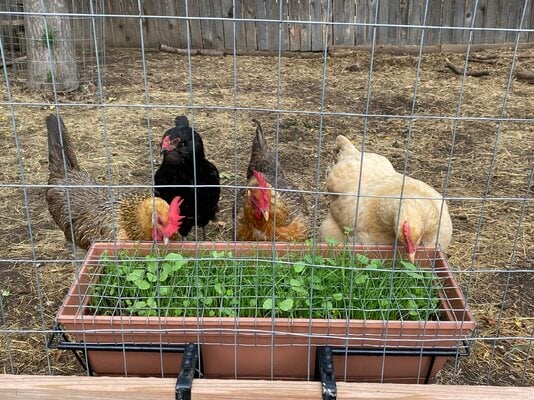
We also introduced a new poop board design and added extra ventilation, key upgrades that allow us to safely maximize our flock size (because, well… egg prices and growing demand from friends and family). The updated design also supports lower roosts, which are especially helpful for our older or larger hens.

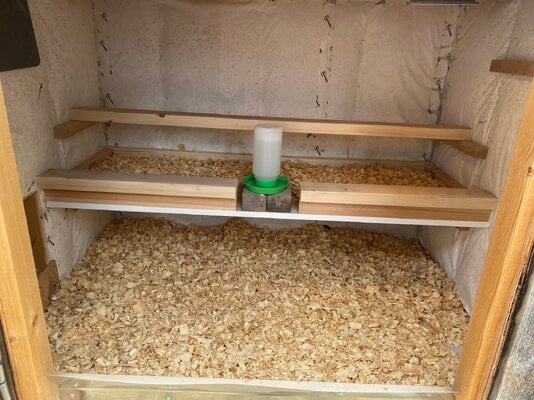


Tiny, one of the original Buff Orpingtons and head hen, is still going strong at 9 years old. These days, she needs a little help getting up and down from the roost, so we’ve added stacked paver stepping stones in a few places to make her daily routine a bit easier.

Our most recent update was finally enclosing the raised foundation with corrugated metal, eliminating the need for straw bales as a wind block. On the south-facing side, we used clear corrugated plastic to let in sunlight, providing both warmth and natural light beneath the coop when the flock is hunkered down during rough weather.
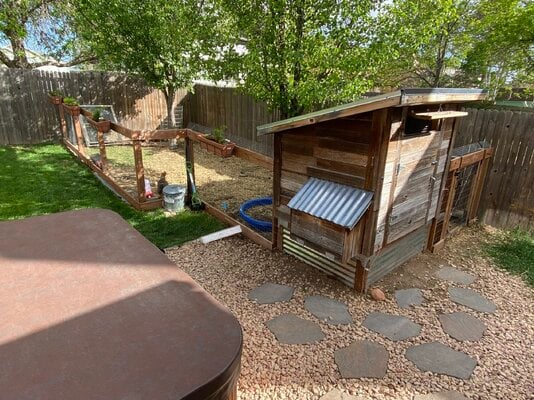
This summer, we plan to reduce more of the lawn and add a stone path along the full length of the run for easier access and maintenance. We’re also planning to add a small storage area for chicken supplies in the inset portion of the run.
We recently welcomed some new members to the flock. Thanks to the thoughtful run design and the strategic placement of kennel fencing and other obstacles, introducing the pullets has been smoother than ever. The layout provides escape routes and features separate feed and water stations that the larger hens can’t access, reducing stress and minimizing competition. So far, it’s been our easiest and most successful flock integration to date.

A 2x6 board was added beneath the poop board inside the coop to offer the new pullets, and one cockerel, until he’s rehomed, a protected space and lower roosting option while they acclimate to the rest of the flock. For the past two nights, everyone has slept on the main roost together.

And there you have it, the epic journey of our ever-evolving Colorado BurbCoop. It’s hard to believe it’s been nine years, and writing this has been a nostalgic trip down memory lane. My wife and I often sit out on the back deck in the mornings with our coffee, reminiscing about the wild ride this little coop has taken us on.
We look back fondly on all the flock members and friends who’ve come and gone, and we’re grateful for those still with us. It’s been a journey full of trials, tribulations, frustrations, and plenty of joyful, hard-earned successes along the way.
Oh, and as for the Corgi-Beast, he’s all grown up now and has a new buddy to pal around with. He still tries to herd the chickens every chance he gets.
Final Thoughts for New Chicken Owners
Raising backyard chickens is a rewarding experience, but it definitely comes with its share of learning curves. If you're just getting started, here are a few pieces of advice we’ve picked up over the years:
- Build for the future. Start with a coop that’s bigger than you think you'll need. Chickens are addictive, and chances are you'll want to expand your flock.
- Prioritize ventilation and predator-proofing. Good airflow is essential for a healthy flock, and a secure coop and run can save you a lot of heartache. In our case, we chose not to fully predator-proof the later run, in favor of access to free-range, a conscious decision. Instead, we focused on making the coop itself as secure as possible, especially against the heavy pressure from nighttime predators in our area. We make it a point to lock up the flock every evening without fail.
- Keep it simple, but smart. Thoughtful design choices, like easy-clean surfaces, external nesting box access, multiple feeding stations, and improved, purpose driven use of space, will save you time and hassle every single day. And don’t overlook the value of reclaimed materials, even for the simplest additions. Whether it’s a scrap of wood turned into a roost, an old fence board repurposed as siding, bricks used as stepping stones, or an old window leaned up against the fence, thoughtful reuse can add character, function, and savings to your setup.
- Expect to adapt. Your chickens, your climate, and your routine will all change over time. Stay flexible, make improvements as you go, and don’t be afraid to try new things.
- Enjoy the process. Chickens have big personalities and small demands. Spend time with them. Laugh at their antics. And know that a peaceful morning with coffee and a content flock scratching in the run is one of life’s simplest pleasures.

