Am just getting back into keeping a backyard flock after 25 years. I live in a nice neighborhood in a small town that's not particularly poultry friendly. Property is 1/3 acre, but not fenced. So, my challenge is to come up with a coop and run that is functional, doesn't scream "I'm a chicken coop," and do it all on a shoestring budget. I found several members here at BYC who had converted Little Tykes playhouses. That looked like just the ticket for me so I bought one on Craigslist for $75, a roll of 1/2" hardware cloth for $16, $12.00 in misc. hardware (flat metal braces and a box of washers), and a bunch of free lumber scavenged from pallets in the bone yard where my DH works. Decided I'd start a thread detailing my playhouse to coop conversion and a run made from mostly recycled materials - partly for bragging rights and partly to chronicle the process for the next newbie needing some ideas on an inexpensive (and cute) coop and run for themselves.
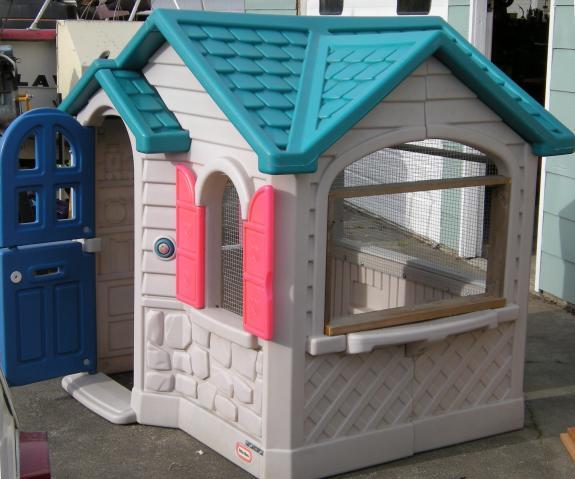
Here's the Little Tykes playhouse I bought. Not sure what model this is, but it's larger than a few I'd looked at. This one is about 4'x5' (outside dimension). Notice the flat metal brackets near the four corners. I added these for structural strength and so the coop can be moved without it coming apart. For those who don't know, these playhouses are meant to be quick assembly/quick knock-down. You'll need to add the bracing and some additional screws to the roof so that it won't fall apart in the first big wind.

This model has 2 small arched windows with hot pick shutters and two very large arched windows without shutters. I will be hanging an exterior nest box on one of those larger windows. The other will only be screened until foul weather, when I'll add a plexiglass covering.
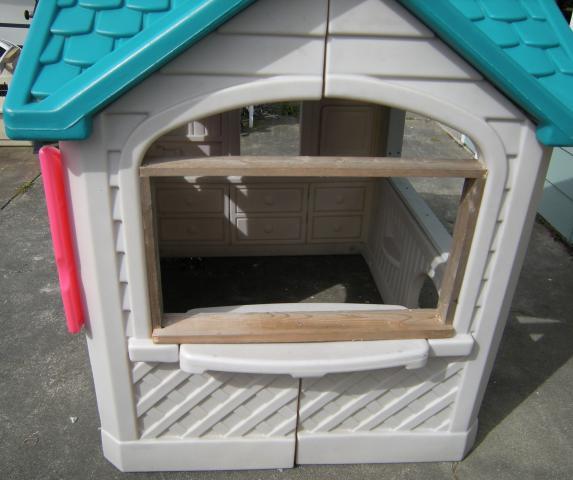
This photo shows the nest box window with basic wood framing. Once the box is built, it will be attached to the wood frame with screws and I'll probably add a bracket to the bottom for some additional support. Since it will likely be late summer before the ladies will need to nest, I'll cover this opening with hardware cloth now and add the nest box later.
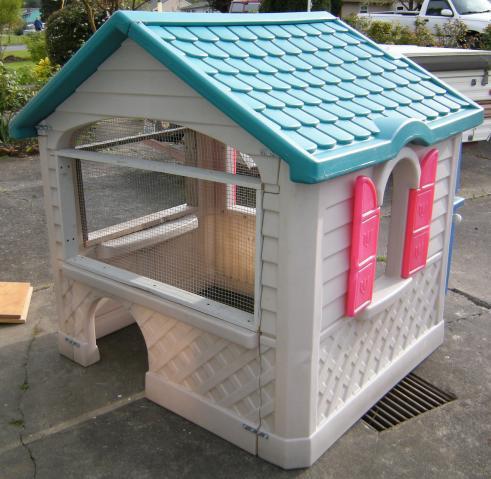
This next photo shows the back side of the coop which will butt up to run. Notice the fortuitous little arched opening at ground level. It seems perfectly suited for a pop door, doesn't it? It will be temporarily screened, however, so the ladies can spend some time out in their new digs while I'm working on the run in Phase II of this project. That big window will get the addition of a rectangular plexiglass window in addition to the screen - hence the wood framing. The arch at the top will remain open for good ventilation. If the weather turns really bitter next winter, I'll add some sort of temporary cover.
For the benefit of the newbies with questions on how to secure hardware cloth inside the coop, this is a photo of one of the small shuttered windows. I used the screws with a small rubber washer that were leftover from my greenhouse project. There are meant to secure the corrugated fiberglass roofing. I added a larger metal washer so it can't pull through the 1/2" openings on the hardware cloth.
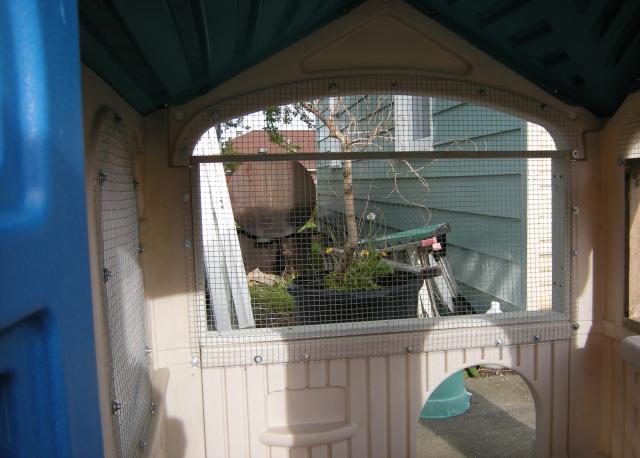
Here's an interior shot showing most of the hardware cloth installed. This is looking through the window that will look out to the run. The pop door will be in the opening at the bottom right.
Last photo is an exterior shot showing most of the wire installed. At a distance, it still looks pretty much like a kid's playhouse - which is what I'm shooting for.
This is as far as I got in about 4 hours of no rain here in the Pacific Northwest. I'll update this thread as the project progresses. Hope you find it interesting, if not informative.
My project cost so far: $103.00
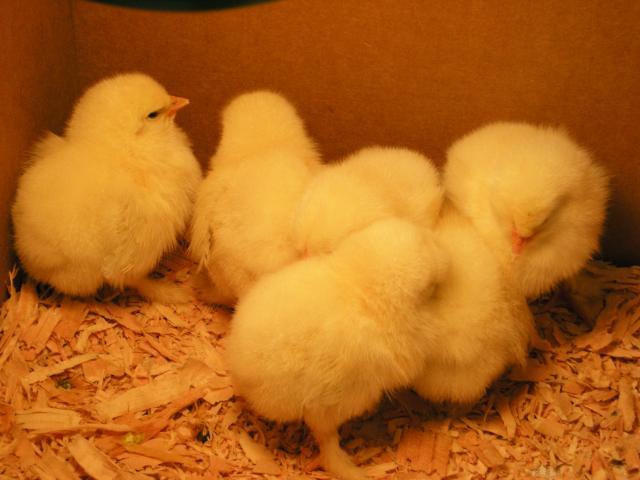
I would be remiss if I didn't post one last photo...these are my sweet little girls at 2 days old (now 3 1/2 wks)...6 Light Brahmas. No names yet. Until they feather out, I can't tell them apart.
Here's the Little Tykes playhouse I bought. Not sure what model this is, but it's larger than a few I'd looked at. This one is about 4'x5' (outside dimension). Notice the flat metal brackets near the four corners. I added these for structural strength and so the coop can be moved without it coming apart. For those who don't know, these playhouses are meant to be quick assembly/quick knock-down. You'll need to add the bracing and some additional screws to the roof so that it won't fall apart in the first big wind.
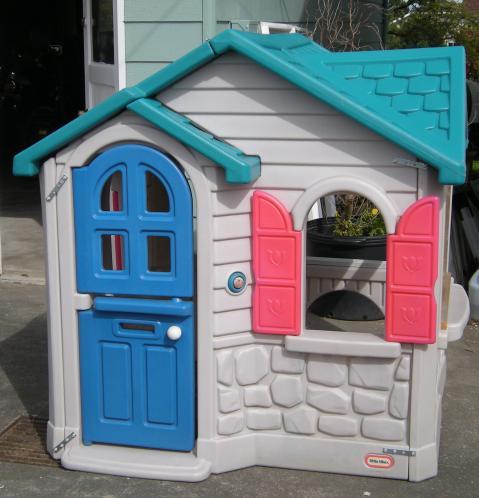
This model has 2 small arched windows with hot pick shutters and two very large arched windows without shutters. I will be hanging an exterior nest box on one of those larger windows. The other will only be screened until foul weather, when I'll add a plexiglass covering.
This photo shows the nest box window with basic wood framing. Once the box is built, it will be attached to the wood frame with screws and I'll probably add a bracket to the bottom for some additional support. Since it will likely be late summer before the ladies will need to nest, I'll cover this opening with hardware cloth now and add the nest box later.
This next photo shows the back side of the coop which will butt up to run. Notice the fortuitous little arched opening at ground level. It seems perfectly suited for a pop door, doesn't it? It will be temporarily screened, however, so the ladies can spend some time out in their new digs while I'm working on the run in Phase II of this project. That big window will get the addition of a rectangular plexiglass window in addition to the screen - hence the wood framing. The arch at the top will remain open for good ventilation. If the weather turns really bitter next winter, I'll add some sort of temporary cover.
For the benefit of the newbies with questions on how to secure hardware cloth inside the coop, this is a photo of one of the small shuttered windows. I used the screws with a small rubber washer that were leftover from my greenhouse project. There are meant to secure the corrugated fiberglass roofing. I added a larger metal washer so it can't pull through the 1/2" openings on the hardware cloth.
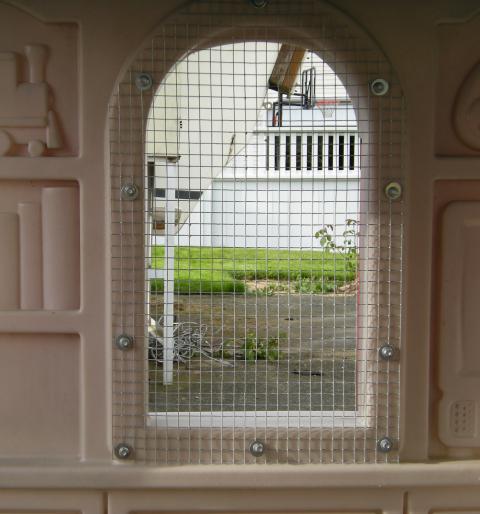
Here's an interior shot showing most of the hardware cloth installed. This is looking through the window that will look out to the run. The pop door will be in the opening at the bottom right.
Last photo is an exterior shot showing most of the wire installed. At a distance, it still looks pretty much like a kid's playhouse - which is what I'm shooting for.
This is as far as I got in about 4 hours of no rain here in the Pacific Northwest. I'll update this thread as the project progresses. Hope you find it interesting, if not informative.
My project cost so far: $103.00
I would be remiss if I didn't post one last photo...these are my sweet little girls at 2 days old (now 3 1/2 wks)...6 Light Brahmas. No names yet. Until they feather out, I can't tell them apart.


Last edited:


