- Sep 24, 2011
- 9
- 0
- 7
Hey everyone,
This post might seem long winded and a little much but I wanted to share my experience with making a DIY incubator. There are a few problems I ran into that can easily be fixed. Almost everyones problem when it comes to making a DIY incubator is keeping the temperature swings down. A normal water heater thermostat is what is available mostly locally, so thats what I used. I purchased mine from Home Depot and it initially had a 10 degree temperature swing! Read below and you will see how to completely eliminate that.
Supplies:
-18 Gallon Rubbermaid tote- I used a "roughneck" tote. It was a little thicker and stronger.
-Lower water heater thermostat- I asked 3 people at Home Depot and they all said they don't sell them. I walked to the water heater section and there were not one but TWO different types. ($8.99)
-Microfiber blanket- This is for the insulation, anything you have around the house will work for this.
-Light socket- A few dollars at a hardware store.
-Computer fan- Mine had 3 wires (red,black,and yellow), only wire up the red and black wires to your old cell phone charger. Tape up the yellow it is not needed.
-12 v power supply- This is for the fan, an old cell phone charger works great. If you do not have one, Goodwill has TONS of old chargers for really cheap.
-40 watt light bulb- I found that the 40 watt bulb did the same thing as a 90 watt bulb, why not save energy?
-Cheap home extension cord- This is what the light/thermostat will wire into. (The red in the picture)
-8 x 10 picture frame w/glass- Any size will work, I just like the large viewing window.
-Duct tape
Tools:
-Drill
-1/8 inch drill bit
-Sharp Knife
-Scissors
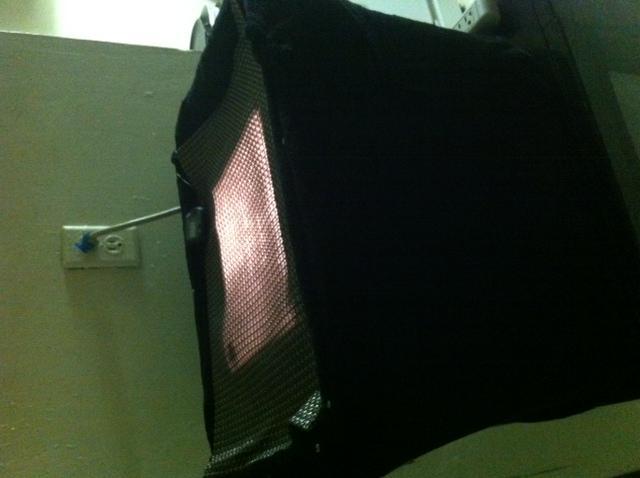
Step 1: PREP TOTE
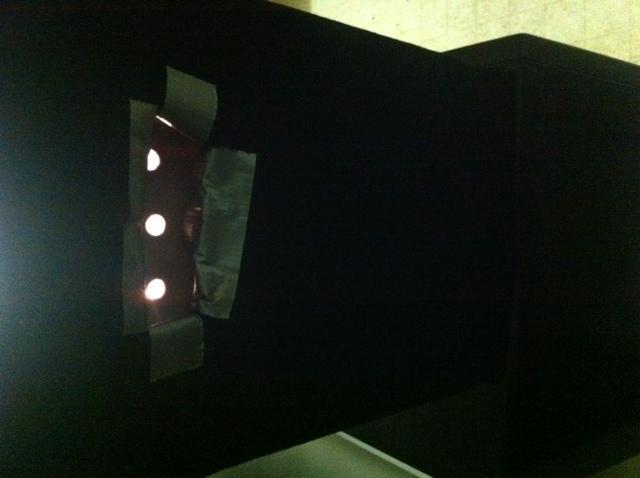
With your knife (or a large drill bit), make a hole that the light socket can tightly fit in, also make three holes or so for the ventilation. (Pictures) You will also need a hole for the fan wiring to come out, and the thermostat wires. Doesn't really matter where it is. Just make one somewhere. I have all the wiring going to the back and nicely taped up. Now cut a 8 x 10 hole in the middle of the lid. I used a knife for this and it worked fine. Place the picture frame with glass upside down so the glass doesn't fall down and secure it very well with duct tape. I have a small aquarium suction cup in the corner of the glass, when I want to access the bator I just pull up on the suction cup and out comes the glass! Now tape around the entire edge securing the tote lid permanently. This helps keep it sealed. The only way to get into the bator is through the glass. Another reason why I went with an 8 x 10, easy access.
Step 2: INSULATION
I used a micro fiber blanket I had laying around the house, anything like a towel or warm fabric would work. As you can see in the photos I used small screws to secure it to the top. I then pulled it tight and duct taped it to the bottom. You can cut holes for the wiring to fit out, also as seen in the photos cut a rectangle to allow your vent holes to escape air.
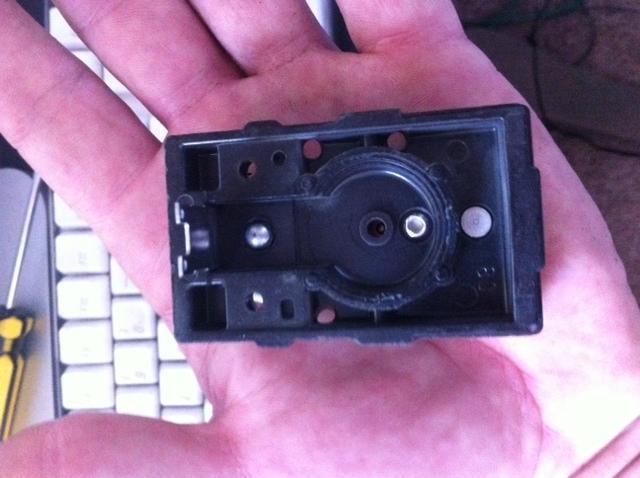
Step 3: THERMOSTAT MODIFICATION & WIRE THERMOSTAT,LIGHT AND FAN.
The thermostat modification is a MUST if you do not want to have 6-10 degree temperature swings. I tried it for a week without the modification and the temperature swings were horrible. This modification is VERY simple, don't be afraid because the thermostat is stronger and more simple than you probably might think. As seen in the photos you just pull back the temperature sticker and you will see where there are 2 rivets. These 2 rivets are the only thing holding on the back plate. Take a 1/8 inch drill bit and slowly drill each one. They will pop out the back side and you can pull them out. Do this carefully and set the back plate aside. There are only 3 parts that operate inside the thermostat. They are the metal disk(what heats up and expands), the plunger(short 1/2 inch or so little stick), and the metal thing that the disk pushes down when it expands. The pictures are pretty self explanatory but just drill 3 holes with your 1/8 inch drill bit where I did and thats it! What this does is because the fan is pointed on the side the holes are, it allows the air to get to the metal disk much faster which in turn cools it down. I went from 6-10 degree temperature swings to .2-.3 degree temperature swings! When putting the back plate back on make sure the metal disk is lined up properly. Its not to hard, it will fit together like a glove if its centered right. I just used 2 small nuts/bolts where the 2 rivets were to secure it back nice and tight. If you have a rivet gun you could just put new rivets back in.
See diagram below, this is a very simple process. To mount the thermostat and fan I just took an aluminum can and cut it to make some what of a tin rectangle (doubled for thickness) I then just screwed the thermostat onto it and cut a slit in the wall of the rubbermaid to slide it into. Its actually pretty solid and there is no way it can fall. You want to have the thermostat mounted about 2-3 fingers away with the metal side facing the light. The farther away it is the harder it is for the heat from the bulb to heat up the metal disk in the thermostat. When mounting everything make sure if possible to have the fan blowing on the plastic side of the thermostat. I tried the other side and it didn't work as well. The reason being is because the air from the fan blows directly into those 3 holes you just drilled and cools down the disk much faster.
Ok, now you have everything wired up and in place. One more problem I came across was the good ol thermometer! There is a lot of controversy about which one is best. Well I couldn't take it so I had 5 thermometers just to make sure it was right! I had a reptile digital thermometer (1.5 degree variance), a corallife aquatic digital thermometer, an tech toyz digital thermometer, a normal outdoor bulb thermometer, and a meat thermometer! I think the most accurate one is the reptile one, but they are all pretty close.
Hopefully this helps people who are having problems with their own DIY incubator, or someone who wants some answers! You could implement this design into anything really. You wouldn't have to use a rubbermaid, just showing everyone how I did it. It worked for me, and I have virtually NO temp swings. HAPPY INCUBATING! If anyone has any questions, just ask.
*I will be working on something for an automatic egg turner/semi automatic egg turner. Just have not gotten around to that yet.
**The thing on top of the lid in the picture is just a table place mat, I did that to hide the brightness of the light. It wasn't even really that bad, just threw it on there.
***Sorry for the pictures, not sure why they flipped like that when I uploaded....


This post might seem long winded and a little much but I wanted to share my experience with making a DIY incubator. There are a few problems I ran into that can easily be fixed. Almost everyones problem when it comes to making a DIY incubator is keeping the temperature swings down. A normal water heater thermostat is what is available mostly locally, so thats what I used. I purchased mine from Home Depot and it initially had a 10 degree temperature swing! Read below and you will see how to completely eliminate that.
Supplies:
-18 Gallon Rubbermaid tote- I used a "roughneck" tote. It was a little thicker and stronger.
-Lower water heater thermostat- I asked 3 people at Home Depot and they all said they don't sell them. I walked to the water heater section and there were not one but TWO different types. ($8.99)
-Microfiber blanket- This is for the insulation, anything you have around the house will work for this.
-Light socket- A few dollars at a hardware store.
-Computer fan- Mine had 3 wires (red,black,and yellow), only wire up the red and black wires to your old cell phone charger. Tape up the yellow it is not needed.
-12 v power supply- This is for the fan, an old cell phone charger works great. If you do not have one, Goodwill has TONS of old chargers for really cheap.
-40 watt light bulb- I found that the 40 watt bulb did the same thing as a 90 watt bulb, why not save energy?
-Cheap home extension cord- This is what the light/thermostat will wire into. (The red in the picture)
-8 x 10 picture frame w/glass- Any size will work, I just like the large viewing window.
-Duct tape
Tools:
-Drill
-1/8 inch drill bit
-Sharp Knife
-Scissors
Step 1: PREP TOTE
With your knife (or a large drill bit), make a hole that the light socket can tightly fit in, also make three holes or so for the ventilation. (Pictures) You will also need a hole for the fan wiring to come out, and the thermostat wires. Doesn't really matter where it is. Just make one somewhere. I have all the wiring going to the back and nicely taped up. Now cut a 8 x 10 hole in the middle of the lid. I used a knife for this and it worked fine. Place the picture frame with glass upside down so the glass doesn't fall down and secure it very well with duct tape. I have a small aquarium suction cup in the corner of the glass, when I want to access the bator I just pull up on the suction cup and out comes the glass! Now tape around the entire edge securing the tote lid permanently. This helps keep it sealed. The only way to get into the bator is through the glass. Another reason why I went with an 8 x 10, easy access.
Step 2: INSULATION
I used a micro fiber blanket I had laying around the house, anything like a towel or warm fabric would work. As you can see in the photos I used small screws to secure it to the top. I then pulled it tight and duct taped it to the bottom. You can cut holes for the wiring to fit out, also as seen in the photos cut a rectangle to allow your vent holes to escape air.
Step 3: THERMOSTAT MODIFICATION & WIRE THERMOSTAT,LIGHT AND FAN.
The thermostat modification is a MUST if you do not want to have 6-10 degree temperature swings. I tried it for a week without the modification and the temperature swings were horrible. This modification is VERY simple, don't be afraid because the thermostat is stronger and more simple than you probably might think. As seen in the photos you just pull back the temperature sticker and you will see where there are 2 rivets. These 2 rivets are the only thing holding on the back plate. Take a 1/8 inch drill bit and slowly drill each one. They will pop out the back side and you can pull them out. Do this carefully and set the back plate aside. There are only 3 parts that operate inside the thermostat. They are the metal disk(what heats up and expands), the plunger(short 1/2 inch or so little stick), and the metal thing that the disk pushes down when it expands. The pictures are pretty self explanatory but just drill 3 holes with your 1/8 inch drill bit where I did and thats it! What this does is because the fan is pointed on the side the holes are, it allows the air to get to the metal disk much faster which in turn cools it down. I went from 6-10 degree temperature swings to .2-.3 degree temperature swings! When putting the back plate back on make sure the metal disk is lined up properly. Its not to hard, it will fit together like a glove if its centered right. I just used 2 small nuts/bolts where the 2 rivets were to secure it back nice and tight. If you have a rivet gun you could just put new rivets back in.
See diagram below, this is a very simple process. To mount the thermostat and fan I just took an aluminum can and cut it to make some what of a tin rectangle (doubled for thickness) I then just screwed the thermostat onto it and cut a slit in the wall of the rubbermaid to slide it into. Its actually pretty solid and there is no way it can fall. You want to have the thermostat mounted about 2-3 fingers away with the metal side facing the light. The farther away it is the harder it is for the heat from the bulb to heat up the metal disk in the thermostat. When mounting everything make sure if possible to have the fan blowing on the plastic side of the thermostat. I tried the other side and it didn't work as well. The reason being is because the air from the fan blows directly into those 3 holes you just drilled and cools down the disk much faster.
Ok, now you have everything wired up and in place. One more problem I came across was the good ol thermometer! There is a lot of controversy about which one is best. Well I couldn't take it so I had 5 thermometers just to make sure it was right! I had a reptile digital thermometer (1.5 degree variance), a corallife aquatic digital thermometer, an tech toyz digital thermometer, a normal outdoor bulb thermometer, and a meat thermometer! I think the most accurate one is the reptile one, but they are all pretty close.
Hopefully this helps people who are having problems with their own DIY incubator, or someone who wants some answers! You could implement this design into anything really. You wouldn't have to use a rubbermaid, just showing everyone how I did it. It worked for me, and I have virtually NO temp swings. HAPPY INCUBATING! If anyone has any questions, just ask.
*I will be working on something for an automatic egg turner/semi automatic egg turner. Just have not gotten around to that yet.
**The thing on top of the lid in the picture is just a table place mat, I did that to hide the brightness of the light. It wasn't even really that bad, just threw it on there.
***Sorry for the pictures, not sure why they flipped like that when I uploaded....
Last edited:

