• giveaway ENDS SOON! Cutest Baby Fowl Photo Contest: Win a Brinsea Maxi 24 EX Connect CLICK HERE!

Help understanding a pattern?! (Done)

vfem

Yoga...The Chicken Pose
11 Years
Aug 4, 2008
7,324
30
264
Fuquay Varina, NC
I thought I got this, but I guess some terms are not making sense to me as simple as it seems. I feel like a dope. I've sewn 3 that all came out wrong.

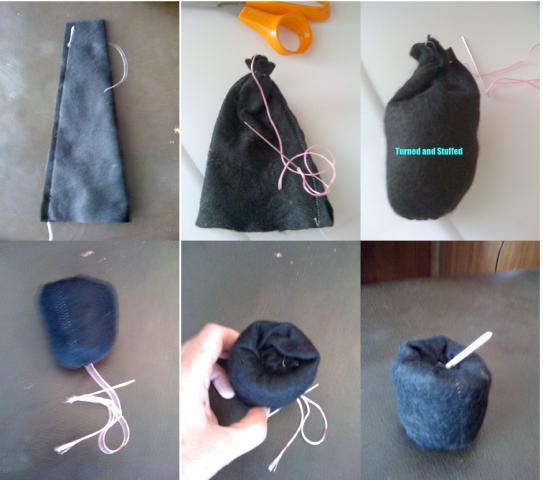
This first one, I folded the side it said to fold and did my 1/4" allowance.
apple_pattern.jpg


You can see where it says fold on that right side. (Forget about the leaf, I understand that, no big deal)
apple_pattern2.jpg


Now when it says gather botton raw edge?! What does that mean. I don't understand if bottom is the folded edge to the bottom left of where I stitched or not? How am I to 'gather' it? And last I checked, that bottom edge was already closed?
apple_pattern3.jpg
 
Last edited:
I'm confused too, you only use one of the half rectangle looking things and fold it in half, but how? It looks like you are then gonna sew 2 sides together, that should make a weird tube? then you gather the bottom and sew together and turn it right side out, I guess when you gather the bottom, you do it like you would a bag with a twist tie? Are you supposed to use more than one fabric to get the quilted look?
 
Hold the apple piece in front of you. Put the short part at the top, long part at the bottom, (like a traffic cone) now fold the fabric left to right (right sides together), not up or down...

Sew the long side, leave the top and bottom open. The short side is the bottom of the apple! Hand gather and sew the short side, now turn right side out. Stuff, now hand gather the wide side (which is now at the top), don't cut the thread, pull the thread through the middle to the bottom making the top of the apple where the stem is. Tie the thread off at the bottom.

Then do the stick and leaf.
 
Sounds like a BUTTERICK pattern to me--NEVER use that brand--hate 'em, 'cause they assume you understand steps that are left OUT....then they leave THOSE steps out!! This is what these instructions have done to you.

What I see is a page with 2, Separate, pattern pieces
(1) apple--the squarish, rounded edge pattern piece
(2) the "eye-shaped" piece for the apple's LEAF

You have (inadvertantly) cut an apple colored piece of fabric using the Leaf pattern. I DON'T like their instructions--here's what I'd do.

For the Leaf(ves):
1) Trace pattern
2) Cut two eye-shaped pieces of fabric (for each leaf)
3) Hand stitch DART, as shown in the picture
4) Sew the 2 pieces together, by machine, leaving about an inch open to put in stuffing
5) Stuff with batting or, fabric scraps, or, even rags
6) Hand stitch opening closed
7) Repeat above to make second leaf
**Do not gather the leaf--MY apple trees do NOT have rippled leaves at the stems, so your fabric apples don't have to have it either!!
For the Apple:
1) Fold and iron fabric
2) Trace pattern 2 times on fabric, putting fold line on the fold of the fabric
3) Cut
4) Begin at bottom of apple, pin and machine stitch two pieces together. This is approximately a 215 degree angle (It MIGHT help if you stitch one line straight, finish, then stitch the other straight line.) Leave BOTTOM OPEN
5) Stuff
6) Hand stitch bottom closed

to FINISH:
Attach leaves by hand sewing


FYI:
1) Surge edges, if desired
2) Use a crayon or fabric pencil (dark for light fabric, light for dark fabric) and pin pattern to fabric, then trace.

(This way you won't destroy the pattern.)

I used to sew a lot more, BUT, my DD's (especially one of them) creates fantasy costumes for Anime conventions. She constantly reworks patterns to make them look right and has learned through doing.

HOPE THIS HELPS!!
hugs.gif
 
I think you cut one piece of "apple" fabric, putting the side that says "fold" on the folded edge of fabric. Then with the cut apple piece folded right sides together, you'll sew the side opposite that "fold" side (the sorta curved side). Then gather the open bottom end. Turn inside out and stuff, then gather the top open end to close it. Cute pattern. And if it seem too big for a pin cushion in its original size, it will be easy to downsize. Like your idea for the gifts, by the way.

Edit: Insider, you posted while I was typing. Looks great!
 
Last edited:
Ok, I am following Terrie's example. So far it feels the closest to looking right. (I'm holding the fabric now!)

I've been running some test scraps to get it right before I do the officaly ones that will be gifts!

I definitely don't see these coming out as pretty as they are in the magazine.

Its the June/July 4th of July PLUM addition this was in. I photo copied the page so I could cut out the pattern. I should have taken pictures of it in color in the mag, since it is gorgeous!!!!
 

New posts New threads Active threads

Back
Top Bottom