- Aug 7, 2010
- 913
- 36
- 278
Last night I finished revising my article on how to build an effective and easy to use homemade incubator, along with a basic guide on how to incubate eggs! Enjoy!

Full Article: https://www.backyardchickens.com/a/how-to-build-a-homemade-incubator-griffin-nest
How to: Build a Homemade Incubator
I've seen some cool designs for homemade incubators all over the internet, but some of them seem so hard to make! My incubator is a cheap, easy to make, and most importantly, EFFECTIVE way to make an homemade incubator!
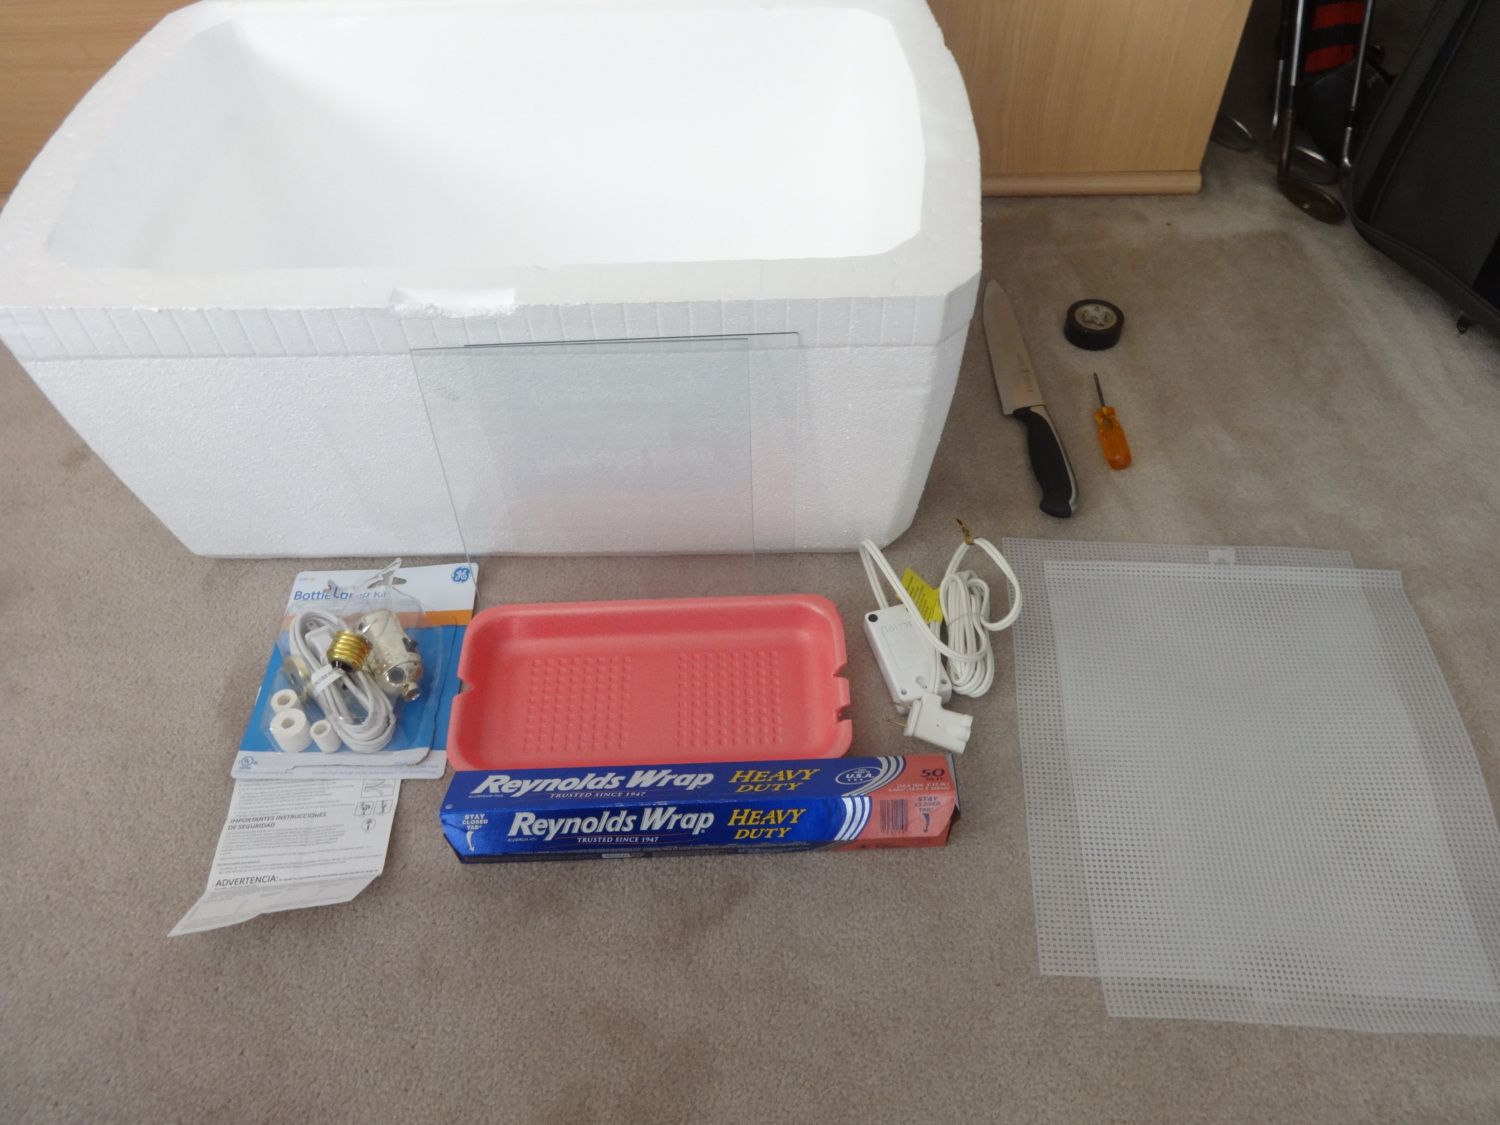 Supplies:
Knife (Be CAREFUL)
Screwdriver
Electric Tape
Full Article: https://www.backyardchickens.com/a/how-to-build-a-homemade-incubator-griffin-nest
How to: Build a Homemade Incubator
I've seen some cool designs for homemade incubators all over the internet, but some of them seem so hard to make! My incubator is a cheap, easy to make, and most importantly, EFFECTIVE way to make an homemade incubator!
Styrofoam Cooler
2 Plastic Picture Frames (same size each)
Light Fixture Kit
Aluminum Foil
A shallow tray
Plastic Mesh (Easy to find in crafting stores)
Light Dimmer Switch (IMPORTANT)
Tools:2 Plastic Picture Frames (same size each)
Light Fixture Kit
Aluminum Foil
A shallow tray
Plastic Mesh (Easy to find in crafting stores)
Light Dimmer Switch (IMPORTANT)
Knife (Be CAREFUL)
Screwdriver
Electric Tape
It is VERY important to plan out your incubator first to avoid any unnecessary holes and cuts!
In general, you will need:
One or two venting holes for air
A water dish for humidity
A heat source
A heat regulator
Something to block direct heat/light from hitting the eggs
Window (Optional)
Step 1: Window
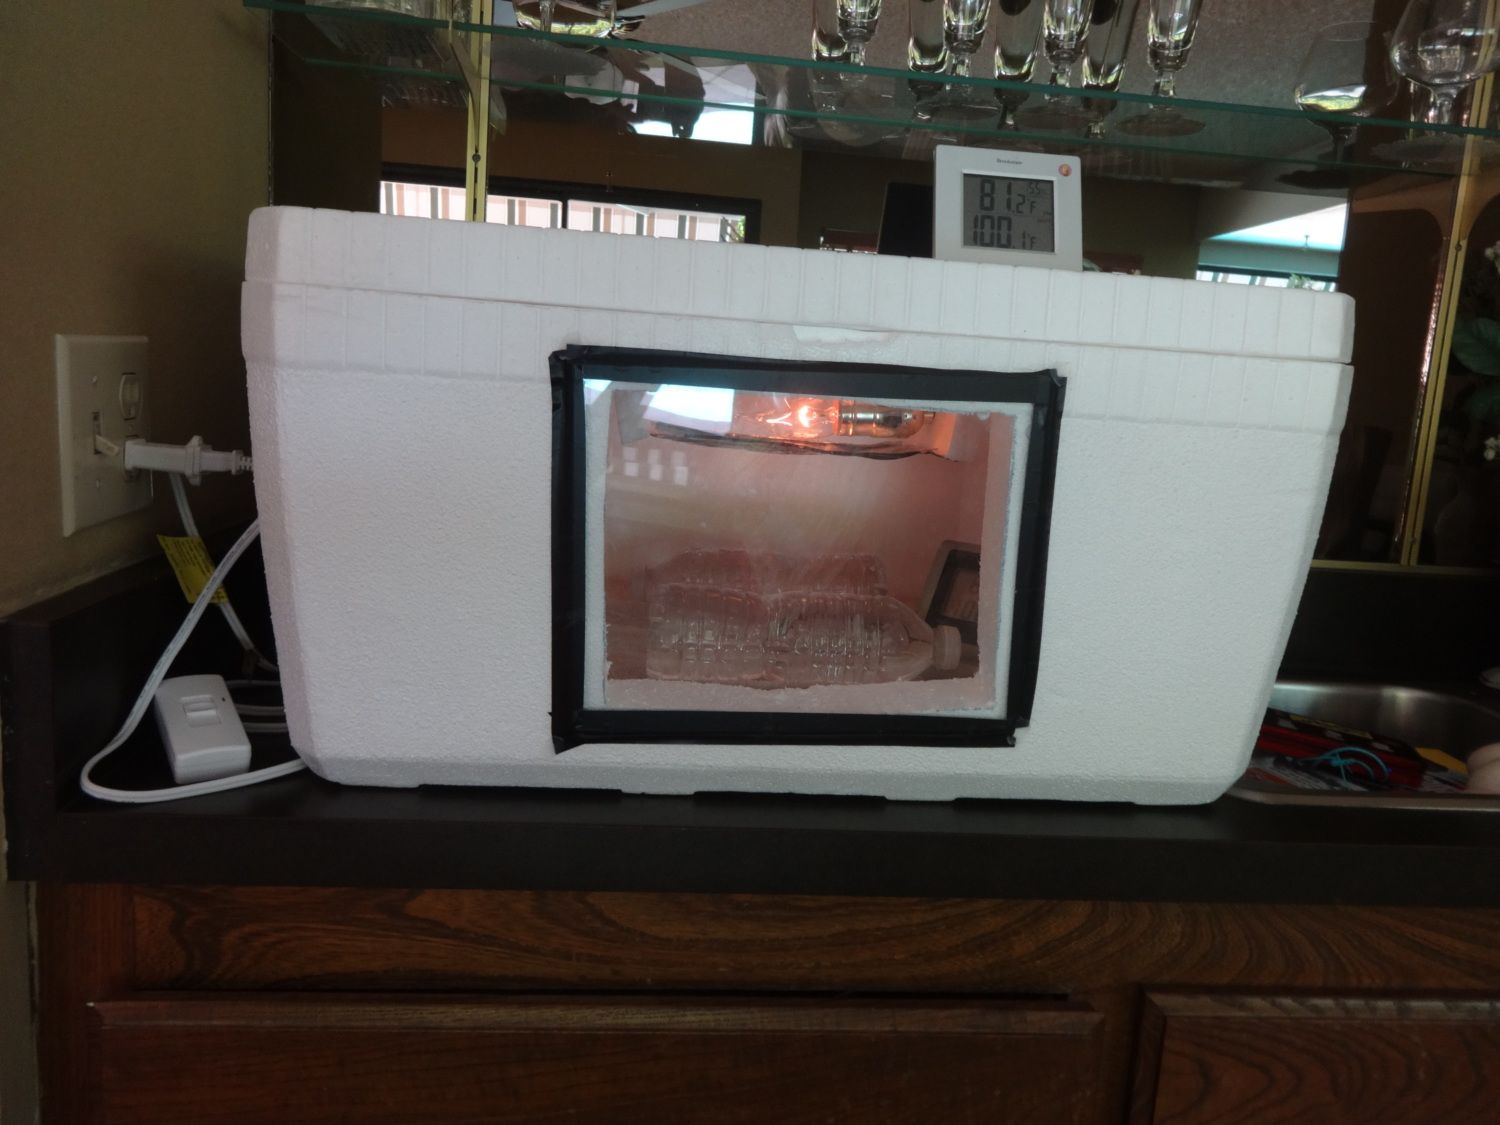
I chose to do the window first because it's the biggest cut you will have to make. First, draw where you want your window to be. Make sure to have the hole slightly smaller than your actual frame so you have room to tape it on. Then, with tape (I would choose duct tape) attach one frame to one side and the other frame to the back. This way, heat isn't lost and you don't have to worry. Also, this is the messy part!
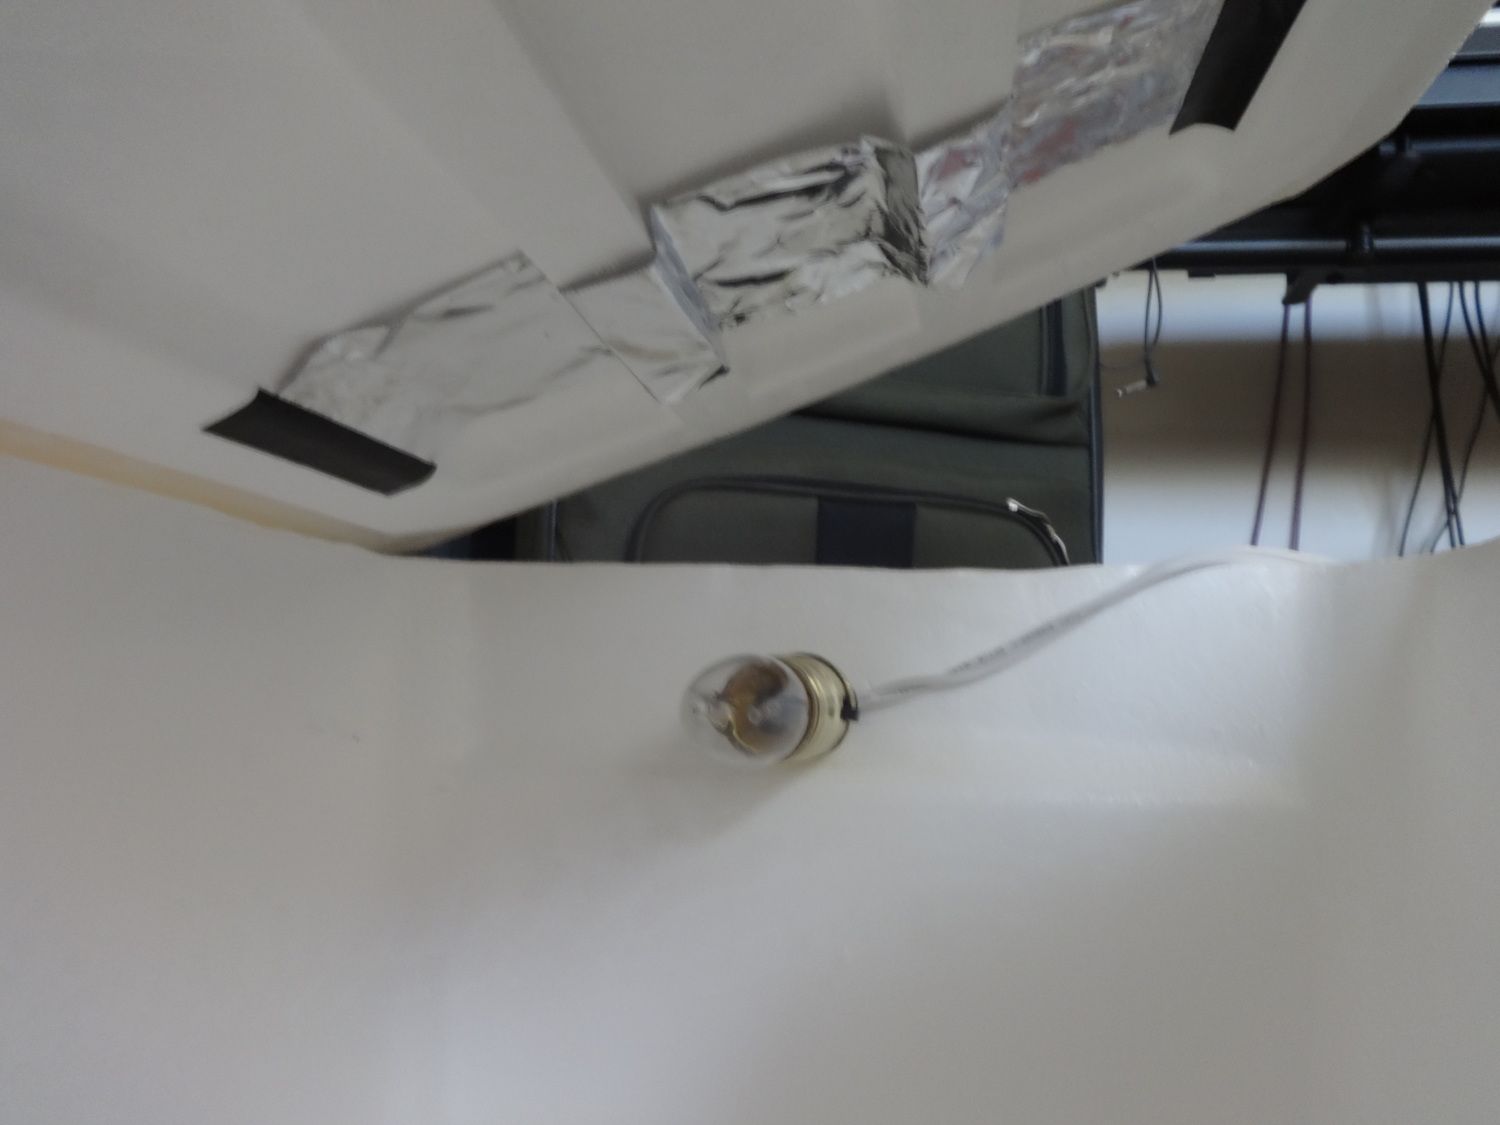
Step 2: Heat Source
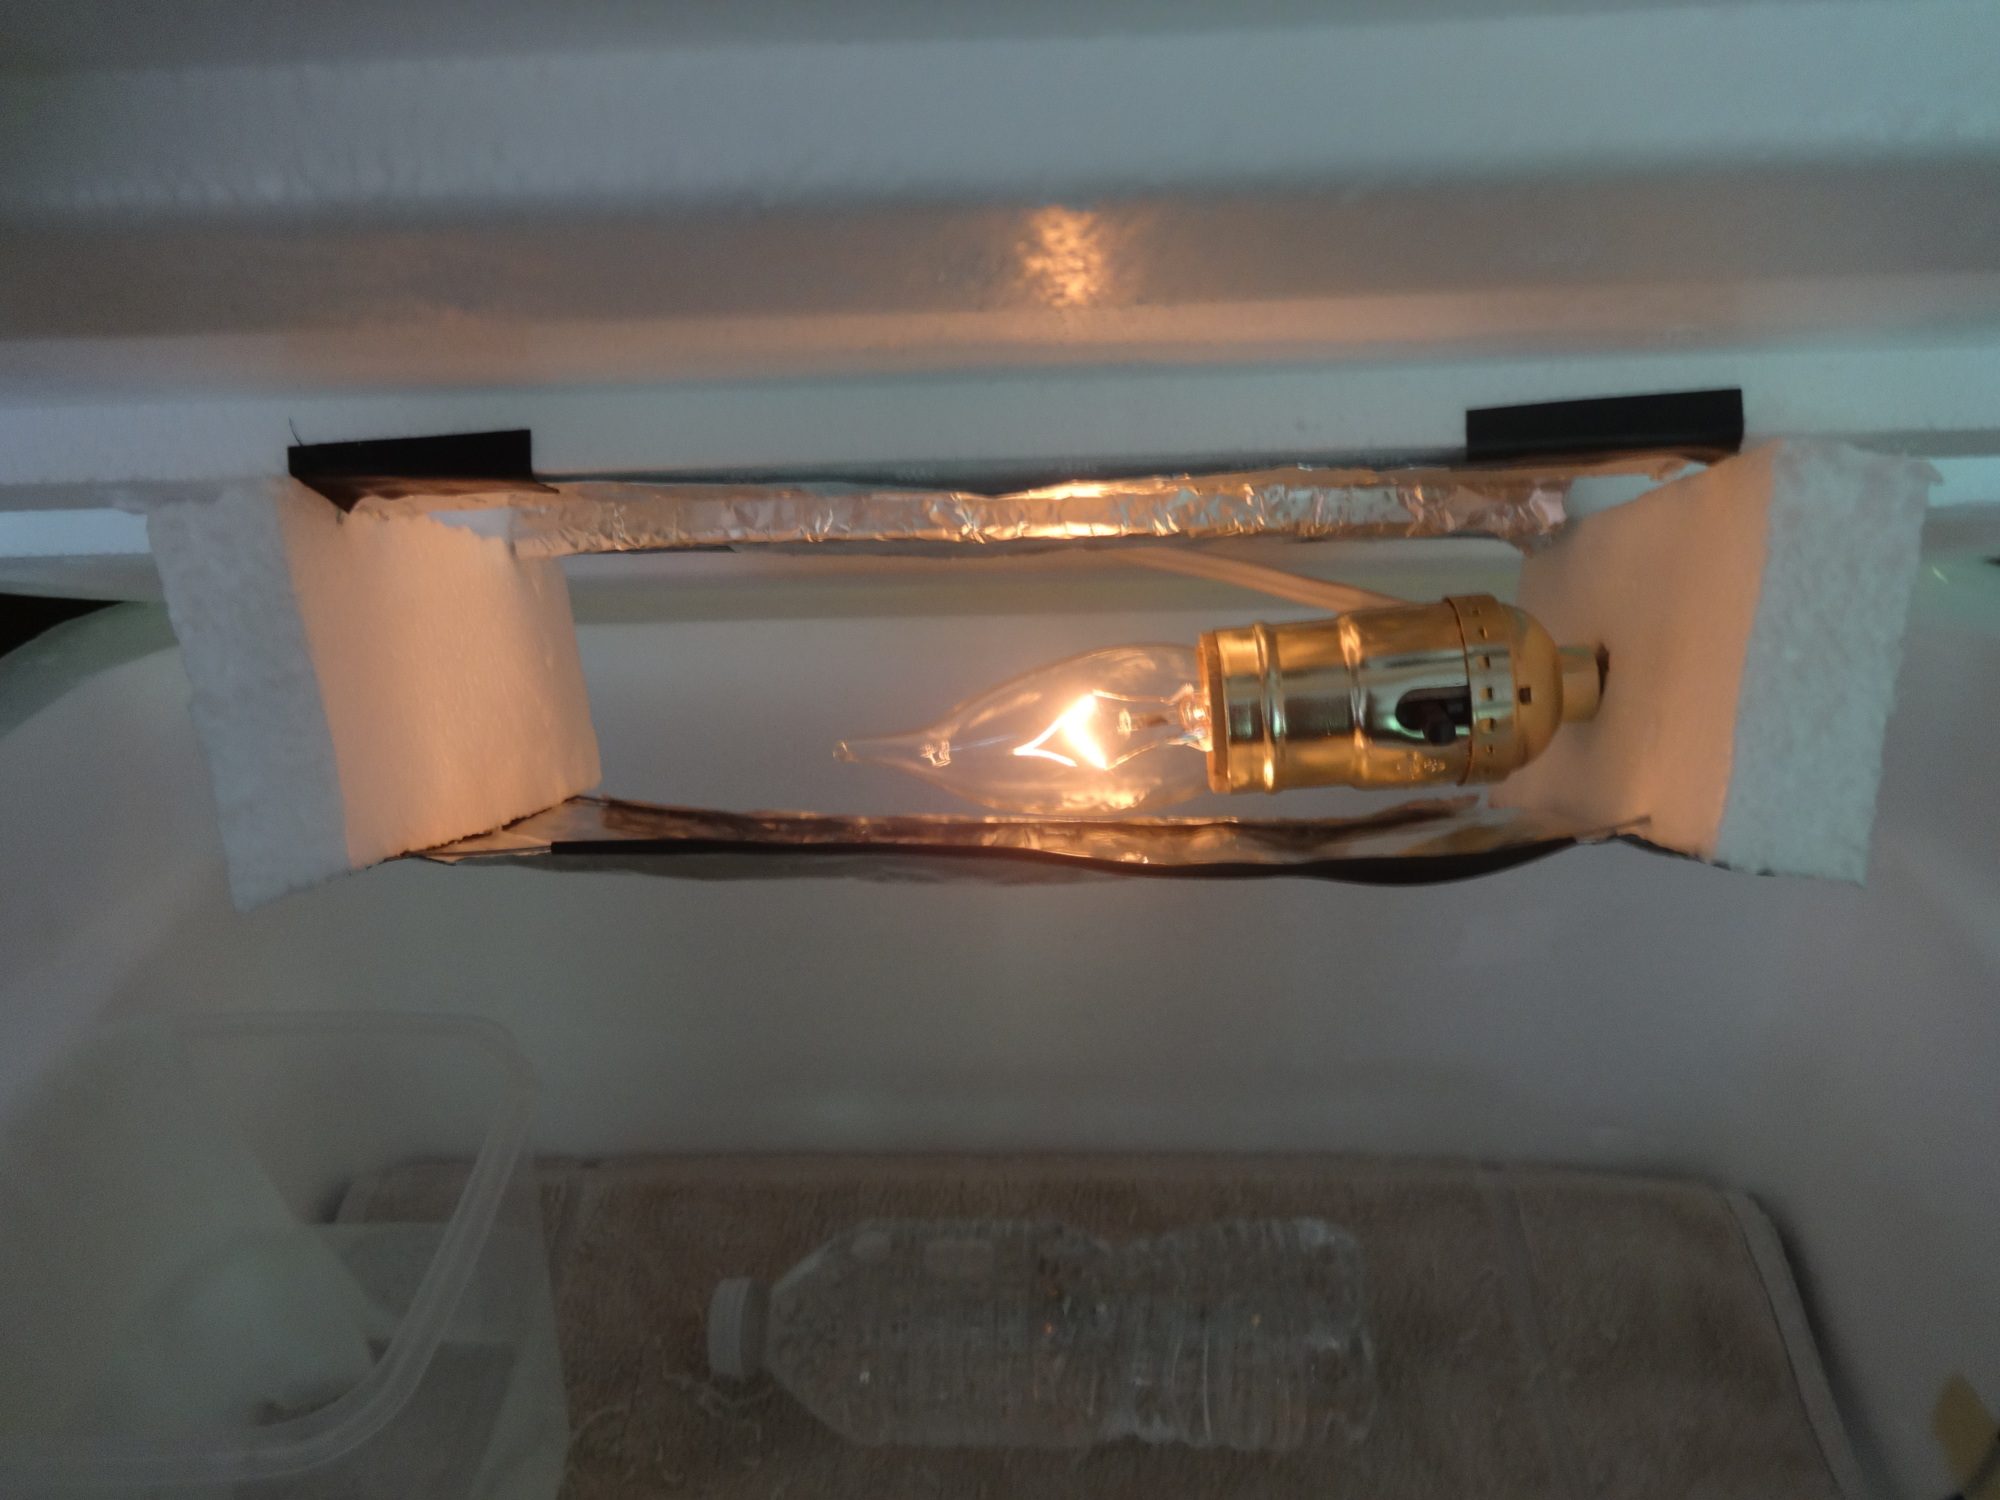
The heat source in this incubator, like most of them, is a light bulb. With your screwdriver, make a small hole near the top of one of the sides of the cooler. Do not make it to far up; We do not want the light bulb touching the lid of the cooler. Then, make a second hole about an inch away from the one you made (Not shown). I will explain this later.
This is the tricky part! Be very careful with this. Follow the instructions in the kit. There are 2 wires, one that is smooth, and one that has waves on it. First, thread the 2 wires through the second hole you just made next to your mounting hole. Then, thread them through the hole on the lid of the light fixture (Seen above). Take the socket, and loosen the 2 screws. There is a silver one and a gold one. Twist the open end of the white wire onto each of the gold and silver screws. The WAVY wire goes on the SILVER screw, and the SMOOTH wire goes on the GOLD screw. Tighten the screws to attach the wires onto the socket.
TEST THE LIGHTBULB CAREFULLY TO SEE IF IT WORKS. When it works, close the cap onto the socket, and screw the long screw into the socket hole. Then, insert it into the mounting hole you made.
Now, MOST IMPORTANLTY, get the dimmer switch and plug it into your light fixture. THIS WILL REGULATE THE TEMPERATURE. I don't know HOW MANY times I've seen people try to make incubators WITHOUT a reliable way to regulate the temperature! (Plugging and removing holes does NOT count as a reliable way to regulate temperature!!!) The dimmer switch is the easiest way to regulate your temperature. However, it will require a constant watch, because one setting on the dimmer will not last the whole incubation. Because the temperature of the enviornment changes, so will the temperature in the incubator, so you must be aware that the dimmer will need to be adjusted frequently. If you do not have time for this, then attach a thermostat to your incubator. I STRONGLY SUGGEST BUYING A THERMOSTAT SPECIFICALLY FOR INCUBATORS. Incubator Warehouse is a great store to find lots of incubator thermostats. DO NOT use water thermostats. THEY ARE NOT FOR INCUBATION AND WILL NOT GIVE YOU THE RESULTS YOU WANT!
This is Incubator Warehouse! http://stores.ebay.com/Incubator-Warehouse
Step 3: Make it Safe
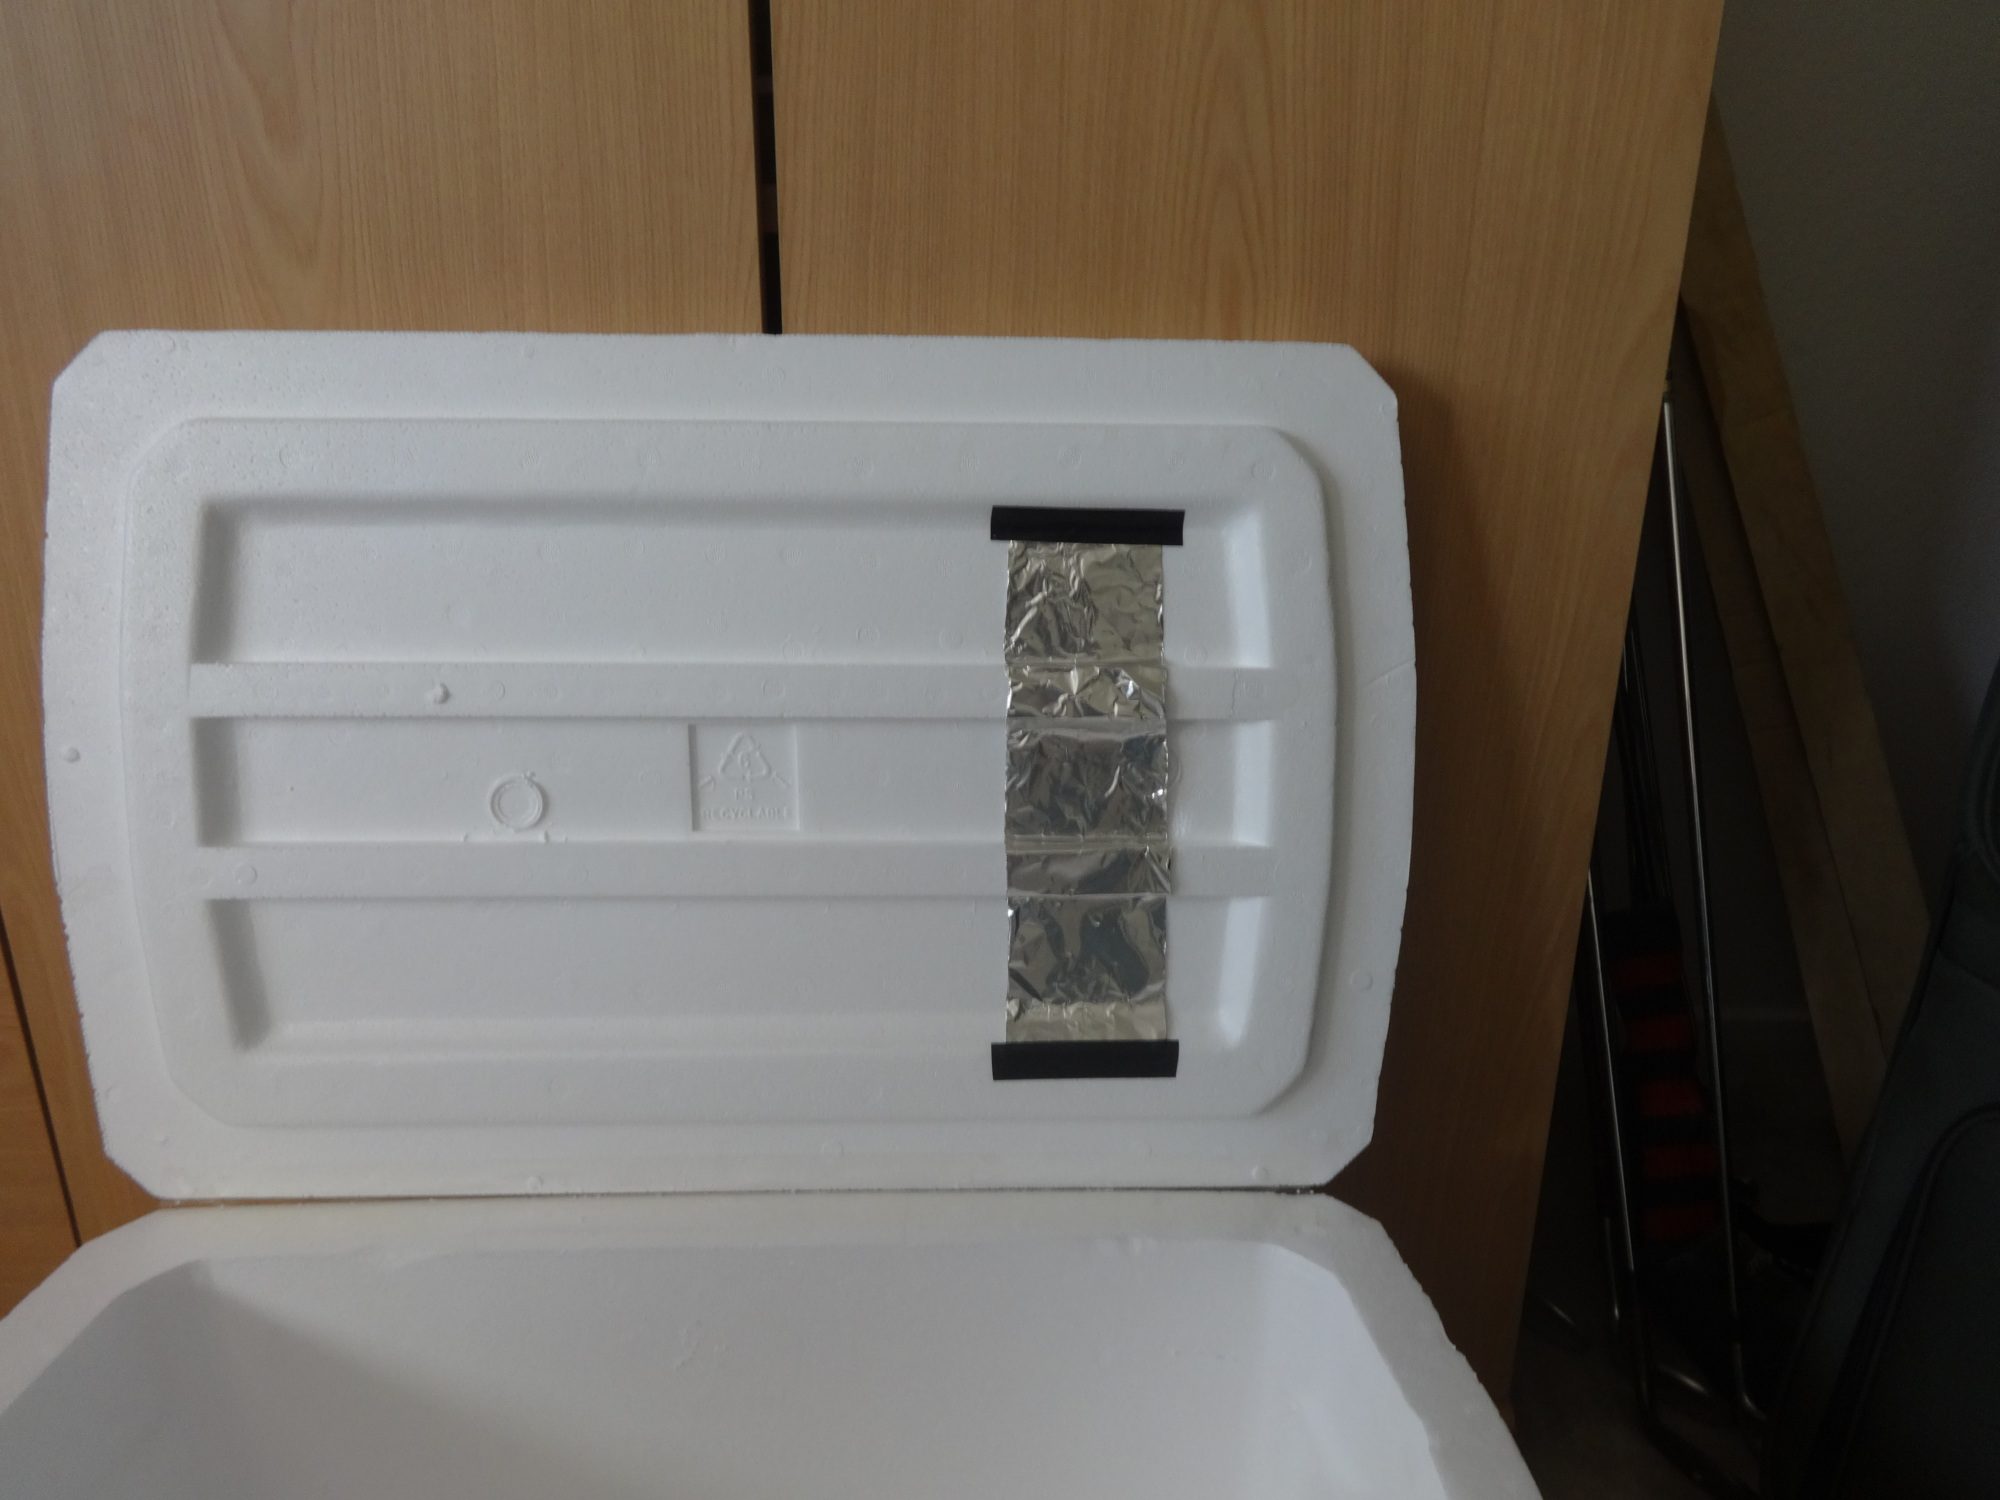
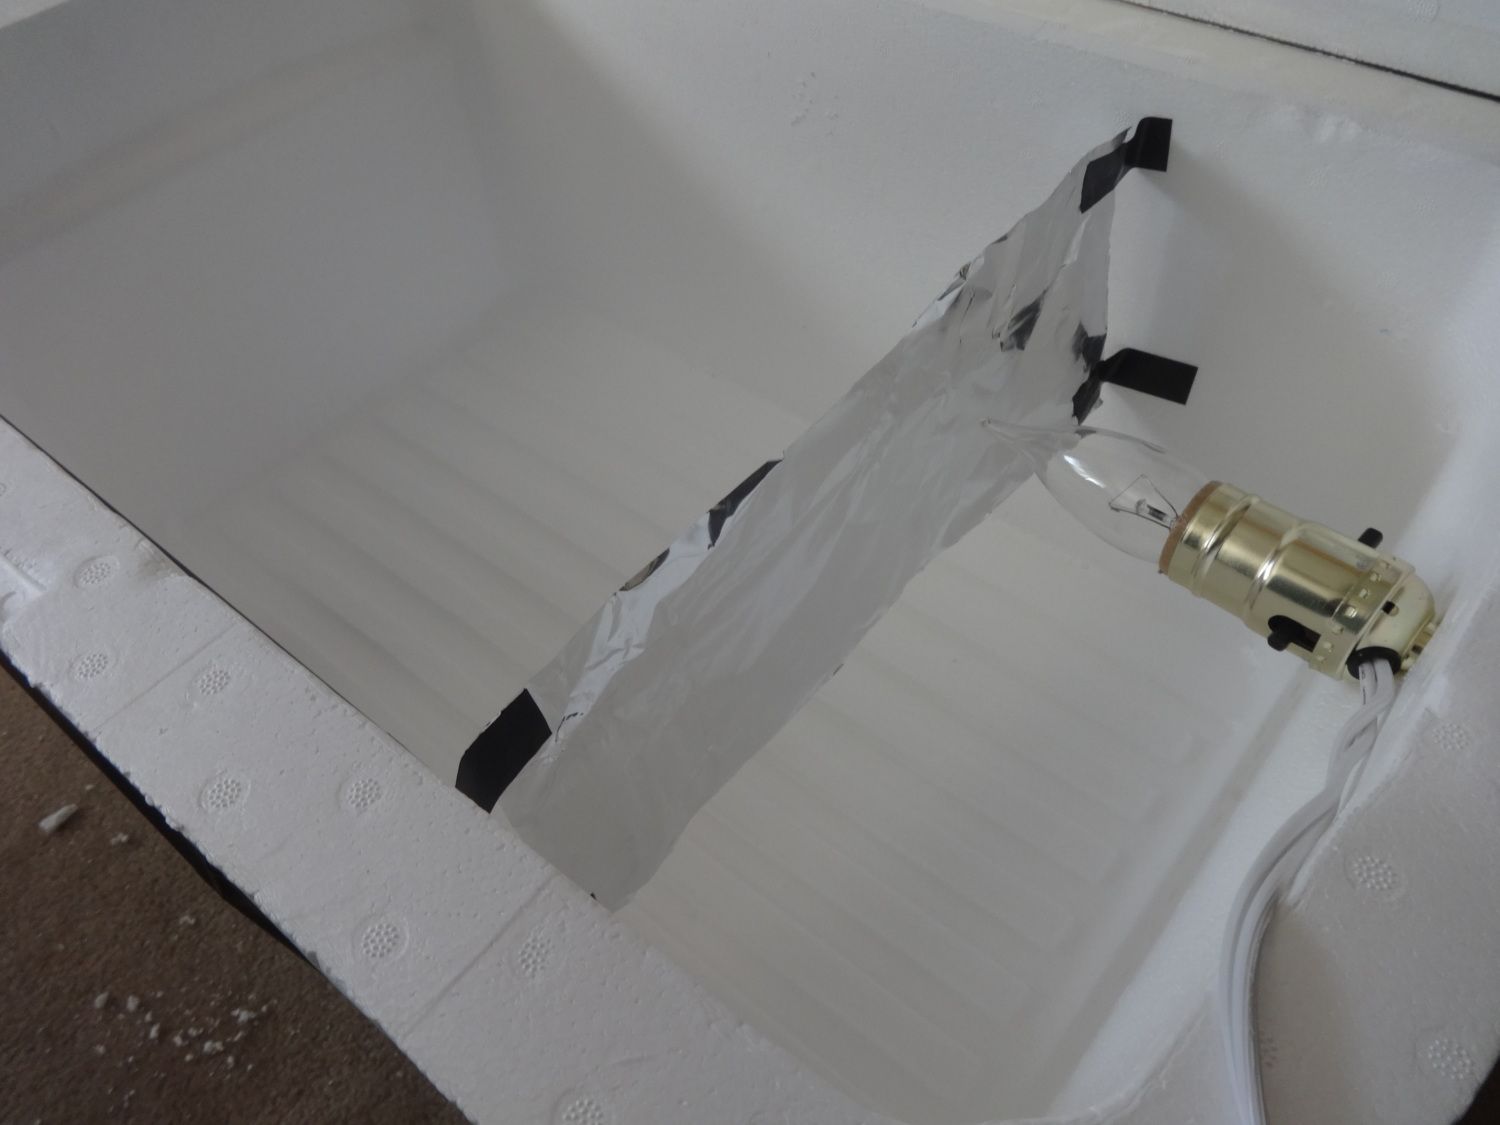
With the aluminum foil, cut out and tape one sheet to the bottom of the lid where the light bulb will be to protect the styrofoam from overheating. Then, cut out another sheet and tape it across the incubator so direct light from the light bulb doesn't go to the eggs. This will prevent overheating, false temperature readings, and dehydration.
Step 4: Water
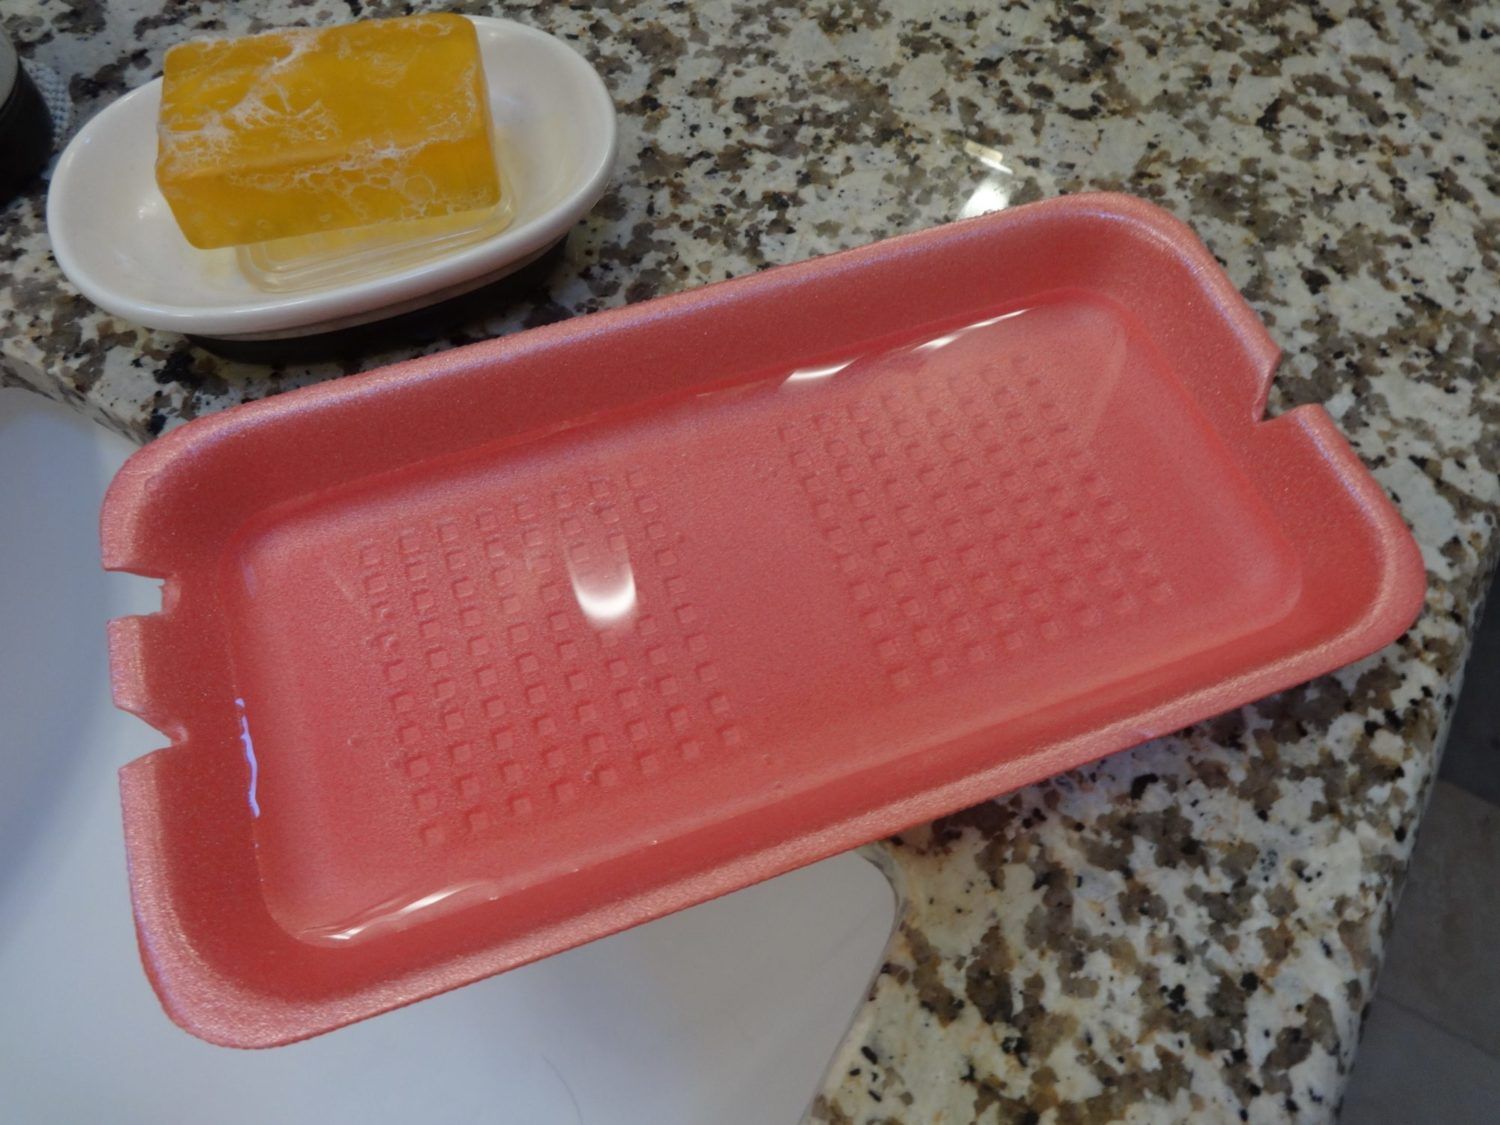
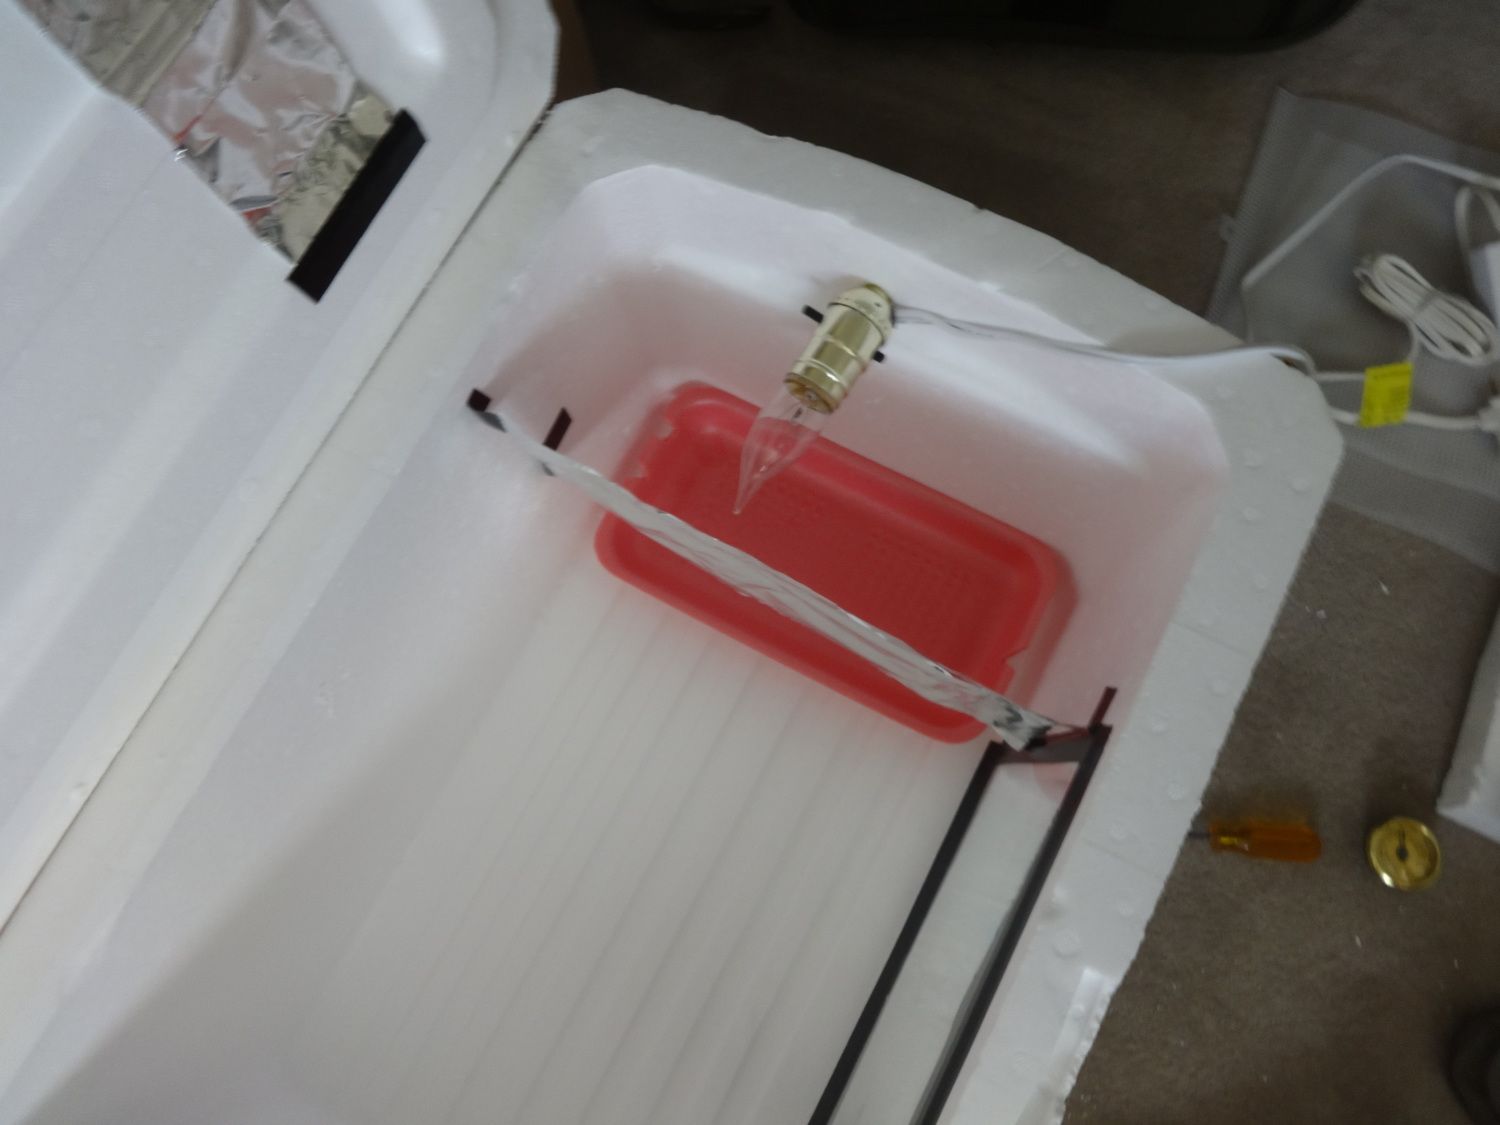
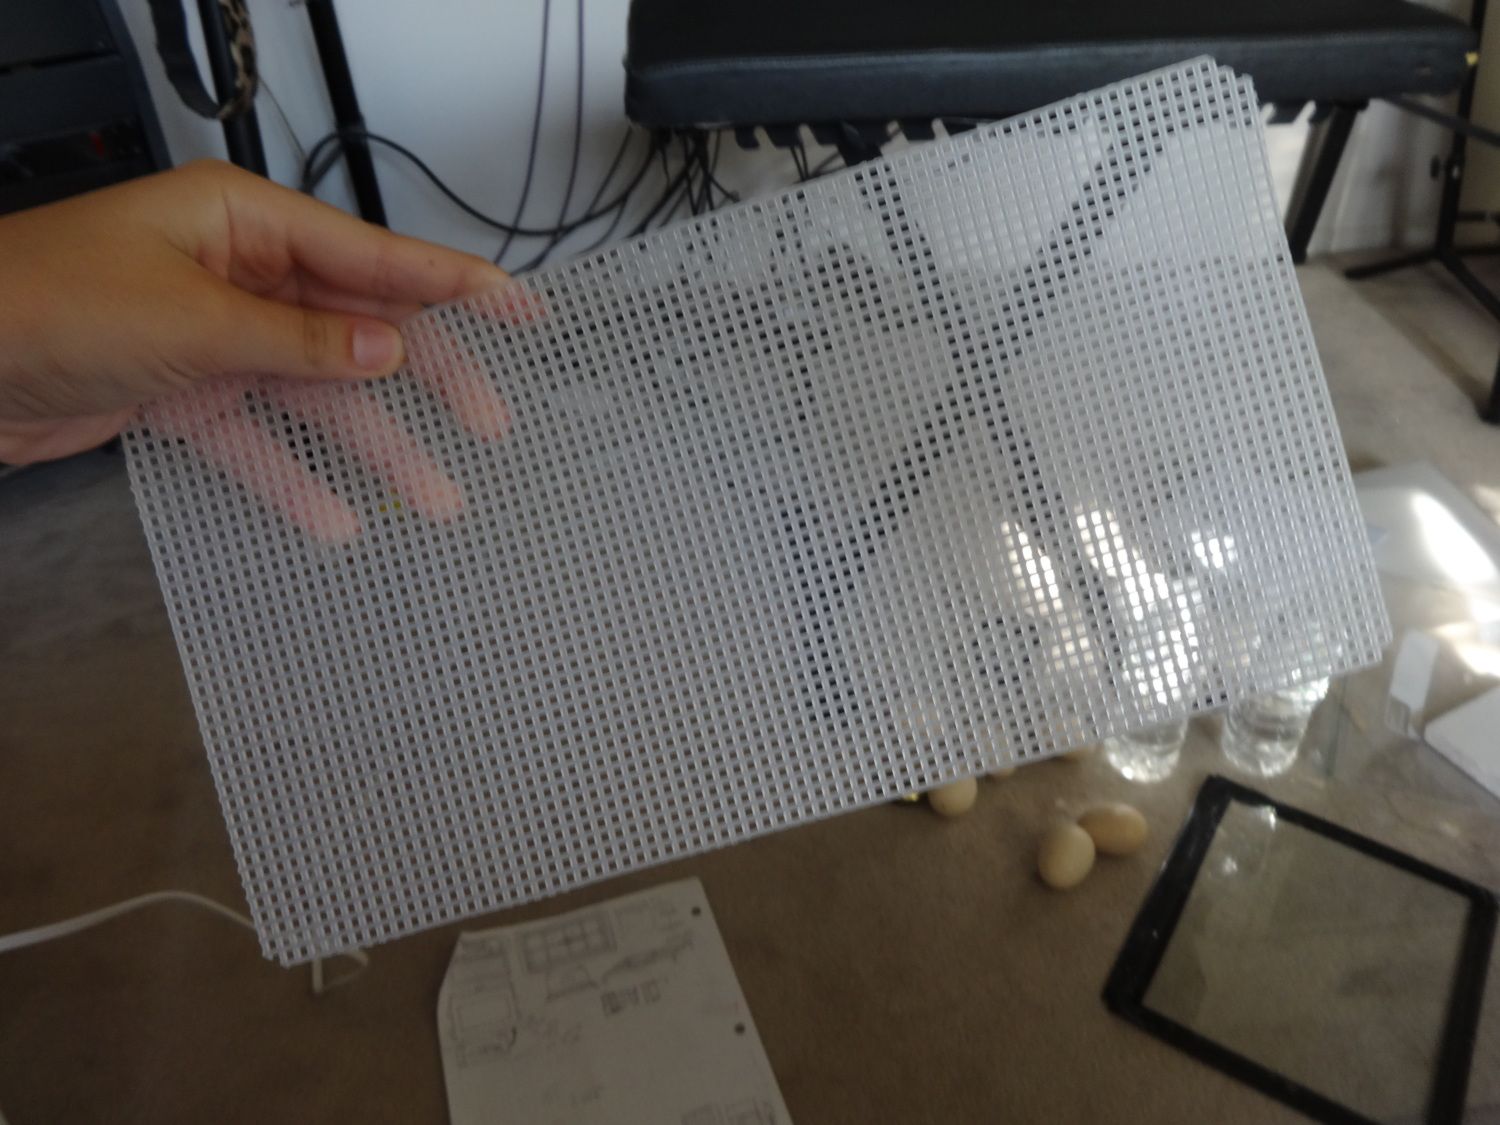
This is simple but a very important part of the incubator. You will want a large, flat tray to use for the incubator's humidity. What I would do would be to get a small dish and put it inside the bigger dish and fill it with water. Then, when the time comes to raise the humidity and the small dish is already full, then add water to the big dish. Place it under the light bulb for effectiveness.Also, use the plastic mesh to cover this dish. When the chicks hatch, they run around, and you don't want them falling in! Plastic mesh is MUCH easier to handle than metal mesh.
Step 5: Preparation:
With the aluminum foil, cut out and tape one sheet to the bottom of the lid where the light bulb will be to protect the styrofoam from overheating. Then, cut out another sheet and tape it across the incubator so direct light from the light bulb doesn't go to the eggs. This will prevent overheating, false temperature readings, and dehydration.
Step 4: Water
This is simple but a very important part of the incubator. You will want a large, flat tray to use for the incubator's humidity. What I would do would be to get a small dish and put it inside the bigger dish and fill it with water. Then, when the time comes to raise the humidity and the small dish is already full, then add water to the big dish. Place it under the light bulb for effectiveness.Also, use the plastic mesh to cover this dish. When the chicks hatch, they run around, and you don't want them falling in! Plastic mesh is MUCH easier to handle than metal mesh.
Step 5: Preparation:
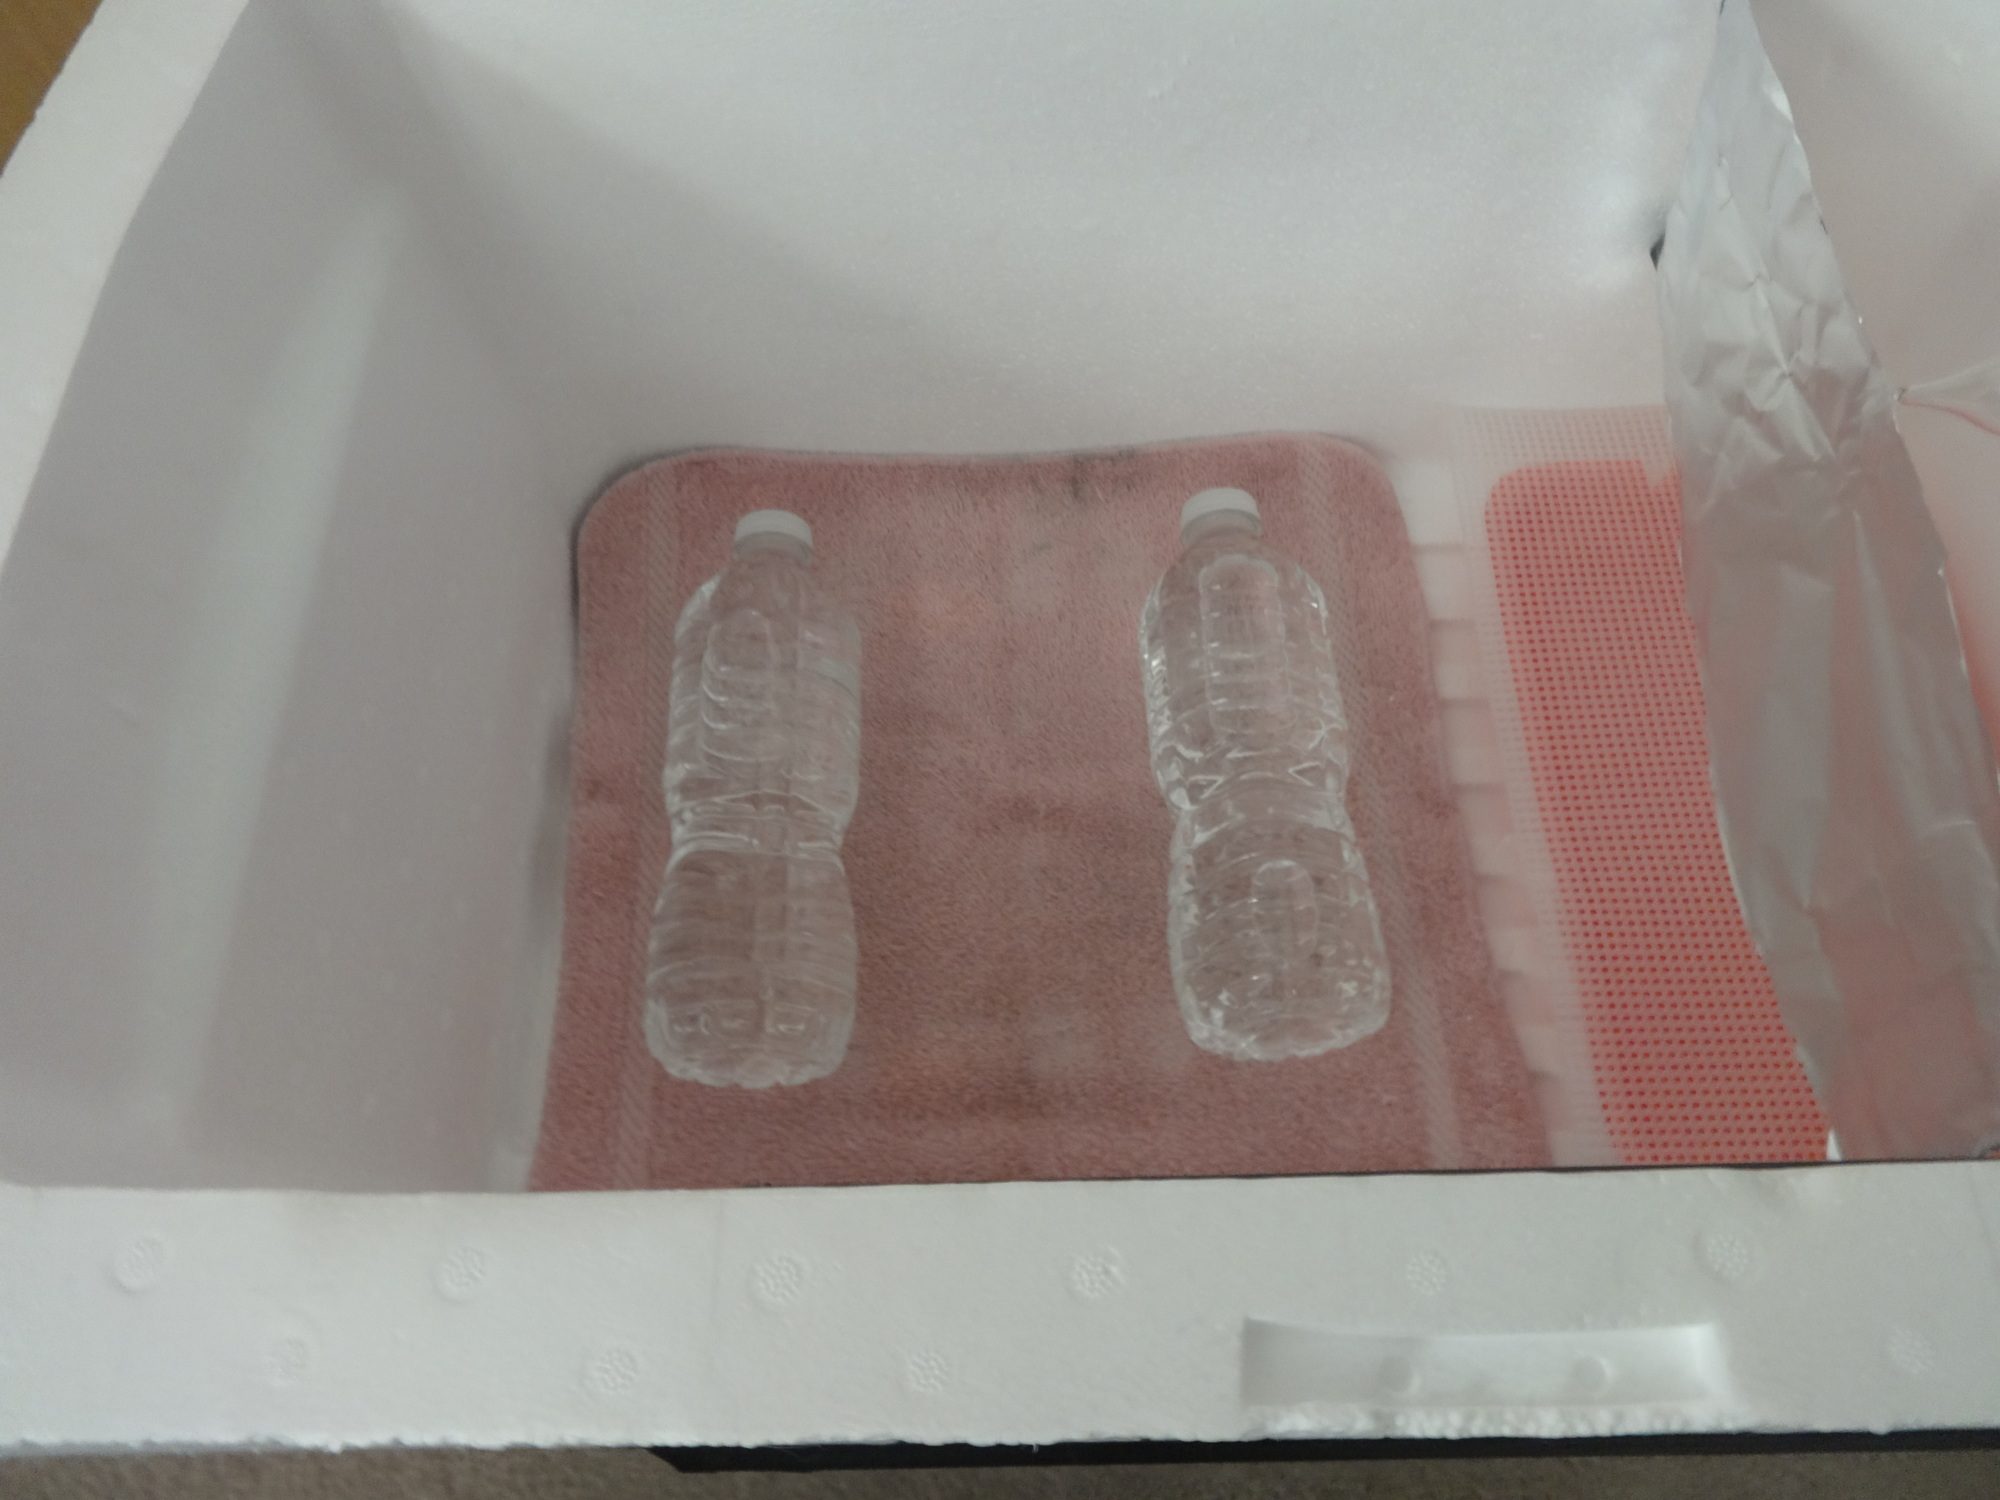
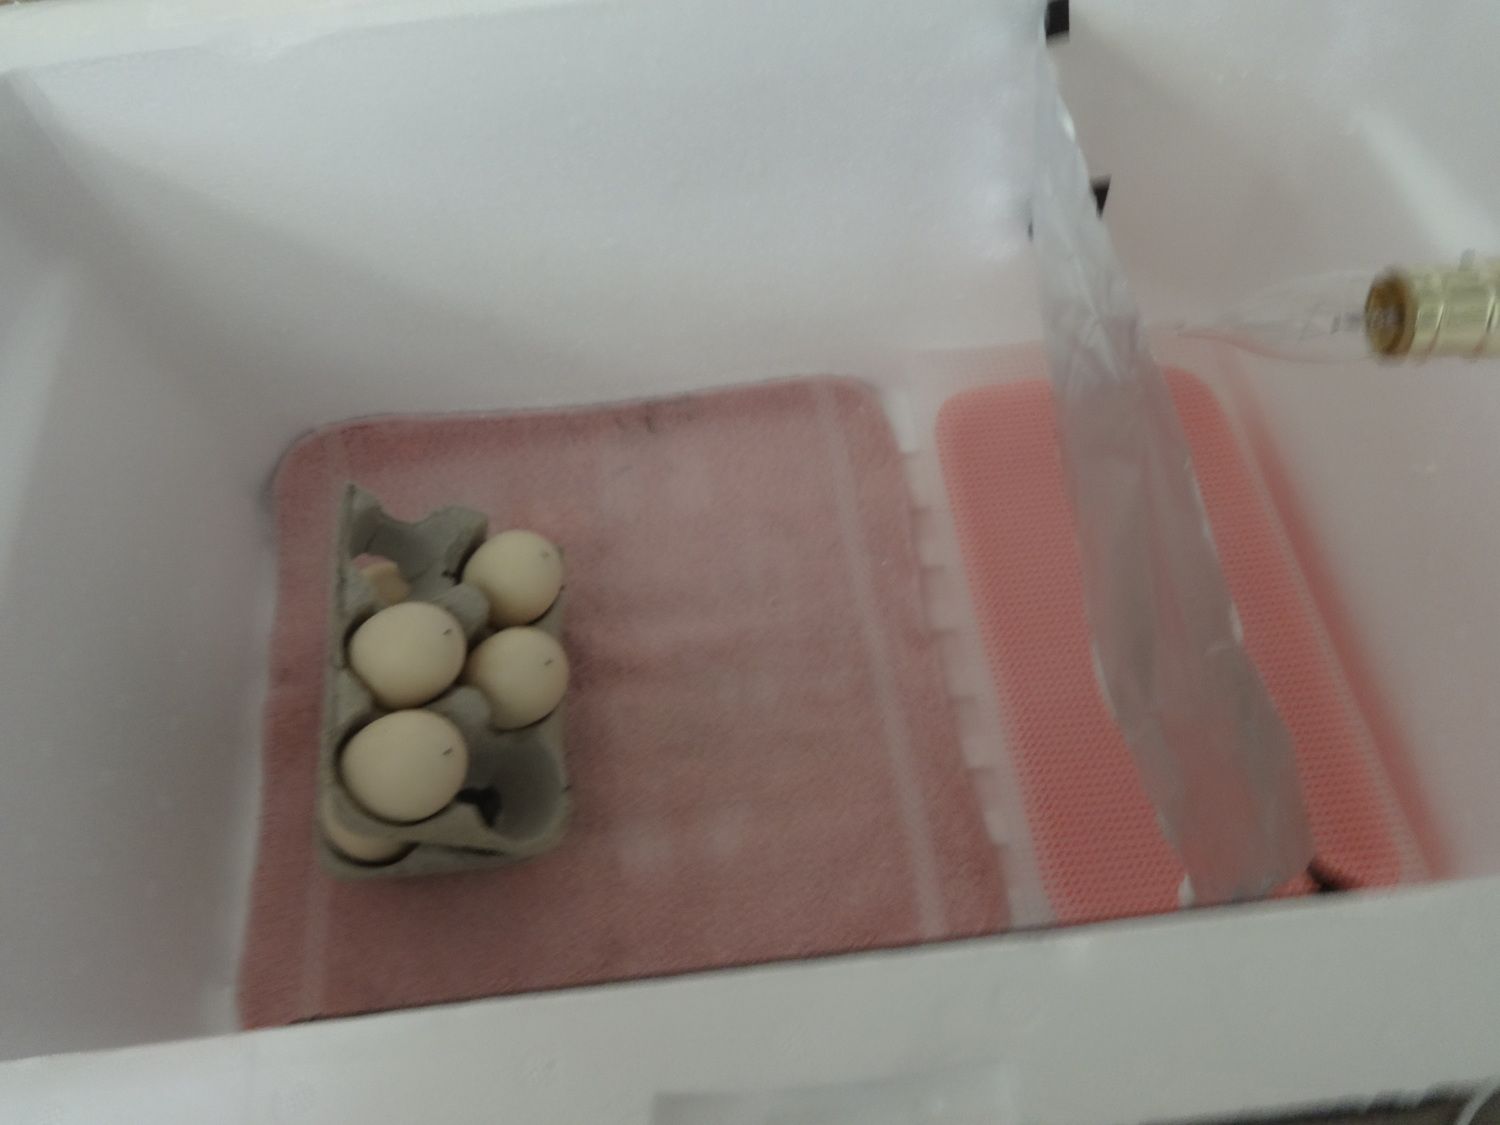
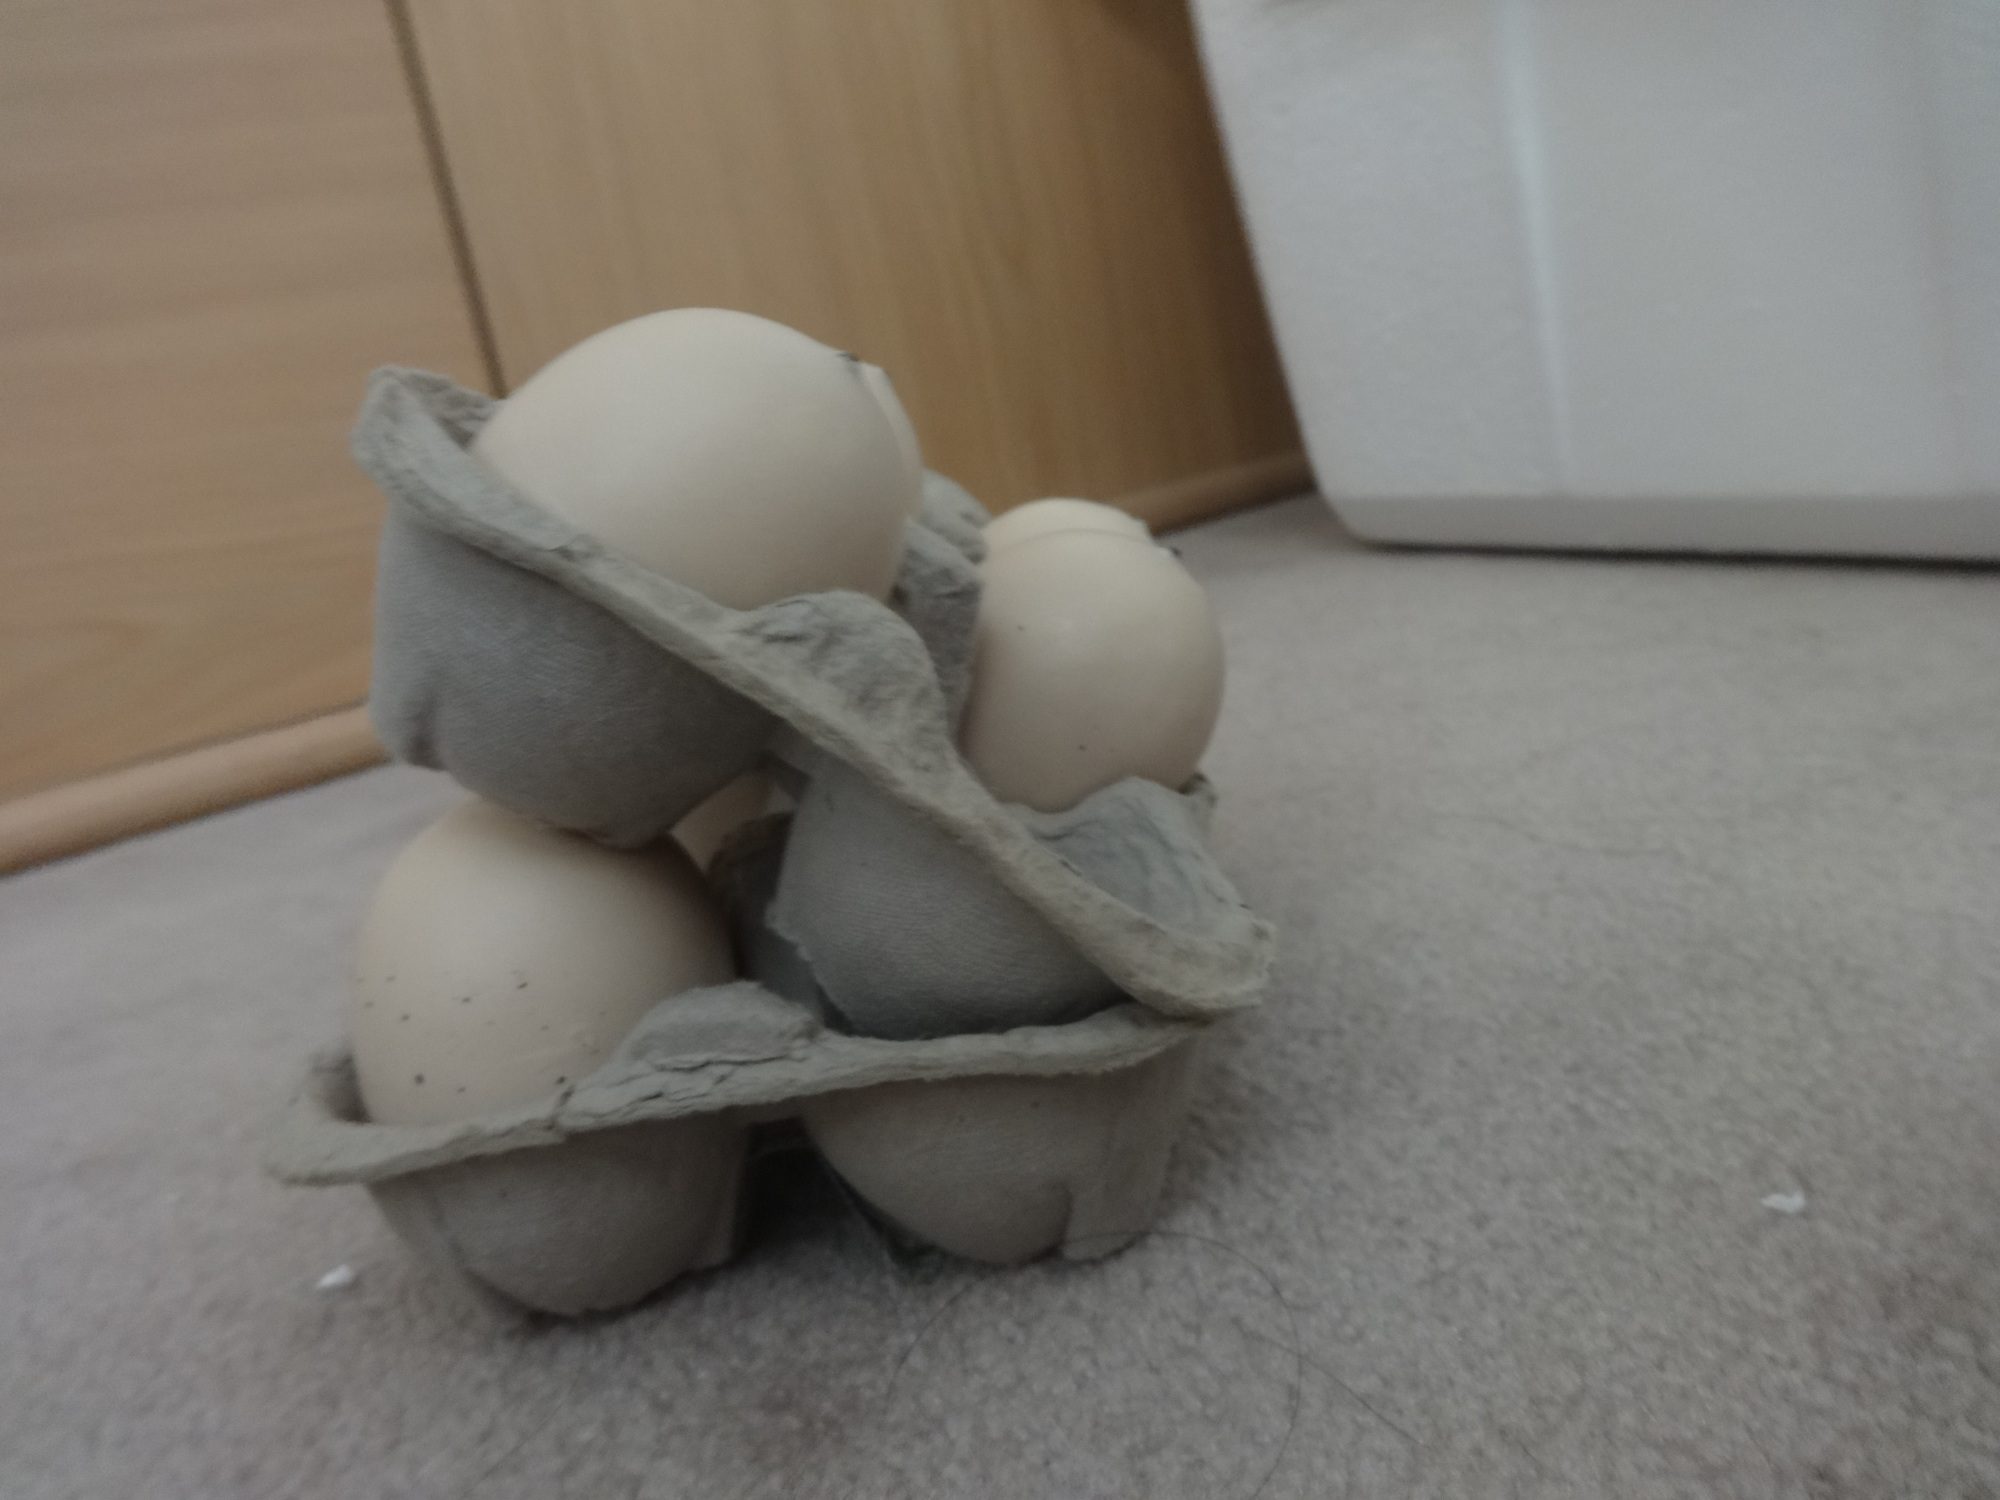
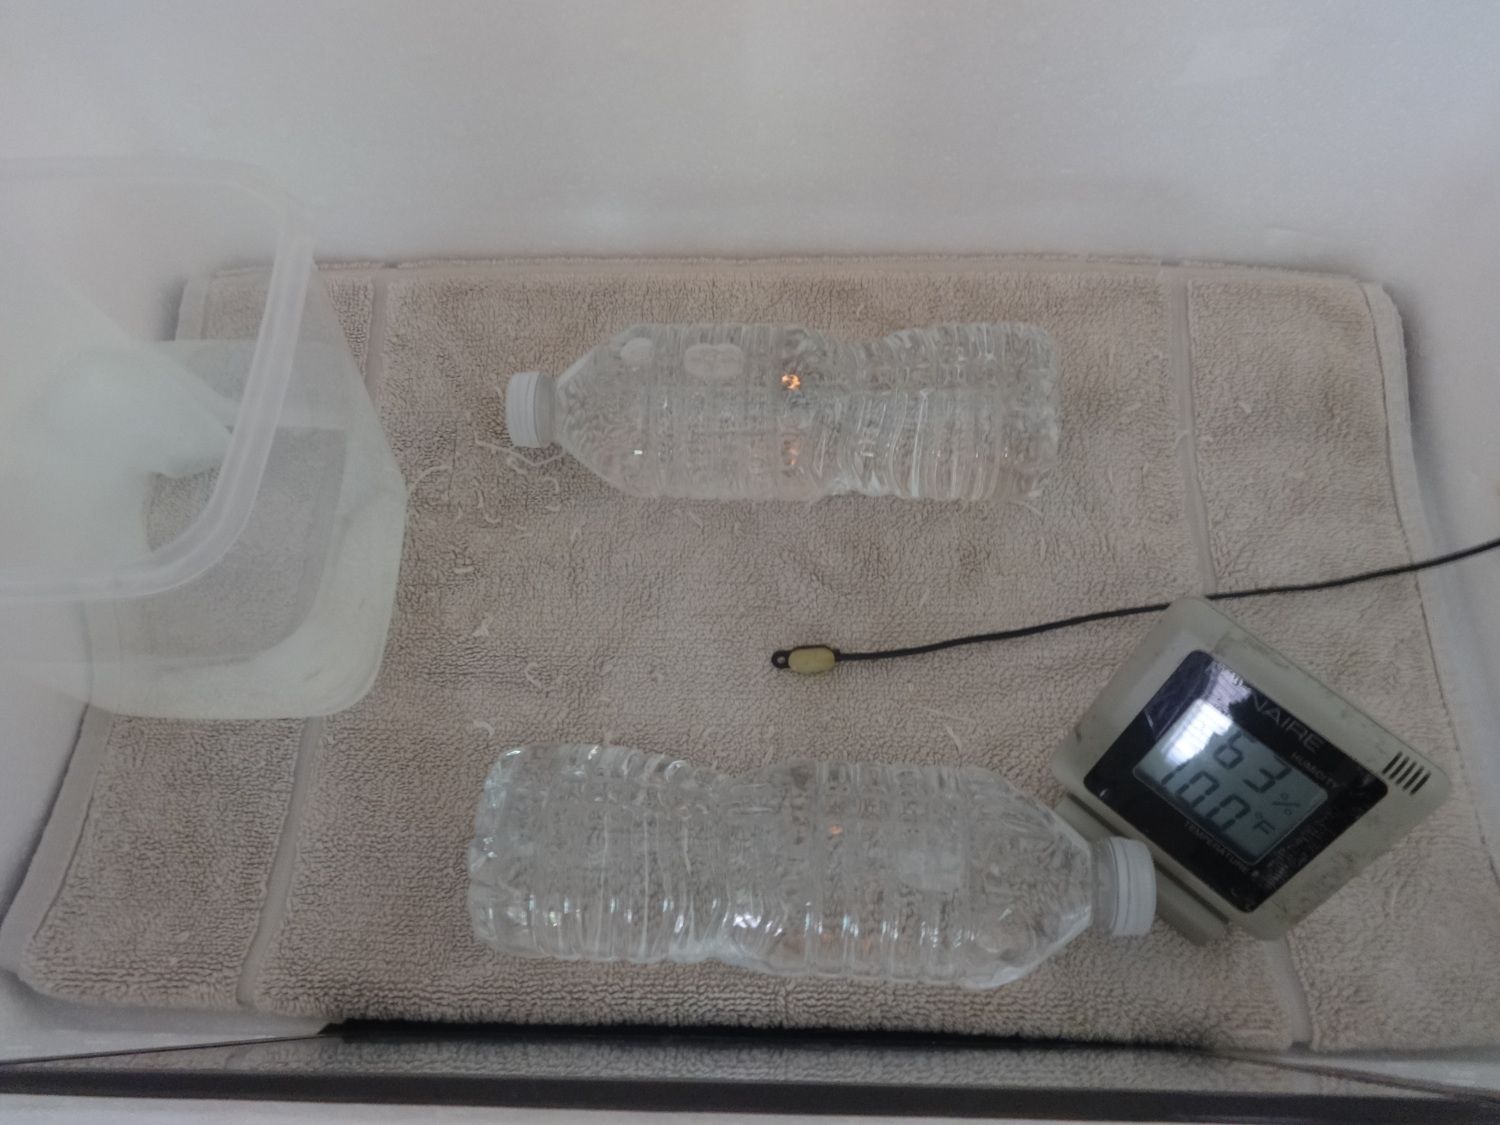
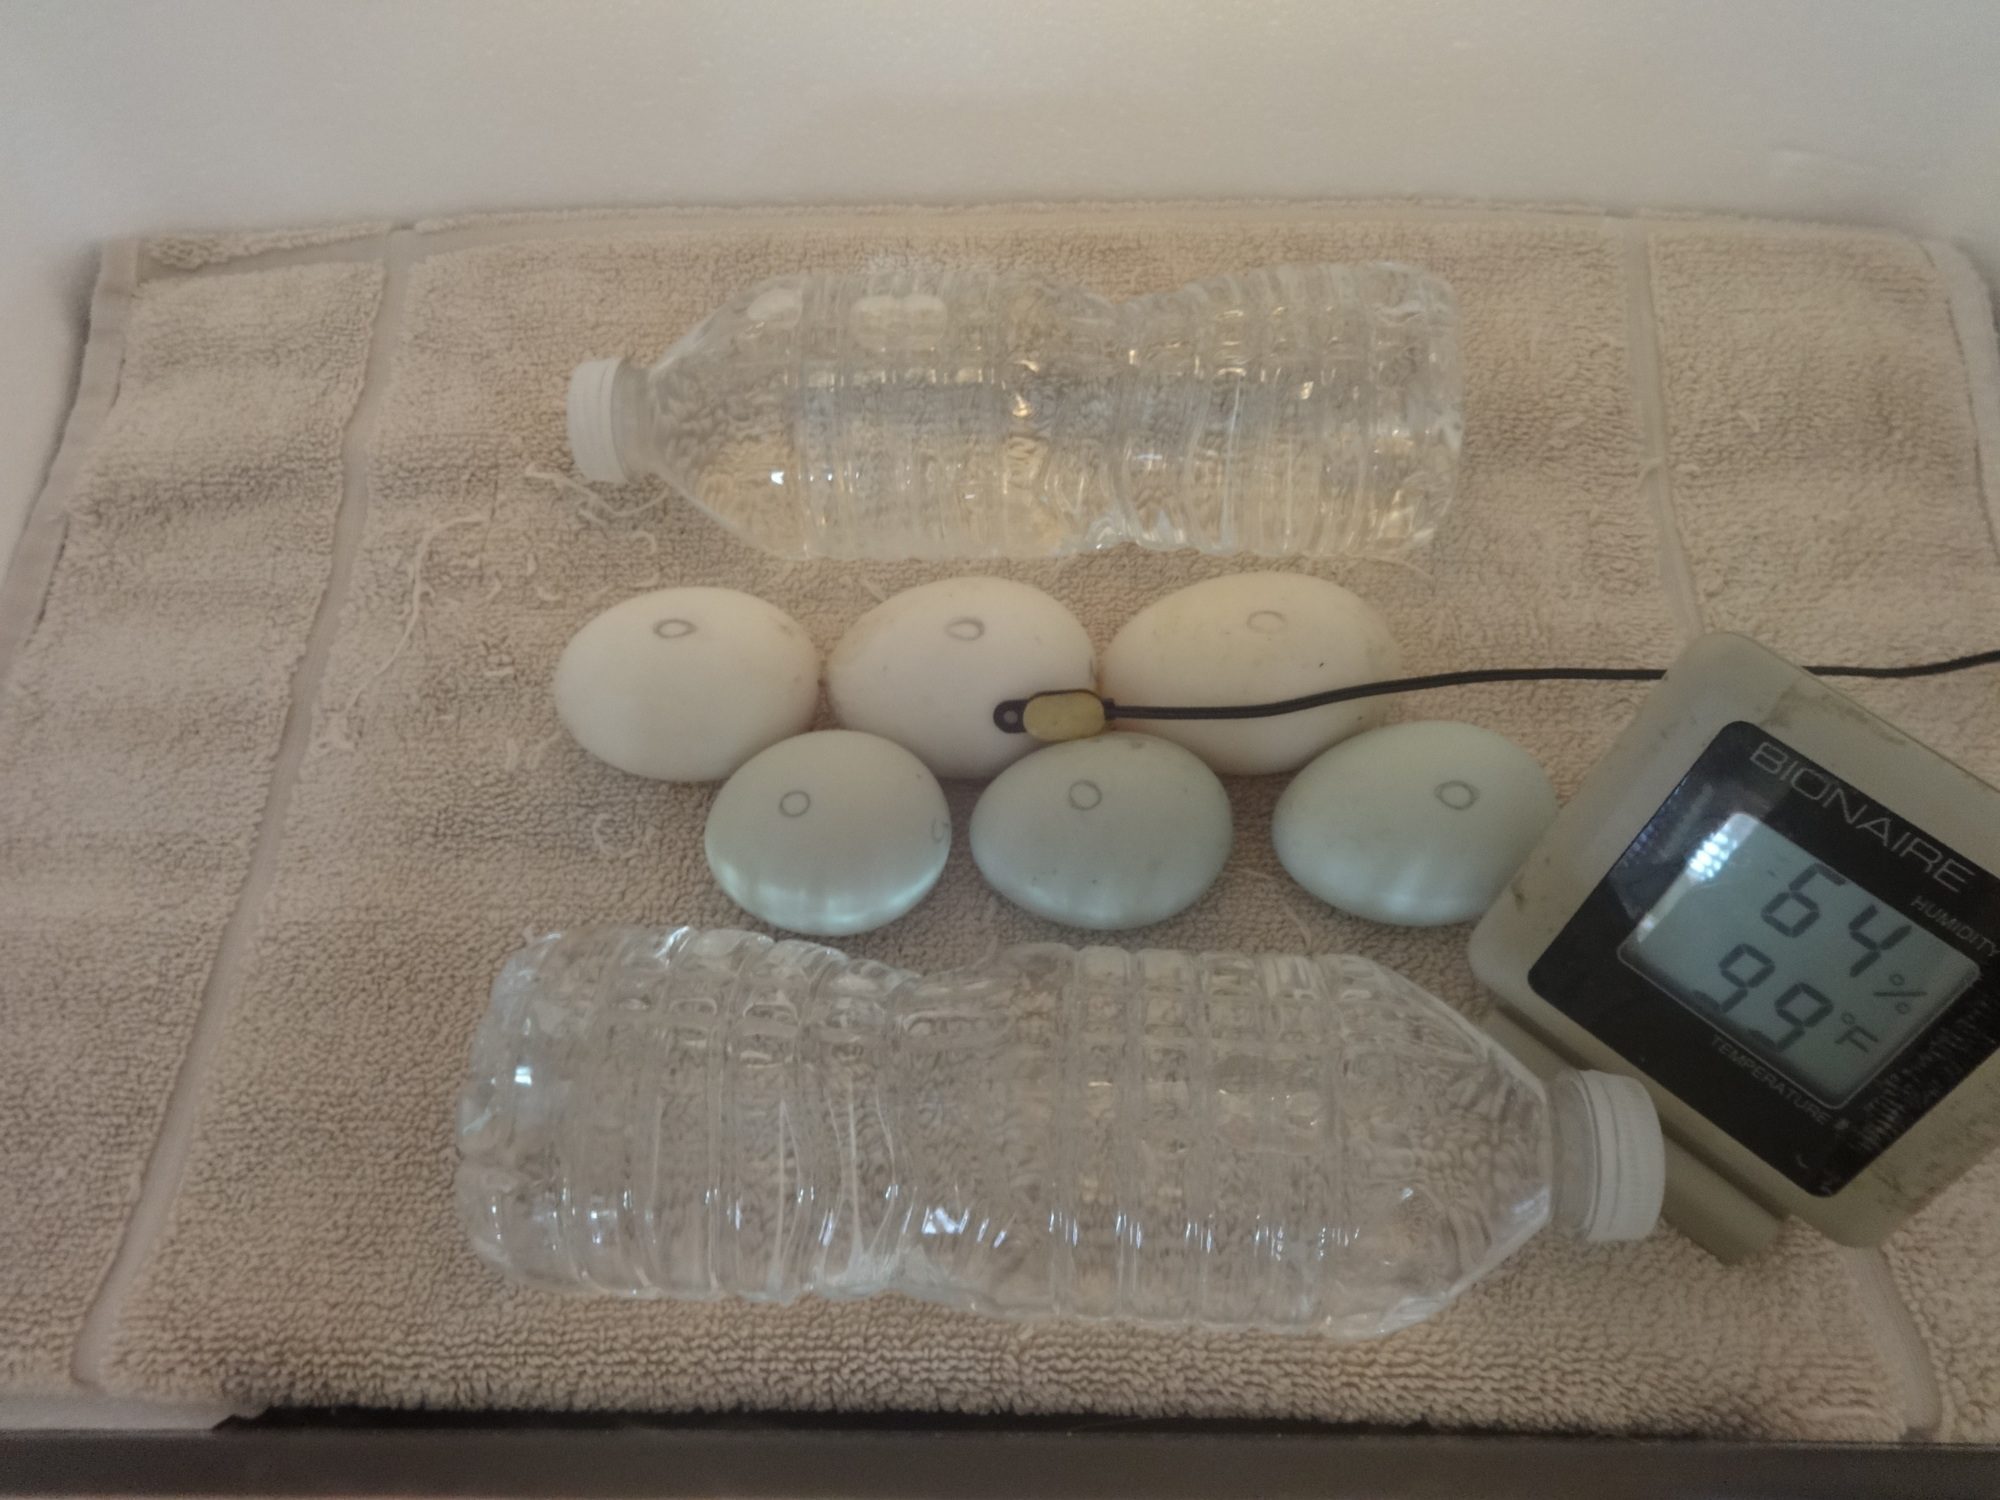
Now That the incubator is almost done, punch one or two small vent holes near the top of the incubator. Make them slightly far apart. Also, here are some suggestions. To stabilize the temperature around the eggs, fill up a few water bottles with warm water and place them near the eggs. This will act as a heat sink, and will not mess up the humidity. Another cool thing you can do to minimize turning time is to put the eggs in an egg turning set as shown above. Get two egg cartons, place 2 fake eggs on one side of the bottom carton, and then put the other carton on top, making a 45 degree angle to put your eggs. This works well with chicken eggs that have a higher hatch rate when lifted up during incubation. (Make sure the fat end of the egg is pointed up. Do research on that!)
Get at LEAST 2 reliable thermometers and 2 reliable hydrometers to measure heat and humidity in the incubator. Test your incubator for a long time before getting your eggs. Play around with the dimmer switch until you find a night/day routine that will keep the incubator between 98 and 100 degrees! I found that after the dimmer is adjusted, it keeps the temperature very well!
Step 6: Hatch!
Step 6: Hatch!
After making the incubator, I did a little adjustment before hatching my eggs. I moved the light bulb to the top of my incubator, but that was my preference. With the incubator I made in this tutorial, I hatched 4 out of 7 SHIPPED duck eggs! Very good for a homemade incubator! I hope you're happy with this tutorial!
If you already have an incubator, this can still be useful! I have a fan-incubator, but I like to use this one as a hatch-bator. Fan incubators are hard to clean, and sometimes dry up the egg. This incubator is great for hatching since it does not have a fan, has a large viewing window, and is easy to clean!
How to: Incubate Eggs (Basics)
Chicken, duck, and game bird (quail, pheasant, partridge) eggs all have similar incubation rules. If you want to hatch a bird artificially, you must have an incubator with a reliable temperature regulator. Eggs are fragile and respond dramatically to the slightest change in overall incubation temperature.
Pre-Incubation:
Before incubating, you must have your incubator running for at least 24 hours to make sure the temperature is set. If you want to wait a few days before putting the egg in the incubator, store the egg in an environment of 50°F to 60°F and 70% humidity. This way, the embryo will remain dormant and the egg will not loose water before its time. Store it in a tilted egg carton with the egg's pointed end facing down in the carton. Tilt the carton to rotate the egg in order to prevent the yolk from sticking to the inner membrane and killing the embryo.
If you ordered eggs in the mail, when they arrive, check them to make sure they have no cracks. If they do, do not incubate them because they are vulnerable to bacterial and might infect the other eggs. Have their pointed ends facing down in a cool location for 12-24 hours before incubating.
Incubation:
For most bird eggs, (like chickens, ducks, and game birds) the incubation temperature is 99.5°F. Please do research on the incubation temperature of the bird if it is a different kind of bird. It is important to keep the incubation temperature as close to 99.5°F as possible. A temperature too high could cause the chick to hatch early and die due to not absorbing its yolk. A temperature too low will cause the chick to be lethargic at bird and die.
Humidity is key when incubating eggs, and is just as important as temperature. Humidity allows for the air cell to grow accordingly so it is the right size when it's time for hatching. (The air cell is the pocket of air located at the rounded end of the egg that the chick uses to breath for the first time.) The ideal humidity level for chickens and game birds is 35%-50%. However, waterfowl like duck and goose eggs need a humidity of 50%-65%. If the humidity is too low throughout incubation, the air cell will be too large and the chick will get dried before coming out. If the humidity is too low, the chick will not have space to breathe in. If the humidity is wrong for a day, do not worry. It's the average humidity over the course of the incubation period that matters.
Turning the eggs is crucial to the embryo's development, as it prevents the embryo from staying in one spot for too long and fusing to the inner membrane. An egg that has gone too long without turning can not be fixed. To turn the eggs, lay them on their sides and turn them fully to the opposite side at least 3 times a day. (Mark an X and and O on each side to see it easily.) You can also use automatic turners that you can buy online or in stores. When using these, always have the egg's pointed end facing down in the egg cup. To help with the hatching process, I strongly recommend tilting the egg's rounded end slightly upwards during the last week of incubation as this helps the embryo to move to it's proper place when getting ready to hatch.
Ventilation is required for hatching eggs as the eggs need oxygen to develop. the oxygen enters through pores on the egg shell, feeding the embryo through diffusion. During the first half of incubation, not much ventilation is needed, but during the second half, add more ventilation. For every 12 eggs, a pencil-sized hole is enough for the first week. During the rest, add another pencil-sized hole. Too much ventilation will cause the humidity to go down and the temperature to be unstable, so keep this in mind.
*Please refrain from ever opening the incubator except to turn the eggs. Do not handle the eggs often as the oils on your hands could seep through the egg and contaminate the embryo. Wash hands thoroughly before touching the eggs.
Hatching:
Each bird has a different incubation period. Here is a list of the incubation periods of several popular birds:
Chicken: 21 days
Bantam Chicken: 20 days
Call Duck: 26 days
Duck: 27-28 days
Muscovy Duck: 35-37 days
Goose: 28 days
Coturnix Quail: 17-18 days
Button Quail: 16 days
Bobwhite Quail: 23 days
3 days before incubation, the eggs no longer need to be turned. Lay them on their sides, and take them out of any egg turner. Turn the humidity up to 70% to soften the shells and prevent the chicks from drying too fast during the hatch. Keep the temperature the same. Do not open the incubator ever during the last 3 days. This process is called "Lockdown". For chickens, lockdown begins on day 18. For ducks it is on day 25, and so on. Have the eggs lay on something soft or not slippery, like a blanket or wire mesh. If the bottom is slippery, the chick could end up with broken legs.
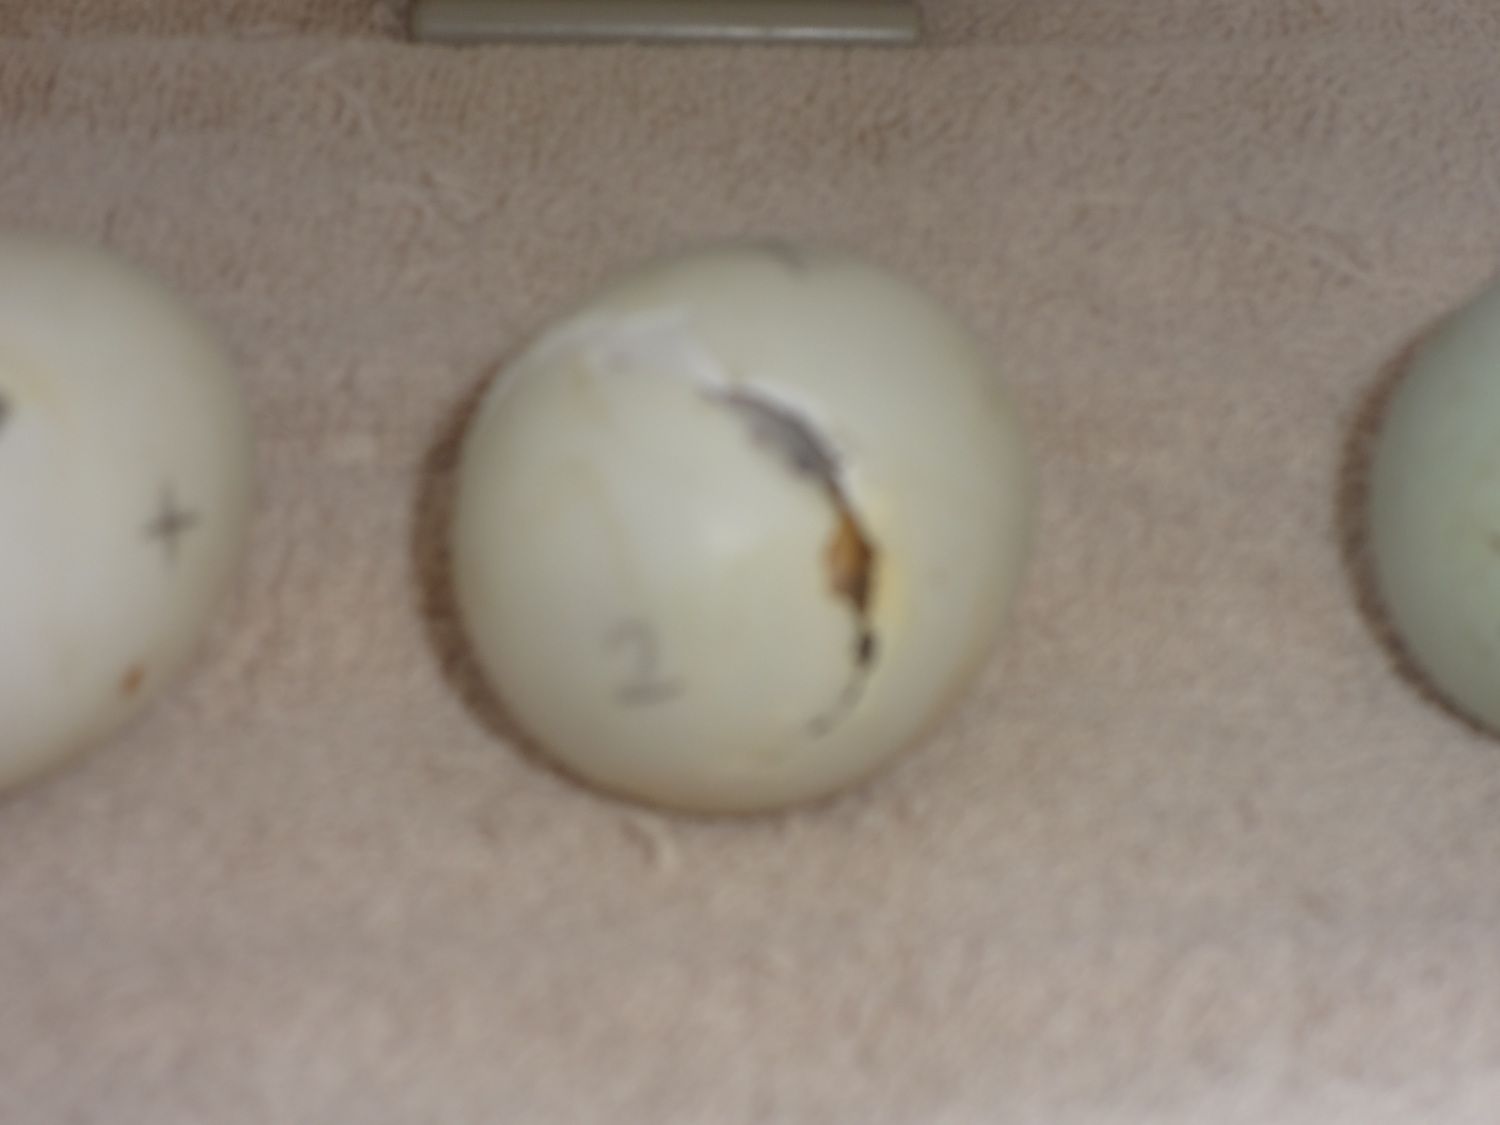
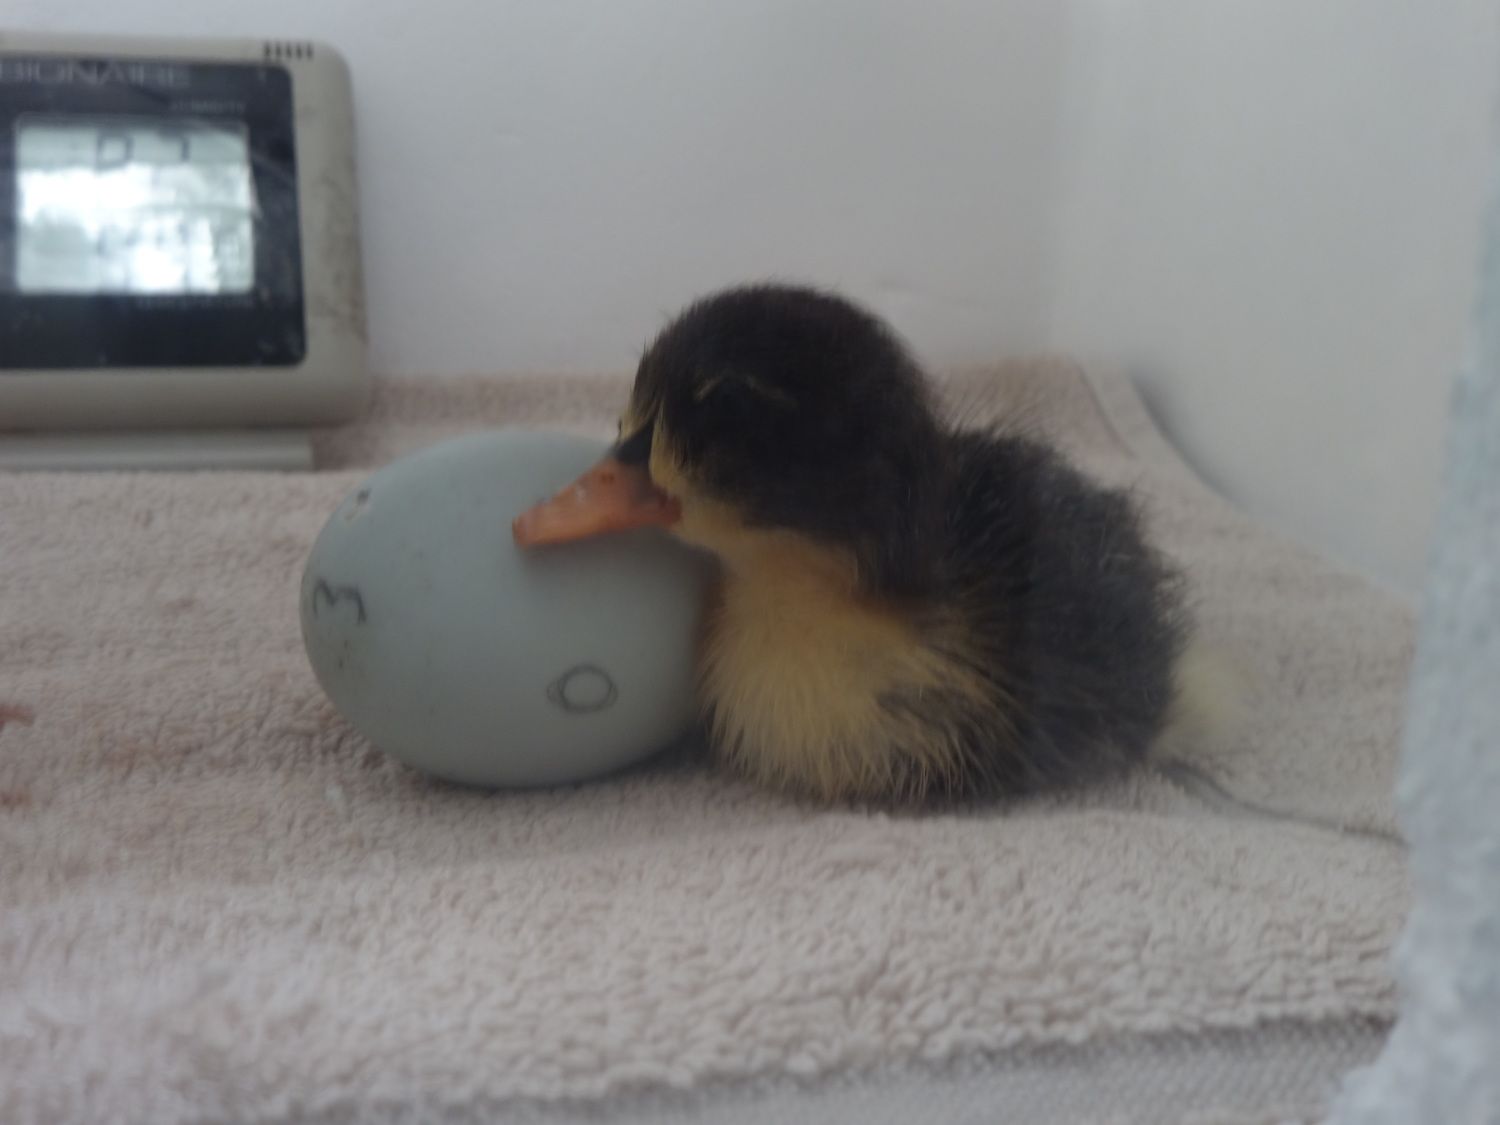
2 days before the hatching day, the embryo will make an "internal pip", meaning it will break into the inner membrane and breathe the air cell. 1 day later, it will make an "external pip" meaning it will break a small dent on the actual shell near the large end which you can see. Once this occurs, the chick will rest for a very long time. DO NOT OPEN THE INCUBATOR AT ALL. THIS LONG WAIT IS NORMAL. It will take at least 12 hours after the first tiny crack for the chick to actually start hatching. (If the chick has not started hatching after 36 hours of the first crack, do research on how to aid it) Once the hatching actually begins occurring, the chick will make a circular opening around the large end of the egg. This process can take 1-4 hours. After the chick has come out, it will rest. Still, do not open the incubator to touch it. Let it rest. After a few hours, the chick will wake up and walk around and dry off. After 24 hours and all of the chicks have hatched, it is ok to open the incubator and touch your new babies. Do not worry about feeding the chick right away. The yolk sac it has absorbed will last it for 2 days, and it probably won't show signs of hunger until then. (If a chick is acting slow and sick, or has egg residue on its down, do research on how to fix it.)
Brooding:
When the chick is 24 hours old, it must be transferred from the incubator to a "brooder", a heated growing station for the chicks. This area could be made out of anything, like a cardboard box, a bin, or an aquarium. Do not have something like a cage because the chicks could escape, and air can flow through the brooder causing the chicks to be cold. Have bedding in the form of shavings. Do not have newspaper because it could make their legs not develop properly.
Have a heat lamp, preferably a red heat lamp used for reptiles, attached to a dimmer switch in order to keep it from getting too hot or too cold. For the first 2 days, have the temperature in the brooder at 95° F. For the rest of the week, have it at 90°F.
For food, have Chick starter mash for chickens, or Game bird starter mash for ducks or game birds. These come in a fine powder that is easy for the chicks to eat. Have them on this food for the first 3 weeks. Show them where the food is and gently put their beak in it so they have a taste for it.
For water, have it in a water dispenser for birds to prevent them from walking in it. Also, put rocks or large marbles in the water so if the chicks do get in the water, they will not get wet and get too cold, because this will cause death.
If a chick looks weak, the other chicks will try to kill it as instinct. Remove the chick and isolate it, and give it vitamin supplements and heat. Once it is completely healthy, place it with the other chicks again. Chicks that are in too small of a space will fight more often.
Last and most importantly, remember that birds grow quickly. Have a home for them once they grow up whether it is in your backyard or at a local farm. Do not hatch birds if you are not in the position to keep them. They need a good, happy life!
Have fun with your chicks!

Last edited:
