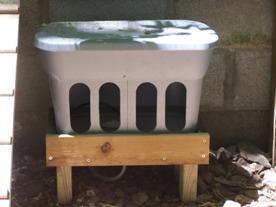
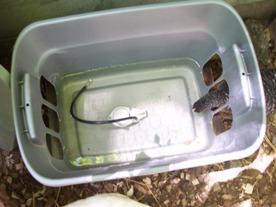
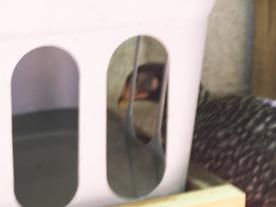
Sorry I didn't get this out sooner. But it's really simple. I like the rubbermaid better than the sterlite (?) because it has more elasticity making it easier to work with. I divided the length of the side I wanted to place feeder holes (I did both sides a the "front")into equal lengths. I wanted a 2 1/4" opening for the peeps to feel comfortable going in & out of & I wanted about an 1" space between the openings. For our waterer it gave us 10 openings for 14 going to 12 peeps. The height of each opening is 8 1/4". Determine how deep you want the trough to be. Ours is 4" & I really should have made it 5". That's because the bottom of the tub rolls up about an 1" & this put the adjustment screw on the top of the ballcock(bc) just out of the water. It still works fine. Just make sure that you have to holes high enough to let the bc work.
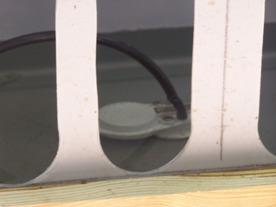
I centered the bc in the bottom of the tub so not to freak out any peeps. The bc is universal fit & uses the tank volume as the shut off. There's no float so you don't have to have a deep well just to accomodate the float system. The one I bought is Ballcock Item # 246712. The male fitting on the bc is long but I wouldn't cut it unless you're really feeling lucky. I added a peice of plywood to stiffen the bottom of the tub & to give myself plenty of treads on the male end of the bc to tighten down the nut. I siliconed the plywood to the tub & the bc to the tub & plywood combo. I got a 20" 3/8" inlet x 7/8" ballcock outlet flex tub which has the fittings in place and all you do is connect them where they go. I connect the 3/8' side which is a female fitting to a 3/8" male reducer on my 1/2" pvc water line. You could connect it directly to a hose pipe (garden hose). You can show the plumbing expert at Lowe's or Home Depot (they are all customer friendly these days!) tell him/her what you want to connect it to & they'll be able to set you up with the proper fittings to get it done.
I measured 6" between center points of the 2 1/4" circles, one at the bottom & one at the top. I drilled the circles out with a cheap ol' circluar hole bit from Lowe's. If you run a straight line perpendicular to the bottom of the tub your circles line up real nice & neat. Lay the tub down on a cutting surface that you can fit inside the tub so you work on just one side. Take a straight edge & using a utility knife with a good sharp blade, cut the tub on the opposite sises of the circle which creates the oval. This is where I really appreciate the rubbermaid. It won't break under the pressure of the knife as easily as the others do.I made a simple wood frame to set the tub in. I used scrape pressure treated 5/4" decking planks. I left the bottom open for easy cleaning & general ease of access.
I'm going to do a drawing & put all this on our BYC page soon. Hope this helps ya!
 I'm going to get it all on our coop page later today.........I hope. In brief, it's a rubbermaid tub that I drilled a series of 2 1/4" holes then cut the tangent lines to make large oval openings. I used a low profile tiolet kit & can keep the water level @ about 4". It's ezy to remove from the stand & tip & clean. I know we'll have to shut it down for 2-3 months a year, but I can live with that.


 , I have been floating the idea of building something similar...floating something similar... from all of the great waterers I have seen on this site.

