Building my first coop! - progress thread

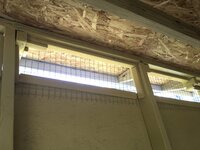
I also got a couple of these. I read about chicks getting tangled and strangled on the long strands of ostrich feather dusters, so I made sure to get dusters made from chicken feathers. Hopefully they’ll feel like mama’s butt and not kill anybody.

Oh, and excuse the cat photobomb. She insists on being included in pictures.

323EB766-32EE-401C-BAD2-0366484E5CAC.jpeg
 
Oh, and excuse the cat photobomb.
Aww she looks a bit like my childhood cat.

I read about chicks getting tangled
Had a chick get tangled in broody mama's breast feathers
had to cut the feathers off the mama then the 'noose' off the chicks neck.
Glad that broody was 'friendly' and I caught it in time.
 
Had a chick get tangled in broody mama's breast feathers
had to cut the feathers off the mama then the 'noose' off the chicks neck.
Glad that broody was 'friendly' and I caught it in time.
Babies of all species are so good at finding ways to die. I’ll keep an eye on the dusters after the chicks hatch.
 
The run construction has officially begun!
IMG_5399.JPG


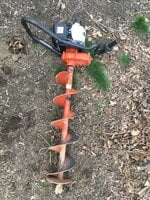
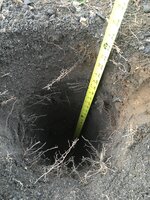
I dug a bunch of holes, all thanks to the auger.
IMG_5378.JPG

Couldn't have done it without the auger. They're 2 feet deep, which is as deep as the auger goes.
IMG_5393.JPG

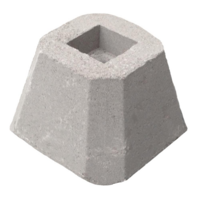
Even with it though, it was HARD work and my whole body hurts today. The soil was full of rocks and thick roots! (that's what I get for wanting a run under trees...) Some areas were so bad that I had to change my plans. Only the 4 corner posts will have in-ground concrete footings. The in-between posts will sit in this kind of footing block:

1586785358071.png
Which will also be dug into the ground where possible, above ground where not possible. This will also reduce the amount of cement I'll need. If I dug holes for all 8 posts, I'd need 750 pounds of dry cement, which is way more than I can move and manage. The footing blocks are 12 x 12 inches at the base and weigh 50 lbs each, so hopefully that will be good enough.

The kids "helped" me with the post hole digger, and really enjoyed watching me work the auger. I had fun, too, even though I busted my ass. I love how I dug holes in the yard with a heavy power tool while my husband was cooking dinner. That's how I like it! 😁
 
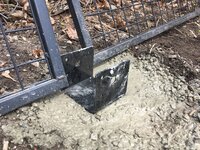
This is finally happening! 2 holes have been filled with concrete, and the first 2 fence panels attached to the coop (while the concrete cures).
96FEE0AA-AF73-410F-B560-1E2218C97D42.jpeg
62423A96-0C79-4F7D-8071-FC1F94CC9190.jpeg
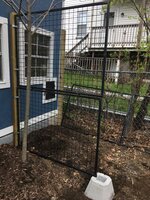
I sunk the concrete block into the ground until the fence panel resting on it was level with the coop side.

Some posts will have poured concrete footers, and some will have those pre-made concrete footer blocks, sunk into the ground.

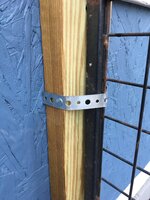
For the coop-side supports, I drilled the 2x4’s into the coop frame. The metal pipe hanger tape was a great find and perfect for securing the fence panels to the wood. I have a whole box of roofing nails left over from the roof construction, and they are coming in handy now for nailing the hanger tape down. They have very wide heads so they won’t come out through the holes.
30894788-B647-4DF7-AD7A-B0375EA12CB2.jpeg
 
Update on my illegally placed coop situation: I met the neighbor who recently bought and moved into the property 1 foot away from the coop. He seems like a really nice, friendly guy! He didn't object to the coop at all, and happily accepted my offer of some fresh eggs once the chickens start laying. I told him I got a faux ivy privacy screen to hang on the run fence, and he really liked that idea, too. He was seriously impressed by the construction and looks of the coop. All in all, this one giant worry of mine is no longer a worry, and I am SO relieved and happy!!! :celebrate
 
Update on my illegally placed coop situation: I met the neighbor who recently bought and moved into the property 1 foot away from the coop. He seems like a really nice, friendly guy! He didn't object to the coop at all, and happily accepted my offer of some fresh eggs once the chickens start laying. I told him I got a faux ivy privacy screen to hang on the run fence, and he really liked that idea, too. He was seriously impressed by the construction and looks of the coop. All in all, this one giant worry of mine is no longer a worry, and I am SO relieved and happy!!! :celebrate
That's great , nice to have good neighbors .
 
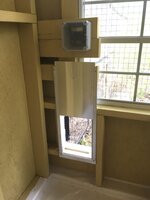
Coop is really close to done. It has an auto door now, the “Happy Henhouse”:
981F686F-43EB-4B6A-AC41-245797BFE68E.jpeg
When I designed the coop, I didn’t think I’d be getting an auto door, so I didn’t factor that into the design. Had to slap some wood on the inside to make it level with the frame, and it’s obscuring the window a bit.., not the prettiest... but it works. The door has been installed for about a week now and works as it should. I can still access the window to open it, too. I’m going to keep the regular pop door I built, too, for when I want to shut the chickens in or out, like for cleaning, without having to mess with the auto door’s programming.

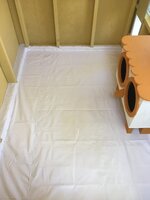
I also put the flooring in. Oilcloth. It was cheap and easy to get. If it doesn’t last long, I can just slap something else on top of it.
8F9CAEB2-3306-4885-AC80-6BF028BF4327.jpeg

I also finished putting HC on the rest of the vents:
E71BAF67-C202-4994-92E4-EB81EDD847A9.jpeg


And added some functional little details :D
C77E2C26-4441-4B3C-96E3-C65F658F8007.jpeg
54A95FF8-2AF9-42E2-8CFF-B7DBDB643A53.jpeg
Roost bar supports are done and painted, just need to put them in and put the branches on them. I decided to give them two roosts instead of one, seeing how I ended up with more chickens than anticipated (though only temporarily, until the extras get big enough to eat).
 
The coop and run are all done, the chickens have moved in, and everybody loves everything! I need to catch up with the build photos, because I have a ton. I'll keep them step by step for anybody interested in the process.

First, the coop.

Here's the clean-out flap. I made a little ramp for it from leftover pieces (they were already triangular like that, I didn't need to cut anything extra), so that I can push the bedding out without catching on the bottom of the wall frame:

IMG_7618.JPG
IMG_7787.JPG


I built steps going up to the human door out of cinder blocks and tiles cemented together (tiles to close the holes in the cinder blocks):

IMG_7788.JPG


Hung some artwork done by the kids especially for the coop:

IMG_7789.JPG


Installed the roosts. I used 6" screws because the branches were very thick:
IMG_7919.JPG


Some extras - a WYZE pan cam:
94D28A3D-6EBA-4B9B-8185-C4430831FD71.jpeg


A remote temperature sensor:
63C917E2-6B1F-4081-8560-DFC62705A8D8.jpeg

D835D95D-D6E1-48B0-BDE2-7F16AEF19F7F.jpeg

(the central air in our house broke, so, as you can see, the chickens have it better than us right now :lol: )

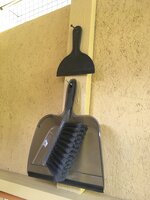
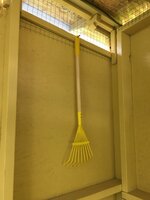
A push broom for the big clean-ups and a rake for fluffing up and rearranging the shavings:
IMG_9074.JPG


Curtains! Because why not :D

IMG_0204.jpg


The lock on the door:
IMG_0208.jpg


The whole interior:
4B4AAE45-21A8-459D-BF35-0C152609F2E1.jpeg

BC9CF513-8EB8-44B8-B91F-5068B362DF13.jpeg


I took the nesting boxes out to give the chicks more room, since they won't need them for a few more months.

The chicks moved in over a month ago and so far everybody is happy!
IMG_0174.jpg
8FD90B27-76BC-44E2-8D1B-8E24B454105A.jpeg


To the left of the doorway, there's a tree stump. That's the visitor chair :D Every morning before I let them out, I go in the coop and sit on my stump for a while. When I do, this is what happens:
IMG_9373.JPG

Meanwhile there are some on my arms, shoulders, and sometimes even on my head!

Here are my chicken cam views - daytime:
261E0B5D-2ACE-4732-ABB9-7F300441C450.jpeg


And nighttime:
47FE8C1D-3F3C-46D5-805D-D267F4A775DD.jpeg


A note on roost space: there are currently 11 chicks in that coop, but I'm not ultimately keeping all of them. I'll cull the 6 males when the hormones hit and they get too loud and obnoxious. Which will leave me with 5 hens and enough roost space. Until then... they'll be tight on the top roost and when they start falling off, somebody's gonna need to settle for the lower roost until I thin out the flock.

And now, here's the outside of the coop, in all its glory! I took a nice clear picture before the run was built and before all the trees and shrubs got their leaves, so it can be seen better:

IMG_5163.jpg


And this is what it looks like now:
IMG_0167.jpg

IMG_0169.jpg


The roof:
IMG_0171.JPG

You can see our house in the background - same color :)

And that is my coop! I'll sort through my pile of run build photos and make another post with those at some point soon, too. I love how everything came together, and the chicks are very happy, too!
 

New posts New threads Active threads

Back
Top Bottom