Hey all,
we got the opportunity to buy a house back in the country again and here we are! I told the DW, I wouldn't be long having chickens again, one of the main reasons I hated living inside the city limits.
So anyway, we bougth 8 blue americaunas from a local breeder, 6 are about 1 1/2 weeks, and the other two were hatched this past monday. I built a brooder box and they are currently in the kitchen....LOL.
So I've drawn up a coop and run, using google sketchup. Man I love that program! it is somewhat limited (the free version) on colors you can pick to 'paint' with, but this will be the design: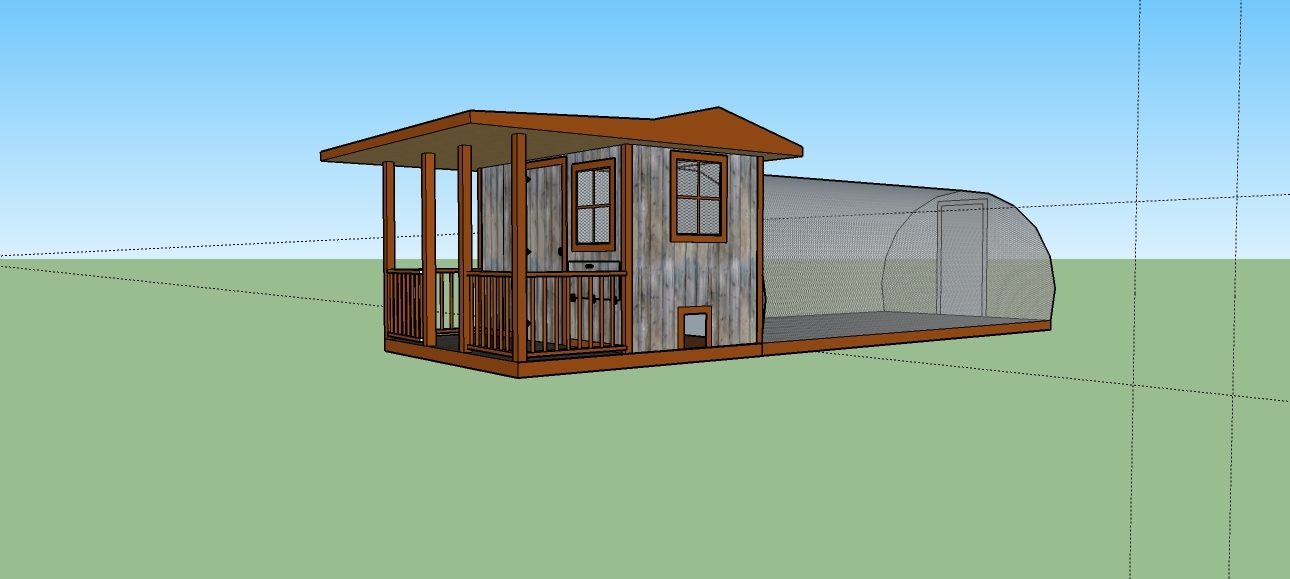
The footprint will be 10x10. The actual coop interior will be 6x8. The porch will be 4 ft wide. DW wanted one that looked like a playhouse.....
The feeder will be built in, gravity fed PVC, a little more description a bit later, the roost will be along the back wall, above the pop doors.
Not sure if I will leave the pop door out the side or not, and after looking at it, I am thinking the nest box under the window will be exterior with a lid top instead of a door to reach into it. My reasoning for that is that for future chick raising, I can fix the brooder box on that side of the coop. I have two pop doors going out the back into the run. For the run, I am going to use cattle panels to make a hoop run, with a door on the end. The coop and run will be 6 1/2' tall, with the peak of the roof being 8', that minimizes the waste on plywood panels. The 1 1/2' I'll cut off on the front and rear panels will be used for shelves for the storage area, seen on the other side:

As mentioned, the two doors on that side will open to a 2' deep storage area. I'll put metal cans in there to hold the feed, and the extra cuts of the plywood will be used as shelves. I intend on making a feeder box on the inside of the coop wall, and cut a hole through from the storage area with a PVS pipe going through the wall and down to the feeder box to gravity feed it. Might as well put it right there where I can fill it from the storage where the feed will be.
I didn't draw in the extra framing that I'll have to do for the run, but it will require more framework. I also didn't draw in the watering system. My plans are to build a stand to hold a food grade plastic drum, plumb in some pvc pipe down the side of the run a ways and put in the watering nipples.
One other aspect, going back to future chicks.....to build the brooder box along the side wall I will have access to the pop door on that side, most likely will have to move that pop door more toward the corner. In my last coop and run that I built, I had the run divided down the middle with a pop door to each. To keep the adults and chicks separate, yet where they could see each other. In this design above, I will be able to go in with fencing and cordon off a section the same way, only make it totally temporary. By just fastening the top of the fence to the cattle panel side, angling down to the ground so as to take in the pop door, and staking the bottom of the fence to the ground.
I do realize that side window will need a storm window over it when the brooder is in. I won't be wiring this coop, but will have access with an extension cord to be able to put a heat lamp in the brooder.
I will take plenty of pictures for posting when I am actually building this. Will probably start on the site prep next week, with my disabilities, it will take me a month to build this, where as back before the injuries, I would have been able to do it in a week or less. It will be on one side of our 1 1/2 acre yard, built under the trees for shade in the summer. It will be wood framed, T-111 plywood panel exterior, plywood floor with vinyl for easy cleaning, corrogated metal roofing....
So whatcha think?
we got the opportunity to buy a house back in the country again and here we are! I told the DW, I wouldn't be long having chickens again, one of the main reasons I hated living inside the city limits.
So anyway, we bougth 8 blue americaunas from a local breeder, 6 are about 1 1/2 weeks, and the other two were hatched this past monday. I built a brooder box and they are currently in the kitchen....LOL.
So I've drawn up a coop and run, using google sketchup. Man I love that program! it is somewhat limited (the free version) on colors you can pick to 'paint' with, but this will be the design:
The footprint will be 10x10. The actual coop interior will be 6x8. The porch will be 4 ft wide. DW wanted one that looked like a playhouse.....
The feeder will be built in, gravity fed PVC, a little more description a bit later, the roost will be along the back wall, above the pop doors.
Not sure if I will leave the pop door out the side or not, and after looking at it, I am thinking the nest box under the window will be exterior with a lid top instead of a door to reach into it. My reasoning for that is that for future chick raising, I can fix the brooder box on that side of the coop. I have two pop doors going out the back into the run. For the run, I am going to use cattle panels to make a hoop run, with a door on the end. The coop and run will be 6 1/2' tall, with the peak of the roof being 8', that minimizes the waste on plywood panels. The 1 1/2' I'll cut off on the front and rear panels will be used for shelves for the storage area, seen on the other side:
As mentioned, the two doors on that side will open to a 2' deep storage area. I'll put metal cans in there to hold the feed, and the extra cuts of the plywood will be used as shelves. I intend on making a feeder box on the inside of the coop wall, and cut a hole through from the storage area with a PVS pipe going through the wall and down to the feeder box to gravity feed it. Might as well put it right there where I can fill it from the storage where the feed will be.
I didn't draw in the extra framing that I'll have to do for the run, but it will require more framework. I also didn't draw in the watering system. My plans are to build a stand to hold a food grade plastic drum, plumb in some pvc pipe down the side of the run a ways and put in the watering nipples.
One other aspect, going back to future chicks.....to build the brooder box along the side wall I will have access to the pop door on that side, most likely will have to move that pop door more toward the corner. In my last coop and run that I built, I had the run divided down the middle with a pop door to each. To keep the adults and chicks separate, yet where they could see each other. In this design above, I will be able to go in with fencing and cordon off a section the same way, only make it totally temporary. By just fastening the top of the fence to the cattle panel side, angling down to the ground so as to take in the pop door, and staking the bottom of the fence to the ground.
I do realize that side window will need a storm window over it when the brooder is in. I won't be wiring this coop, but will have access with an extension cord to be able to put a heat lamp in the brooder.
I will take plenty of pictures for posting when I am actually building this. Will probably start on the site prep next week, with my disabilities, it will take me a month to build this, where as back before the injuries, I would have been able to do it in a week or less. It will be on one side of our 1 1/2 acre yard, built under the trees for shade in the summer. It will be wood framed, T-111 plywood panel exterior, plywood floor with vinyl for easy cleaning, corrogated metal roofing....
So whatcha think?
Last edited:


