This is our Barn Red Coop.

I had to change phones so the building pics were lost. Then I had back surgery, then we moved. So I will do my best to explain it. I had help from my son and husband on this. My son framed it. My son used 2x4s for basic framing but used 2x6s for support corners and the flooring frame. He used 4x4s at the corners of the run. He framed the coop and run but after the framing was done we concentrated on the coop part first. The framing was nailed and screwed. Then we placed the floor of the coop. We used plywood as a floor base. The coop measures 5x8 and the attached run measures 5x8. I used cauking and steel wool to fill any little cracks on the floor where the boards butted together and hand sanded any uneven cauking. I put sheet vinyl on top of the base floor for ease of cleaning. I used liquid nails to secure it to the base wood flooring.
Then we used plywood sheets to put up the walls. We had to cut out the doors and the vent holes from the plywood before the walls went up. We nailed it together then we drilled holes and placed screws at stress points like corners.
I used cabinet henges to attach the vent hole covers. I cut the covers bigger than the vents so that the hole for the vents was completely covered by the vent doors. I also sanded the covers before I placed them. Then we used door henges to place the people door in place and attached slide latches at 2 places on that door to lock it closed for chicken security.
Next we made the nest boxes.
1st we cut a hole out of the wall where it was to be placed. Then we framed the hole and support for the nest boxes. It was actually one big box that was divided into 3 boxes. We measured the hole, cut plywood to fit the base or bottom of the hole, and added the sides. The nest box was nailed and screwed. Then I divided the box in 3 sections on the inside for 3 nest boxes by placing vertical dividers supported by 2x4s. Which was cut to fit the hole and be secured on top and on bottom by screws and is flush with the lid. Once the box was constructed we placed it in the hole with the supports. It was nailed and screwed in place and we added the supports under the box on the inside of the coop since the inside of the box is larger than the outside of the box. The nest box is extended outside and extended inside the wall of the coop. On the outside edge of the box where the lid lands I placed a 2x4 to keep it from worping and as a support for the heavy lid. Then we made a.. lift lid.. for it so I can collect the eggs from outside the coop. I added a 2x4 on the edge of the lid for weight to keep it closed and secure and I also use it as a handle to open the lid. To make sure the girls stayed dry in the box when the lid is lifted ..we used a piece of metal flashing and screws to place a piece of plastic table cloth above the site where the lid hinges onto the coop wall to prevent rain from dripping down. It is set up where it can be unscrewed to replace the plastic flap if needed. The move here damaged the flap some.

The nest box took us a really long time as we wanted to get it right.
Then it was constructing the pop door. We had previously cut the pop hole before we placed the plywood. I cut a piece of plywood big enough to completely cover the pop hole to use as the door. We placed spacers or groves above and below the door and on both sides for stops and for door support and for framing to allow just enough room for the door to slide and shut securely without room for anything but the pop door. Basically a spacer the width of the door between the wall and the frame. We framed the bottom for the slide door then placed the door in the grove then framed the top securing the door in place.
Then we attached metal flashing above the frame to protect the wood from weather.
Then I used 1/2 inch hardware cloth to cover all the vents from the inside of the coop. All hardware cloth is stapled securely with a staple every 2 to 3 inches apart. And every inch apart at stress points
Then we placed metal roof on top of the coop at a slant for drainage. We also used the metal spacers that is curved like the metal sheeting to cover the holes between the sheeting and the framing.
Then we finished the framing on the run which didn't have a floor. It was open to ground. I covered the run and the roof of the run with 1/2 inch hardware cloth. Then placed a tarp on top of the hardware cloth of the roof for shade and weather protection. Then I painted everything in the run and the outside of the coop "Barn Red". Then we placed metal flashing on the wall corners for weather protection. Then we constructed a small attached table in the coop. Under the table I have metal cans to keep feed in. On the table is the poop board that I have placed a crate plastic liner on and sand in that to clean poop. At the top edge of the table is framing for and a roost bar set that I made. The framing is made of 2x4s but the roost bars are made of 2x2s which I sanded before placing. I put u-shaped holes on the edges of the frame to make ease of placing the roost bars where I can easily remove them for cleaning. The frame for the roost bars is screwed to the table but easily removed for cleaning.
We purchased a cheap screened door and I put hardware cloth on it and placed it for the people run door. I also put 2 hook and closed eyed locks on this door too.
I have been stapling old feed bags to the inside of the coop for insulation (an ongoing operation). I placed shade cloth around the bottom of the run because my dogs kept pawing at the run. It worked. Out of site-out of mind. Then my phone had to be replaced and I lost all the building pics. The chickens moved in and I had to have surgery on my back. Then we had to move. I hired a shed mover to move my coop. He placed 4x6 posts under it as skids. So when the coop was placed it was sitting on the skids not the ground. So I placed hardware cloth around it and on the bottom of the run then placed concrete cinder blocks around the whole coop. I filled the run with sand to cover the hardware cloth and will do deep liter methods on top of the sand. I am starting seedlings now but when they are ready and weather is warmer I will be planting herbs and edibles inside the cinder blocks for the girls.
This pic shows the inside of the nest boxes
This one shows opening the nest boxes from the outside
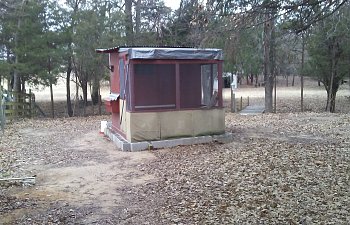
These are some outside pics
In this pic you can see the hardware cloth coming up from the bottom which we secured with a 2x4 on top of the 4x6 so the girls feet are protected from the hardware cloth. The Bottom is covered with sand.
This pic shows the underside of the run roof
My RIR Louise is leaving the coop going into the run. You can see the pop door from inside the coop.
I plan on fixing a way to open the pop door without going into the run to do so. I also plan on adding another run attached to the present run with a pop door so the girls can have more room outside. I have to make a run as there are more preditors in this area that we live in now than before at the old house. If I had to do it again i would make the coop bigger by at least 8x8 instead of 5x8 giving the girls more room for ladder space and roost space. And I would add a people door from the coop to the run.
This is a pic of one of the vents with the outside cover/door closed so you can see the hardware cloth on the inside of the coop.
Pics of inside nest box is at end of article. I tried to place them here but had trouble doing so. The.. side of the nest box.. outside the coop is at the bottom of the article also.
This pic shows under the table and the ladder placement. As said earlier.. I would give more room for the ladder if I was to do it again.
The coop people door
The run people screen door
Screen door lock
Coop door lock
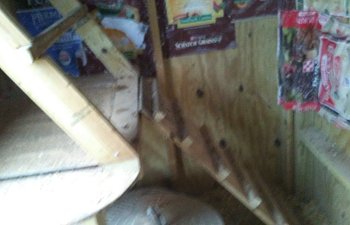
This one shows a closer look at the framework on the pop door.
I also plan on adding curtains for the nest boxes. And more roosts in the run. I also want to add another big vent over the pop door.
Following pics are layouts
Just note. I did a lot of research before building this on this site. My first coop. Also 1st time I made a building. Thank you.
Debra
I had to change phones so the building pics were lost. Then I had back surgery, then we moved. So I will do my best to explain it. I had help from my son and husband on this. My son framed it. My son used 2x4s for basic framing but used 2x6s for support corners and the flooring frame. He used 4x4s at the corners of the run. He framed the coop and run but after the framing was done we concentrated on the coop part first. The framing was nailed and screwed. Then we placed the floor of the coop. We used plywood as a floor base. The coop measures 5x8 and the attached run measures 5x8. I used cauking and steel wool to fill any little cracks on the floor where the boards butted together and hand sanded any uneven cauking. I put sheet vinyl on top of the base floor for ease of cleaning. I used liquid nails to secure it to the base wood flooring.
Then we used plywood sheets to put up the walls. We had to cut out the doors and the vent holes from the plywood before the walls went up. We nailed it together then we drilled holes and placed screws at stress points like corners.
I used cabinet henges to attach the vent hole covers. I cut the covers bigger than the vents so that the hole for the vents was completely covered by the vent doors. I also sanded the covers before I placed them. Then we used door henges to place the people door in place and attached slide latches at 2 places on that door to lock it closed for chicken security.
Next we made the nest boxes.
1st we cut a hole out of the wall where it was to be placed. Then we framed the hole and support for the nest boxes. It was actually one big box that was divided into 3 boxes. We measured the hole, cut plywood to fit the base or bottom of the hole, and added the sides. The nest box was nailed and screwed. Then I divided the box in 3 sections on the inside for 3 nest boxes by placing vertical dividers supported by 2x4s. Which was cut to fit the hole and be secured on top and on bottom by screws and is flush with the lid. Once the box was constructed we placed it in the hole with the supports. It was nailed and screwed in place and we added the supports under the box on the inside of the coop since the inside of the box is larger than the outside of the box. The nest box is extended outside and extended inside the wall of the coop. On the outside edge of the box where the lid lands I placed a 2x4 to keep it from worping and as a support for the heavy lid. Then we made a.. lift lid.. for it so I can collect the eggs from outside the coop. I added a 2x4 on the edge of the lid for weight to keep it closed and secure and I also use it as a handle to open the lid. To make sure the girls stayed dry in the box when the lid is lifted ..we used a piece of metal flashing and screws to place a piece of plastic table cloth above the site where the lid hinges onto the coop wall to prevent rain from dripping down. It is set up where it can be unscrewed to replace the plastic flap if needed. The move here damaged the flap some.
The nest box took us a really long time as we wanted to get it right.
Then it was constructing the pop door. We had previously cut the pop hole before we placed the plywood. I cut a piece of plywood big enough to completely cover the pop hole to use as the door. We placed spacers or groves above and below the door and on both sides for stops and for door support and for framing to allow just enough room for the door to slide and shut securely without room for anything but the pop door. Basically a spacer the width of the door between the wall and the frame. We framed the bottom for the slide door then placed the door in the grove then framed the top securing the door in place.
Then we attached metal flashing above the frame to protect the wood from weather.
Then I used 1/2 inch hardware cloth to cover all the vents from the inside of the coop. All hardware cloth is stapled securely with a staple every 2 to 3 inches apart. And every inch apart at stress points
Then we placed metal roof on top of the coop at a slant for drainage. We also used the metal spacers that is curved like the metal sheeting to cover the holes between the sheeting and the framing.
Then we finished the framing on the run which didn't have a floor. It was open to ground. I covered the run and the roof of the run with 1/2 inch hardware cloth. Then placed a tarp on top of the hardware cloth of the roof for shade and weather protection. Then I painted everything in the run and the outside of the coop "Barn Red". Then we placed metal flashing on the wall corners for weather protection. Then we constructed a small attached table in the coop. Under the table I have metal cans to keep feed in. On the table is the poop board that I have placed a crate plastic liner on and sand in that to clean poop. At the top edge of the table is framing for and a roost bar set that I made. The framing is made of 2x4s but the roost bars are made of 2x2s which I sanded before placing. I put u-shaped holes on the edges of the frame to make ease of placing the roost bars where I can easily remove them for cleaning. The frame for the roost bars is screwed to the table but easily removed for cleaning.
I have been stapling old feed bags to the inside of the coop for insulation (an ongoing operation). I placed shade cloth around the bottom of the run because my dogs kept pawing at the run. It worked. Out of site-out of mind. Then my phone had to be replaced and I lost all the building pics. The chickens moved in and I had to have surgery on my back. Then we had to move. I hired a shed mover to move my coop. He placed 4x6 posts under it as skids. So when the coop was placed it was sitting on the skids not the ground. So I placed hardware cloth around it and on the bottom of the run then placed concrete cinder blocks around the whole coop. I filled the run with sand to cover the hardware cloth and will do deep liter methods on top of the sand. I am starting seedlings now but when they are ready and weather is warmer I will be planting herbs and edibles inside the cinder blocks for the girls.
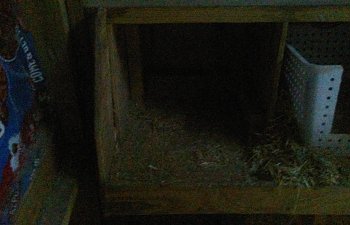
This pic shows the inside of the nest boxes
This one shows opening the nest boxes from the outside
These are some outside pics
In this pic you can see the hardware cloth coming up from the bottom which we secured with a 2x4 on top of the 4x6 so the girls feet are protected from the hardware cloth. The Bottom is covered with sand.
This pic shows the underside of the run roof
My RIR Louise is leaving the coop going into the run. You can see the pop door from inside the coop.
I plan on fixing a way to open the pop door without going into the run to do so. I also plan on adding another run attached to the present run with a pop door so the girls can have more room outside. I have to make a run as there are more preditors in this area that we live in now than before at the old house. If I had to do it again i would make the coop bigger by at least 8x8 instead of 5x8 giving the girls more room for ladder space and roost space. And I would add a people door from the coop to the run.
This is a pic of one of the vents with the outside cover/door closed so you can see the hardware cloth on the inside of the coop.
Pics of inside nest box is at end of article. I tried to place them here but had trouble doing so. The.. side of the nest box.. outside the coop is at the bottom of the article also.
This pic shows under the table and the ladder placement. As said earlier.. I would give more room for the ladder if I was to do it again.
The coop people door
The run people screen door
Screen door lock
Coop door lock
This one shows a closer look at the framework on the pop door.
I also plan on adding curtains for the nest boxes. And more roosts in the run. I also want to add another big vent over the pop door.
Following pics are layouts
Just note. I did a lot of research before building this on this site. My first coop. Also 1st time I made a building. Thank you.
Debra