I grew up keeping poultry. Mum took us kids to a local market every spring and each of us got to pick out a chick or duckling to raise. In the back of our acre of backyard were a duck coop and a chicken coop, but the birds free-ranged the whole property during the day. It was the kids' job to shut the coops up each night, and when invariably - because kids are kids - we forgot, we woke the next morning to the devastation foxes leave when they've been partying all night. Beyond that, we never gave a lot of thought to the birds - they were just "there".
As a young adult, while house-hunting, we looked at one house that had the most gorgeous chicken coop in the backyard. We literally bought that house because of the coop LOL. As part of the contract, the sellers agreed to leave some started hens, so we had eggs as soon as we moved into the house. I thoroughly appreciated being able to collect the fresh eggs, and between those and the vegie garden I immediately started, I was able to feed my toddlers some pretty wholesome meals.
Then I moved to the US, to a city where I never saw any poultry and assumed there were rules prohibiting keeping them. Unfortunately, I didn't check into it for many years, and it was only in 2009 that I decided I couldn't take it any more, looked into the city ordinances and discovered that they are in fact, perfectly legal here. I lost no time obtaining both chicks and a free A-Frame coop from someone on Freecycle and we were in business. The 8 straight run buff orp chicks I obtained from a local breeder turned out to be split 50/50 on gender and since the city ordinances do prohibit roos, we were quickly down to four. Well, not for long. Chicken math took over, and before I knew it was brushing up against my upper limit of 12 hens and STILL there were more breeds I wanted.
So what does any sane person do in this situation? Keep in mind the sane person has already bought one house primarily because of the coop in the backyard......you got it! We bought a house on 10-acres, out in the country, where there are no restrictions on poultry. (Having a wonderful DH is a pre-requisite - I don't know many men who would be so patiently supportive of a wife who buys properties just to keep chickens.)
The property we purchased is on 10-acres and already contained a concrete slab that seemed to be the most appropriate place to build a coop. The slab measured 15'9" x 10'8". I decided to stick with even numbers and build a 10x14 coop. The front 10x10 is to be coop, with the back 10x4 area to be storage for feed, medicine, chick feeders/waterers. Etc. As of today, this is still a work in progress and I will update this page as I proceed but will start with the progress to date.
First came gobs of research. The concrete slab had no built in anchor points so I researched the heck out of how to anchor the thing so it won't blow away in our Kansas winds. I settled on 5 1/2" long wedge anchors, and since I was using treated lumber for the bottom plates, they had to be zinc coated. I couldn't even buy them locally and had to order them from a seller on eBay.
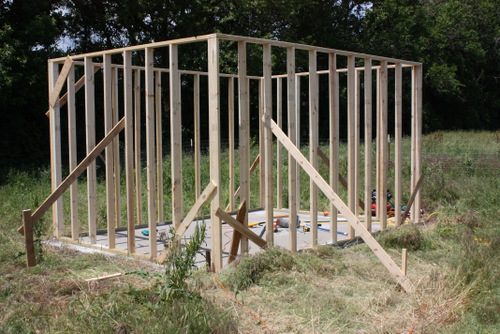
I started by building the walls one by one on the slab, and when all four walls were built, spent most of a day drilling the holes with a hammer drill and anchoring them. At this point I did not frame in doors and windows, figuring it would be easier to just build 4 walls with studs 16" OC, and then cut out openings for windows and doors. (DH is so busy right now that he was unable to help with the build, so a friend offered to come and help me. Couldn't have done it without him - some of the pieces are so long/heavy/unwieldy that there would be no way for one person to handle them alone).
All four walls in place:

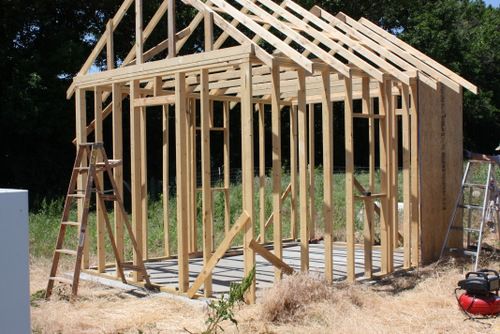
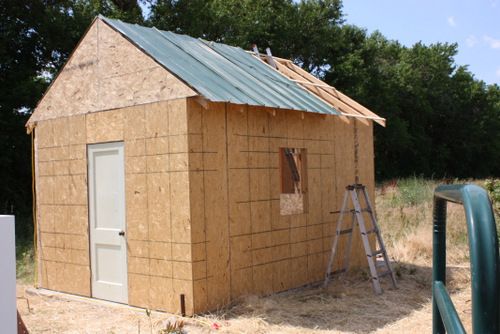
Next step was to design and build the roof trusses. We built one to make sure it was the angle we wanted, and once we were satisfied with it, used it as a template to build the remaining trusses. Then I stood on a ladder and my helper passed one end up to me, rested the other end on his step-ladder, climbed up the ladder, and pulled his end up. It wound up not being as hard as I had feared. Triangulating and securing them took some time but we were pleased with the end result. (A few nights after installing them we had a huge storm with 70mph winds and I am pleased to report, the trusses stayed right in place). At this point you can also see where we had cut out and framed the windows and doors.
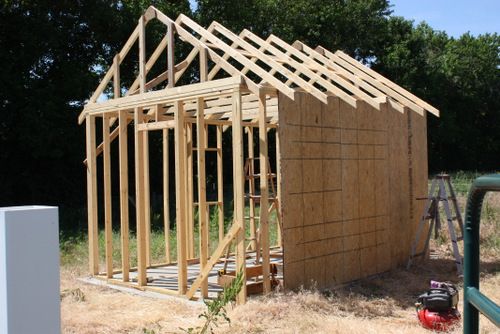
Now the fun part: sheeting. I like this step because each sheet that goes up looks like huge progress and only takes minutes. I purchased a framing nailer just to build the coop, so was able to nail each sheet of OSB up in 5-10 minutes. In no time the coop went from just framed out, to looking like a real building.
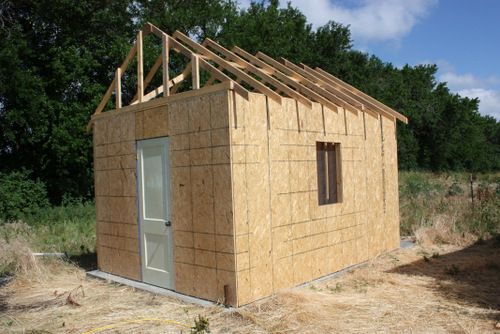
Once all the sheets of OSB were up, we installed the doors. There are two external doors, so that I have the option of entering directly into the coop, directly into the storage area, and, eventually, going from one to the other via the internal door that will be installed in the internal wall dividing the two. I was fortunate that the doors were given to me by a neighbor who was doing some renovating. They were internal doors at her house but will be external here. Hey - it "just a chicken coop"!
The windows we covered with hardware cloth on the inside because.....I got ahead of myself and got some Spring chicks that are now crowing. My neighbors have been tolerant to date but I didn't want to push my luck, so needed to get the trouble-makers moved out to the new property. Although there is no roof, by installing doors and covering window openings with hardware cloth, I hoped to keep them safe for a few days until I can get the roof on.
The internal wall is framed and installed (less the door, only because I didn't have the hinges to install that yet.
Next step is roofing and siding. I already have the roof materials (metal roof because those materials were also donated to me and free is free). I'm still trying to obtain some siding used - it is rather expensive new, and if I can save a little on that, I will do it.
June 5th, 2012
I spent yesterday working on the coop some more and by the end was exhausted, hot, sweaty, sunburned (it was 92 in the shade but I spent most of the day on a ladder in the sun) but pleased with the progress.
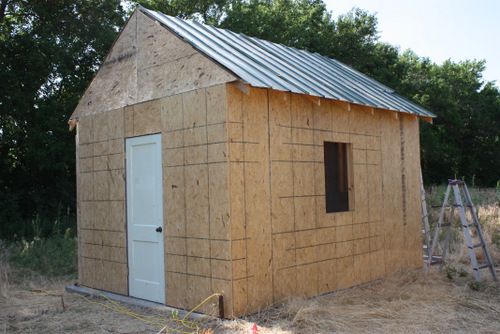
The first thing to do was to finish sheeting, having purchased the last sheet of OSB I needed to do the triangle-thingies at the end of the coop.
Next we started laying out the foundation for the roof. Several sheets of metal roofing were donated to me so although metal wouldn't have been my first choice.....free is free so I will make do. The (used) roofing sheets I was given consisted of 2 that were 12 1/2' long, 2 that were 11' long, and four that were 6' long. I decided that if I could cut the longer sheets down to the 92" needed for one side, I could add them onto the 6-footers for the other side.
So the first thing that needed be done was to lay some furring sheets horizontally across the roof trusses, so we would have good anchor points for the sheets of metal roofing.
Next, we put a cut off wheel on the circular saw, and made the first cut into one of the longer sheets, then installed that sheet on the roof as the foundation for the rest of them to line up on.
We decided to alternate sides, doing one sheet at a time left and right. That allowed us to get up on ladders from the inside of the coop and screw the sheets in the middle on both the left and right sides of the roof. There was a LOT of getting up and down from ladders. The coop is 8' tall with a 4' peak, and I had to get up on a high rung of the ladder in order to lean over the top part of the roof to affix screws. I am not afraid of heights but I AM afraid of a ladder slipping and having to fall from a 12'+ height so....I'm glad that part is done.
We still need to add a ridge cap but it already provides shade and much better protection from the storms that are predicted for later this week, since I may not be able to make any more progress until Friday.
In addition to the coop, is the work we have to do on the "run". Rather than a traditional run, I opted to give them a huge fenced yard, in which to roam during the day. My hope is that by locking them into a secure coop at night, we will minimize losses to predators. Their yard will be approximately an acre in size. It contains one tree within the yard, and there are two others just on the outside of the fence - one on the east side and one on the south. The hedge row shown in the pic is to the west and starts to throw shade into the yard by about 1:30 in the afternoon. At any given point during the day there is somewhere that is in the shade so they will really have their choice about keeping cool this summer.
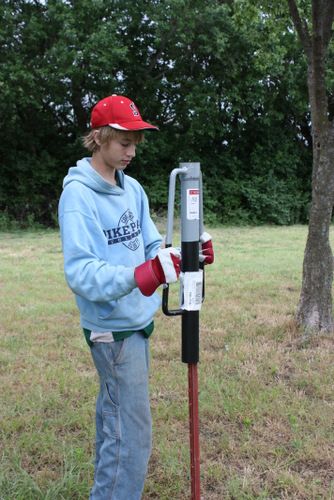
We had some good rain last week so while the ground was soft, it seemed like a good time to drive fence posts. I told DS that he will make friends quickly at his new school in the fall, if he is buff and toned and that therefore, he should be thanking me for allowing him to drive the fence posts.
This photo shows the string line for the first side of the fence. After driving in all of the fence posts on this side we realized we had room to go back another 12', so in fact the fence post shown here is the second post and the run is 12' longer. You can see the coop in the background.
The job was made easier by the purchase of a fence post pounder.
The fence will be 5' high, galvanized 2x4 welded wire. I bought 400' of it this morning, along with the wire post ties so hopefully I can get some work done on the fencing in the next few days. For a yard this size that is not going to be a covered run, the cost of hardware cloth is prohibitive. The main point of the fencing will be to keep the chickens contained (one may occasionally fly over but at my current house a 4' chicken wife fence kept them out of the vegie garden so hopefully the 5' will deter them from trying to fly out), and to slow down local dogs who want to play a game of chicken chase. I know it won't keep out raccoons or other determined predators but since they are most active at night when the chickens will be safely locked in their coop, I decided to try this, and hope losses are minimal.
That is it until Friday when we will hopefully finish the roof (ridge vent) and get started on the siding. Oh - silly me - after fretting about finding some used siding, I found a number of sheets in our pole barn, left over from when the seller had the barn built. I'm hoping it will be enough to side the whole coop with the added benefit, it will match the barn.
July 6th, 2012
So much has happened since my last update, including moving house. My camera cable's whereabouts was unknown until yesterday so although I continued to take pictures, I had no way to download them so I could update the progress of my coop build. I found it yesterday so without further ado.....
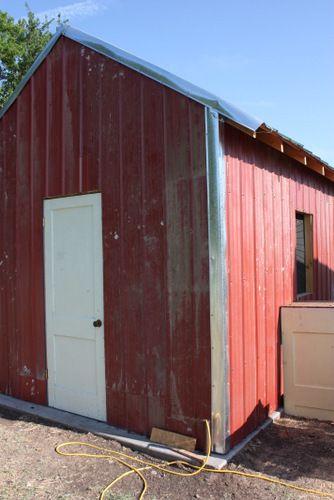
Next step was to start on the siding. I had not planned to do metal siding and was a little concerned about it in the heat, but free is free and I decided it it wasn't working I could always replace it. We've had a heat wave since moving the birds here with temps of up to 112, and what I'm finding is that the coop is not baking them. Having the OSB under the metal siding makes a huge difference, as does having a tree row to its west, so it gets shade in the afternoon. Here is a pic with the siding. Yes, its a little dusty from where it was lying in the pole barn for who knows how long. A good rain or hose off will fix that. To trim the edges, I used $7 strips of galvanized flashing from Menards. I don't love the silver but it was better than paying $35 a piece for the metal corner pieces that are usually used. If I really get motivated one day I might strip them with vinegar and paint them white. For now they are doing their job even if they don't look great.
And the last outside step was to add a ridge cap. I had one of the metal siding corner pieces in the barn, but instead of using it as a corner piece, I used it as the top ridge cap. Since it was 10' long and I needed 14', I slid a 4' piece of galvanized flashing under each end. What I love about the ridge cap is not how it looks but how it performs. Because the corner piece has 4" sides, it sits up from the top of the roof, allowing hot air to vent along its entire length. The flashing underneath extends 2' under on each end, to prevent rain entering via this point. We had a torrential rain 2 days after it was installed and the coop stayed dry. Yet, the inside of the coop is no hotter than the outside at any given time of the day.
I also completed my internal wall but using a sheet of OSB to create a solid lower portion, and chicken wire for a see-through (and for air flow) upper portion (well, okay, the chicken wire was not on when this photo was taken but it is now. An installed door completed the wall. The storage area now has shelves you can see in this picture, and feed bins at the opposite end.
Next I built nest boxes. I found some scrap lumber in my barn, and was able to use it to make the nest boxes. I was pleased not to have to go out and buy more supplies. The slope of the roof is effective at keeping them from nesting on it. I did put legs on the front but found I was actually able to install it by screwing the back directly into studs, which holds it solidly and the legs are unnecessary. The hens don't seem to have any problem jumping directly from the ground to the top row of boxes. Each box is about 14x14x14.
My guineas, chicks and ducks were moved to the coop first. My layers did not get moved over here until June 17th. The next morning they demonstrated that they recognized what the nest boxes were "for":
I had anticipated a slow down in laying after the stress of the move and thought these might be the last eggs I'd see for a few weeks. The slow down didn't happen and every day since then, I've gathered enough eggs to put a smile on my face. I do plan to replace the shavings in the nest boxes with straw, as they tend to scratch the shavings to the edges.
The next internal finishing item was to build roosts. DS and I completed this in an hour or so using more scrap lumber from the barn. There are 3 levels, at 2', 4' & 6' off the floor. Needless to say, most of them want to be on the top level, but a few of the lower ranking birds will roost on the middle level, and my broody-hatched chicks seem content on the lower level. The plan (still on the to-do list), is to install eye hooks towards the bottom of the roost so I can swing them up and hook them to the ceiling when it is time to clean all of the bedding out of the coop. For that reason they are installed via lag bolts at the top. In this photo you can also see that I stapled chicken wire along the bottom of the rafters, to prevent them roosting up there. Although it wouldn't have been a huge issue for them to roost up there I worried about them jumping down in the morning and getting foot/leg injuries.
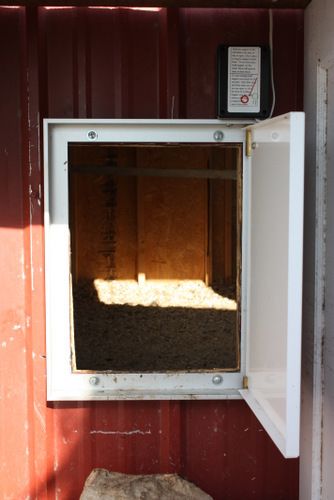
Next I wanted to install an automatic door, for several reasons. First, I wanted the flock to be able to get outside first thing in the morning, even if I wanted to sleep in. Second, I wanted to be sure they were securely locked up at night even if I forgot, or if I am out all evening. Third, I wanted the flock to be semi self-sufficient in the event we need to go out of town for a few days.
So I researched thoroughly, ever automatic door out there. I eventually went with the Pullet Shut door, that swings outward to open, rather than the guillotine style. I had room for the guillotine but got some poor reviews on some, with people saying the motor didn't hold up, the sensor didn't work etc. Installation was easy, even with the metal siding. I put the cut-off wheel on the circular saw and cut through the metal, then switched to a regular blade to cut through the OSB. Piece of cake. Four bolts installed the door, and then I had to run the wiring. The battery sits inside the coop above the window. The solar panel that charges the battery sits on the roof (it can be seen in the above photo of the ridge cap). And the sensor is so small you probably can't see it in the photo showing the front of the coop. So far the door has worked flawlessly.
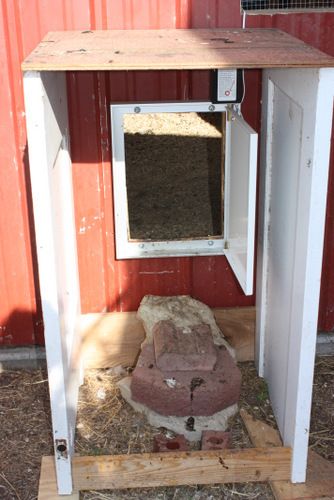
However I had a problem with the guineas wanting to fly up and sit on the top of the door. Then when they flew down and kicked off, I could see the door rock on its hinges and knew it would only be a matter of time until it was broken. The door was NOT cheap so in order to protect my investment I built a "chunnel". (I do now regret getting the door that opens out since a guillotine style door would not have had this issue.)
The chunnel is constructed from an internal door that was donated to me. I cut it in half, "roofed" it with some scrap pieces of plywood, triangulated the bottom with some more scraps, and sat it in front of the door. Still to go: attaching it to the coop via screws from the inside into the side walls, and painting it to match the coop so it doesn't look like "doo-doo". The pile of rocks will also be replaced by proper steps. I installed the door high enough to do DLM this winter which made it too high for the ducks to jump in and out, so I had to hastily make some steps for them. The chickens and guineas have no problem navigating it directly from the ground.
The yard itself is also finished. At 60' across by 240' long it gives them enough space to feel like they are free-ranging, and keep grass growing in it, versus turning into a dirt patch, yet they are not pooping on the porch or patio
They have become so used to their space that even when I leave the gate open, no one ventures out. The yard extends past the white vinyl fence you can see in this picture (it was already there and they just walk under it), to about 30' past the back of the coop.
So that is it for now. I still have things that need to be tweaked but it feels good to have got it to this point.
October 7th, 2012
The tweaking continues. After discovering the several of my birds had bumblefoot, I decided to redo the roosts. The top roost on the ladder style was 6' high and they were jumping off rather than stepping down. Despite the deep bedding layer, I think this is the cause of the bumblefoot so....I took that ladder roost apart and built a roost that holds more birds, takes up less space, and contains 4 roosts on the same level instead of 3 roosts on different levels. The new roost is 3' off the coop floor (less as the deep litter bedding layer builds up).
And, as the weather gets colder, it felt like time to add the storm windows to the outside of the coop. Until now all I had for windows was an opening covered on the inside by hardware cloth. That remained and it took only 5 minutes to screw the storm window to the outside of the window opening. I really liked how it gave the coop a more "finished" look. At the same time, I added gutters. This was not in the original plan but what I found was that water draining off the roof edge was creating a little trench in the ground below. I found myself lining pans along under the roof any time it rained to catch the water and then the birds had water for days without the need to refill so.....a lightbulb went off and I thought if I could catch all of that water and keep it clean for them....so I bought a rain barrel and gutters. The rain barrel will have to wait until spring since we get enough freezing weather here to destroy the fittings, but the gutters are now installed and ready to go.
April 3rd, 2013
Late last year I added a new feeder to the coop that is working out even better than I had hoped. I took the left over piece of gutter from when I added the gutters (above), and attached it to the internal wall of the coop, after adding end caps. Then I took a piece of 4" PVC pipe and inserted it almost to the bottom of the gutter, leaving just enough space for feed to spill out into the gutter. I attached the PVC pipe to the wall with metal strapping. I angled the top of the PVC to allow pouring into it more easily without spilling. I can now fill the pipe from the feed room side of my coop, and the birds themselves spread it down the length of the gutter. The pipe holds enough feed for 40-50 birds to last about a day and a half. After four years of trying one feeder style after another, I have finally found what works flawlessly for my situation. The feeder takes up almost no room in the coop, since it is attached to the wall and sticks out only 3-4". It is mounted high enough that rodents don't appear to be an issue. And, the steep sides of the gutter don't allow the birds to bill the feed out, so I have almost zero waste.
Oops...looks like I need a better picture showing the whole gutter feeder system. Will update soon.
As a young adult, while house-hunting, we looked at one house that had the most gorgeous chicken coop in the backyard. We literally bought that house because of the coop LOL. As part of the contract, the sellers agreed to leave some started hens, so we had eggs as soon as we moved into the house. I thoroughly appreciated being able to collect the fresh eggs, and between those and the vegie garden I immediately started, I was able to feed my toddlers some pretty wholesome meals.
Then I moved to the US, to a city where I never saw any poultry and assumed there were rules prohibiting keeping them. Unfortunately, I didn't check into it for many years, and it was only in 2009 that I decided I couldn't take it any more, looked into the city ordinances and discovered that they are in fact, perfectly legal here. I lost no time obtaining both chicks and a free A-Frame coop from someone on Freecycle and we were in business. The 8 straight run buff orp chicks I obtained from a local breeder turned out to be split 50/50 on gender and since the city ordinances do prohibit roos, we were quickly down to four. Well, not for long. Chicken math took over, and before I knew it was brushing up against my upper limit of 12 hens and STILL there were more breeds I wanted.
So what does any sane person do in this situation? Keep in mind the sane person has already bought one house primarily because of the coop in the backyard......you got it! We bought a house on 10-acres, out in the country, where there are no restrictions on poultry. (Having a wonderful DH is a pre-requisite - I don't know many men who would be so patiently supportive of a wife who buys properties just to keep chickens.)
The property we purchased is on 10-acres and already contained a concrete slab that seemed to be the most appropriate place to build a coop. The slab measured 15'9" x 10'8". I decided to stick with even numbers and build a 10x14 coop. The front 10x10 is to be coop, with the back 10x4 area to be storage for feed, medicine, chick feeders/waterers. Etc. As of today, this is still a work in progress and I will update this page as I proceed but will start with the progress to date.
First came gobs of research. The concrete slab had no built in anchor points so I researched the heck out of how to anchor the thing so it won't blow away in our Kansas winds. I settled on 5 1/2" long wedge anchors, and since I was using treated lumber for the bottom plates, they had to be zinc coated. I couldn't even buy them locally and had to order them from a seller on eBay.
I started by building the walls one by one on the slab, and when all four walls were built, spent most of a day drilling the holes with a hammer drill and anchoring them. At this point I did not frame in doors and windows, figuring it would be easier to just build 4 walls with studs 16" OC, and then cut out openings for windows and doors. (DH is so busy right now that he was unable to help with the build, so a friend offered to come and help me. Couldn't have done it without him - some of the pieces are so long/heavy/unwieldy that there would be no way for one person to handle them alone).
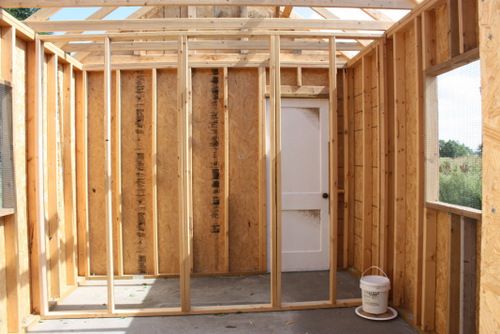
All four walls in place:
Next step was to design and build the roof trusses. We built one to make sure it was the angle we wanted, and once we were satisfied with it, used it as a template to build the remaining trusses. Then I stood on a ladder and my helper passed one end up to me, rested the other end on his step-ladder, climbed up the ladder, and pulled his end up. It wound up not being as hard as I had feared. Triangulating and securing them took some time but we were pleased with the end result. (A few nights after installing them we had a huge storm with 70mph winds and I am pleased to report, the trusses stayed right in place). At this point you can also see where we had cut out and framed the windows and doors.

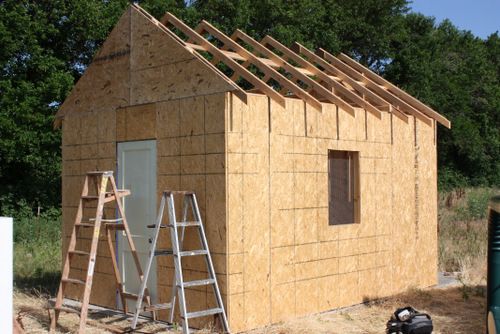
Now the fun part: sheeting. I like this step because each sheet that goes up looks like huge progress and only takes minutes. I purchased a framing nailer just to build the coop, so was able to nail each sheet of OSB up in 5-10 minutes. In no time the coop went from just framed out, to looking like a real building.
Once all the sheets of OSB were up, we installed the doors. There are two external doors, so that I have the option of entering directly into the coop, directly into the storage area, and, eventually, going from one to the other via the internal door that will be installed in the internal wall dividing the two. I was fortunate that the doors were given to me by a neighbor who was doing some renovating. They were internal doors at her house but will be external here. Hey - it "just a chicken coop"!
The windows we covered with hardware cloth on the inside because.....I got ahead of myself and got some Spring chicks that are now crowing. My neighbors have been tolerant to date but I didn't want to push my luck, so needed to get the trouble-makers moved out to the new property. Although there is no roof, by installing doors and covering window openings with hardware cloth, I hoped to keep them safe for a few days until I can get the roof on.
The internal wall is framed and installed (less the door, only because I didn't have the hinges to install that yet.
Next step is roofing and siding. I already have the roof materials (metal roof because those materials were also donated to me and free is free). I'm still trying to obtain some siding used - it is rather expensive new, and if I can save a little on that, I will do it.
June 5th, 2012
I spent yesterday working on the coop some more and by the end was exhausted, hot, sweaty, sunburned (it was 92 in the shade but I spent most of the day on a ladder in the sun) but pleased with the progress.
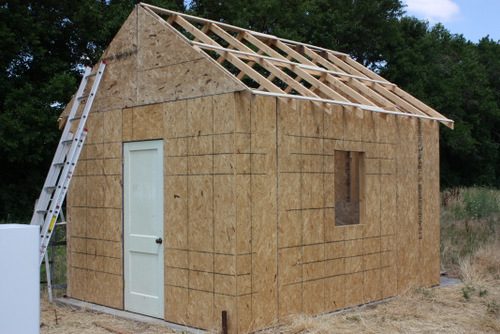
The first thing to do was to finish sheeting, having purchased the last sheet of OSB I needed to do the triangle-thingies at the end of the coop.
Next we started laying out the foundation for the roof. Several sheets of metal roofing were donated to me so although metal wouldn't have been my first choice.....free is free so I will make do. The (used) roofing sheets I was given consisted of 2 that were 12 1/2' long, 2 that were 11' long, and four that were 6' long. I decided that if I could cut the longer sheets down to the 92" needed for one side, I could add them onto the 6-footers for the other side.
So the first thing that needed be done was to lay some furring sheets horizontally across the roof trusses, so we would have good anchor points for the sheets of metal roofing.
Next, we put a cut off wheel on the circular saw, and made the first cut into one of the longer sheets, then installed that sheet on the roof as the foundation for the rest of them to line up on.
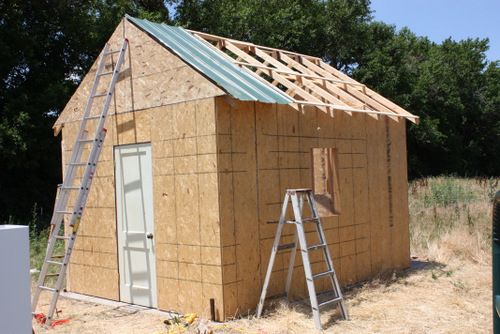
We decided to alternate sides, doing one sheet at a time left and right. That allowed us to get up on ladders from the inside of the coop and screw the sheets in the middle on both the left and right sides of the roof. There was a LOT of getting up and down from ladders. The coop is 8' tall with a 4' peak, and I had to get up on a high rung of the ladder in order to lean over the top part of the roof to affix screws. I am not afraid of heights but I AM afraid of a ladder slipping and having to fall from a 12'+ height so....I'm glad that part is done.
We still need to add a ridge cap but it already provides shade and much better protection from the storms that are predicted for later this week, since I may not be able to make any more progress until Friday.
In addition to the coop, is the work we have to do on the "run". Rather than a traditional run, I opted to give them a huge fenced yard, in which to roam during the day. My hope is that by locking them into a secure coop at night, we will minimize losses to predators. Their yard will be approximately an acre in size. It contains one tree within the yard, and there are two others just on the outside of the fence - one on the east side and one on the south. The hedge row shown in the pic is to the west and starts to throw shade into the yard by about 1:30 in the afternoon. At any given point during the day there is somewhere that is in the shade so they will really have their choice about keeping cool this summer.
We had some good rain last week so while the ground was soft, it seemed like a good time to drive fence posts. I told DS that he will make friends quickly at his new school in the fall, if he is buff and toned and that therefore, he should be thanking me for allowing him to drive the fence posts.
This photo shows the string line for the first side of the fence. After driving in all of the fence posts on this side we realized we had room to go back another 12', so in fact the fence post shown here is the second post and the run is 12' longer. You can see the coop in the background.

The job was made easier by the purchase of a fence post pounder.
The fence will be 5' high, galvanized 2x4 welded wire. I bought 400' of it this morning, along with the wire post ties so hopefully I can get some work done on the fencing in the next few days. For a yard this size that is not going to be a covered run, the cost of hardware cloth is prohibitive. The main point of the fencing will be to keep the chickens contained (one may occasionally fly over but at my current house a 4' chicken wife fence kept them out of the vegie garden so hopefully the 5' will deter them from trying to fly out), and to slow down local dogs who want to play a game of chicken chase. I know it won't keep out raccoons or other determined predators but since they are most active at night when the chickens will be safely locked in their coop, I decided to try this, and hope losses are minimal.
That is it until Friday when we will hopefully finish the roof (ridge vent) and get started on the siding. Oh - silly me - after fretting about finding some used siding, I found a number of sheets in our pole barn, left over from when the seller had the barn built. I'm hoping it will be enough to side the whole coop with the added benefit, it will match the barn.
July 6th, 2012
So much has happened since my last update, including moving house. My camera cable's whereabouts was unknown until yesterday so although I continued to take pictures, I had no way to download them so I could update the progress of my coop build. I found it yesterday so without further ado.....
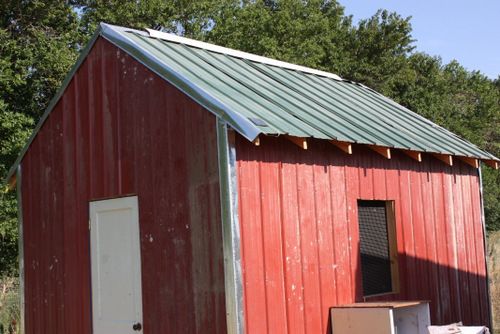
Next step was to start on the siding. I had not planned to do metal siding and was a little concerned about it in the heat, but free is free and I decided it it wasn't working I could always replace it. We've had a heat wave since moving the birds here with temps of up to 112, and what I'm finding is that the coop is not baking them. Having the OSB under the metal siding makes a huge difference, as does having a tree row to its west, so it gets shade in the afternoon. Here is a pic with the siding. Yes, its a little dusty from where it was lying in the pole barn for who knows how long. A good rain or hose off will fix that. To trim the edges, I used $7 strips of galvanized flashing from Menards. I don't love the silver but it was better than paying $35 a piece for the metal corner pieces that are usually used. If I really get motivated one day I might strip them with vinegar and paint them white. For now they are doing their job even if they don't look great.
And the last outside step was to add a ridge cap. I had one of the metal siding corner pieces in the barn, but instead of using it as a corner piece, I used it as the top ridge cap. Since it was 10' long and I needed 14', I slid a 4' piece of galvanized flashing under each end. What I love about the ridge cap is not how it looks but how it performs. Because the corner piece has 4" sides, it sits up from the top of the roof, allowing hot air to vent along its entire length. The flashing underneath extends 2' under on each end, to prevent rain entering via this point. We had a torrential rain 2 days after it was installed and the coop stayed dry. Yet, the inside of the coop is no hotter than the outside at any given time of the day.
I also completed my internal wall but using a sheet of OSB to create a solid lower portion, and chicken wire for a see-through (and for air flow) upper portion (well, okay, the chicken wire was not on when this photo was taken but it is now. An installed door completed the wall. The storage area now has shelves you can see in this picture, and feed bins at the opposite end.

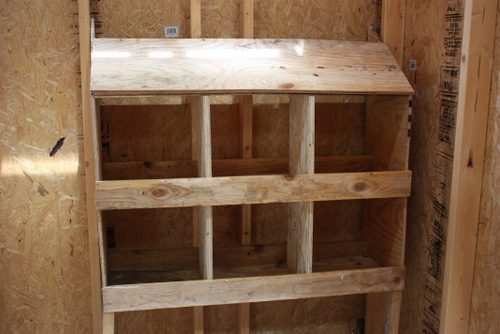
Next I built nest boxes. I found some scrap lumber in my barn, and was able to use it to make the nest boxes. I was pleased not to have to go out and buy more supplies. The slope of the roof is effective at keeping them from nesting on it. I did put legs on the front but found I was actually able to install it by screwing the back directly into studs, which holds it solidly and the legs are unnecessary. The hens don't seem to have any problem jumping directly from the ground to the top row of boxes. Each box is about 14x14x14.
My guineas, chicks and ducks were moved to the coop first. My layers did not get moved over here until June 17th. The next morning they demonstrated that they recognized what the nest boxes were "for":
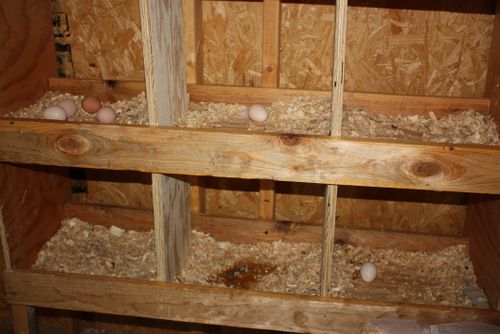
I had anticipated a slow down in laying after the stress of the move and thought these might be the last eggs I'd see for a few weeks. The slow down didn't happen and every day since then, I've gathered enough eggs to put a smile on my face. I do plan to replace the shavings in the nest boxes with straw, as they tend to scratch the shavings to the edges.
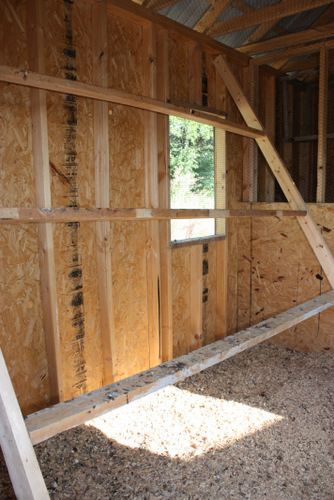
The next internal finishing item was to build roosts. DS and I completed this in an hour or so using more scrap lumber from the barn. There are 3 levels, at 2', 4' & 6' off the floor. Needless to say, most of them want to be on the top level, but a few of the lower ranking birds will roost on the middle level, and my broody-hatched chicks seem content on the lower level. The plan (still on the to-do list), is to install eye hooks towards the bottom of the roost so I can swing them up and hook them to the ceiling when it is time to clean all of the bedding out of the coop. For that reason they are installed via lag bolts at the top. In this photo you can also see that I stapled chicken wire along the bottom of the rafters, to prevent them roosting up there. Although it wouldn't have been a huge issue for them to roost up there I worried about them jumping down in the morning and getting foot/leg injuries.
Next I wanted to install an automatic door, for several reasons. First, I wanted the flock to be able to get outside first thing in the morning, even if I wanted to sleep in. Second, I wanted to be sure they were securely locked up at night even if I forgot, or if I am out all evening. Third, I wanted the flock to be semi self-sufficient in the event we need to go out of town for a few days.
So I researched thoroughly, ever automatic door out there. I eventually went with the Pullet Shut door, that swings outward to open, rather than the guillotine style. I had room for the guillotine but got some poor reviews on some, with people saying the motor didn't hold up, the sensor didn't work etc. Installation was easy, even with the metal siding. I put the cut-off wheel on the circular saw and cut through the metal, then switched to a regular blade to cut through the OSB. Piece of cake. Four bolts installed the door, and then I had to run the wiring. The battery sits inside the coop above the window. The solar panel that charges the battery sits on the roof (it can be seen in the above photo of the ridge cap). And the sensor is so small you probably can't see it in the photo showing the front of the coop. So far the door has worked flawlessly.
However I had a problem with the guineas wanting to fly up and sit on the top of the door. Then when they flew down and kicked off, I could see the door rock on its hinges and knew it would only be a matter of time until it was broken. The door was NOT cheap so in order to protect my investment I built a "chunnel". (I do now regret getting the door that opens out since a guillotine style door would not have had this issue.)
The chunnel is constructed from an internal door that was donated to me. I cut it in half, "roofed" it with some scrap pieces of plywood, triangulated the bottom with some more scraps, and sat it in front of the door. Still to go: attaching it to the coop via screws from the inside into the side walls, and painting it to match the coop so it doesn't look like "doo-doo". The pile of rocks will also be replaced by proper steps. I installed the door high enough to do DLM this winter which made it too high for the ducks to jump in and out, so I had to hastily make some steps for them. The chickens and guineas have no problem navigating it directly from the ground.
The yard itself is also finished. At 60' across by 240' long it gives them enough space to feel like they are free-ranging, and keep grass growing in it, versus turning into a dirt patch, yet they are not pooping on the porch or patio

So that is it for now. I still have things that need to be tweaked but it feels good to have got it to this point.
October 7th, 2012
The tweaking continues. After discovering the several of my birds had bumblefoot, I decided to redo the roosts. The top roost on the ladder style was 6' high and they were jumping off rather than stepping down. Despite the deep bedding layer, I think this is the cause of the bumblefoot so....I took that ladder roost apart and built a roost that holds more birds, takes up less space, and contains 4 roosts on the same level instead of 3 roosts on different levels. The new roost is 3' off the coop floor (less as the deep litter bedding layer builds up).
And, as the weather gets colder, it felt like time to add the storm windows to the outside of the coop. Until now all I had for windows was an opening covered on the inside by hardware cloth. That remained and it took only 5 minutes to screw the storm window to the outside of the window opening. I really liked how it gave the coop a more "finished" look. At the same time, I added gutters. This was not in the original plan but what I found was that water draining off the roof edge was creating a little trench in the ground below. I found myself lining pans along under the roof any time it rained to catch the water and then the birds had water for days without the need to refill so.....a lightbulb went off and I thought if I could catch all of that water and keep it clean for them....so I bought a rain barrel and gutters. The rain barrel will have to wait until spring since we get enough freezing weather here to destroy the fittings, but the gutters are now installed and ready to go.
April 3rd, 2013
Late last year I added a new feeder to the coop that is working out even better than I had hoped. I took the left over piece of gutter from when I added the gutters (above), and attached it to the internal wall of the coop, after adding end caps. Then I took a piece of 4" PVC pipe and inserted it almost to the bottom of the gutter, leaving just enough space for feed to spill out into the gutter. I attached the PVC pipe to the wall with metal strapping. I angled the top of the PVC to allow pouring into it more easily without spilling. I can now fill the pipe from the feed room side of my coop, and the birds themselves spread it down the length of the gutter. The pipe holds enough feed for 40-50 birds to last about a day and a half. After four years of trying one feeder style after another, I have finally found what works flawlessly for my situation. The feeder takes up almost no room in the coop, since it is attached to the wall and sticks out only 3-4". It is mounted high enough that rodents don't appear to be an issue. And, the steep sides of the gutter don't allow the birds to bill the feed out, so I have almost zero waste.
Oops...looks like I need a better picture showing the whole gutter feeder system. Will update soon.

