The Blue Coop
(built by girl power)

Once upon a time there was a bundle of wood. It looks like such a small bundle, doesn't it? Doesn't look like a coop's worth of lumber, but indeed it is. My first discovery was that for a small nominal fee, Home Depot will deliver all sorts of things to the exact spot you want it. They will bring this tiny little pile of lumber out on a great big truck with a zippy little pallet lift and just zip that lumber all over. The second discovery was that chickens are scared of zippy little pallet lifts. I'm not sure their opinion of bundles of lumber.
So job number one was to clear the site. For me that meant clearing the site of chickens.
The posts went in first. I used 4x4s sunk about a foot down in concrete. I wimped out and hired someone to auger the holes for me. I have discovered that they lie when they call it a one-man auger. The holes were dug to about 18". I added 6" of gravel and then set the posts so that they were 7' above grade. Scrap bits were screwed in as bracing so it would stay plumb and vertical while the concrete dried. It takes half a bag of concrete per post. (So for the four posts I used two 60lb bags of dry concrete mix. I used one bag of gravel for all four.) My posts are spaced 8' on center down each side. The coop end is 16' from post to post.
Fred the Cat is my project supervisor.
I set the posts one evening so they could cure overnight. The next morning I started on the base. I am a lazy carpenter and tend to make everything just match the standard lumber sizes. The base is 4'x8' and stands 2' off the ground. It used (4) 2x4s for the frame topped with a 4'x8' sheet of 1/2" exterior grade plywood. The legs are pressure treated 2x4s and it took (2) 2x4s cut up to leg it. Make sure at this point that you have positioned it correctly between the posts. Mine is set so that 1' of the base is inside the run. A string run from post to post helps with this process. It is offset so that one side is 3' from the post and the other around 5' from the post. You'll want to make one side the door to the run side.
The wall framing happened next. The front side is 4' tall and 8' long and built out of 5 1/2 2x4s. The middle 2x4 is a foot down from the top and the top vertical supports are spaced 2' on center. The right and left longer lower supports are offset to make it easier to screw them in. The top supports are seen, so I wanted them to be even. The tricky part of this was figuring the angle for the top piece. I'm not sure that it's all that important, but I like the idea of the roof sitting flush on the top. I didn't like it enough to do the back wall that way. Did I mention that I'm a lazy carpenter? My angles were all off just a little. The third big lesson was that it's a chicken coop and not a great masterpiece. Gaps are okay if it only mars the aesthetics of the place.
As I am a lazy worker, I painted everything as I went. It is A LOT easier to not have to cut in and just roll everything. At this point in the process I had already painted the base and the fronts and backs of the wall wood. Since the top of the front wall got wire on it and was visible, I went ahead and painted it the trim color and then stapled on the window screening. I used hardware cloth cut to fit. A pneumatic staple gun is your friend. There is a lot of stapling once you get to the run.
The back wall is 3'x8' and was built out of 4 1/2 2x4s. I spaced the vertical supports to match the front wall. The back wall sits flush against the back of the floor. The front wall sits with the front edge 1' from the platform edge. They are connected in the center at the 3' mark. The ends are braced so the bottom of the horizontal brace is 6" from the top. A second 2x4 was fit over the first so that the end was flush to the outside edge. In this picture it looks like the wall facing has been attached. It is merely clamped on at this point. I took it off to cut the pop door. I just wanted to see what it looked like. I'm an impatient carpenter too.")
I built the roosts all at one end. The nest boxes will be at the other. The roosts are about 16" off the floor.
This next photo shows a number of steps. The walls have been faced. I used (2) sheets of T-111 because I liked the look. The sheets come 8' long with the lines run the long way. I cut each sheet into a 3' section and a 5' section. T-111 is made with an overlap so the end of one piece fits on top of the end of the next. It keeps the pattern going. It also means that (2) four foot panels are actually wider than 8'. I didn't think of that and didn't think to trim it to a true 8' width. This kind of bit me in the tushie later. Go ahead and trim it to fit flush with the ends of your frame. The 5' sections fit on the back wall. The 3' sections go on the front. It should fit neatly to the top edge of the middle horizontal 2x4. Make sure you cut your pop door hole first.
The sides I made out of plywood purchased for another project. It's 3/4" exterior grade plywood and had already been cut into a couple of 3' sections. I cut the top angle first off each 3'x4' piece. Three feet is your width and four feet the height. The angle is drawn from 3' high in the back and 4' in the front. Once this angle was trimmed off, I made a another cut so the piece was 6" high in the back and 18" in the front. That piece becomes the permanently attached top piece. The remaining 3' wide by 2 1/2 foot panel becomes the door.
The roof supports are 4 1/2' sticks of 1x4. These are easier if pre-painted. I put these up and then had to move the end two once I put the trim up.
For the sides of the bottom platform I stapled hardware cloth to the 2x4 legs and then screwed the pre-painted 1x2s on top of the screen. This part is outside of the run proper, so I wanted it as predator proof as possible. I also added a 2x4 along the bottom (at the ground level) so that the bottom edge is even with the platform edge.
This shot shows the doors on. The one hinges on the back edge. The other side hinges on the front edge. I had a good reason for that at one point, but I can't remember why. The one hinges on the front is that way so I can scoop litter easier. This door is for egg collection. I'm guessing my reasoning was due to the run gate. Beats me. I've started putting the roof up in this picture. My local co-op sells cut to order roofing tin in a variety of colors. It comes in 3' widths. I ended up getting (3) 4 1/2' pieces. The pieces overlap on a ridge, so hopefully it will keep water from leaking. Home Depot sells roofing nails that have a little rubber washer on them. They are a LOT easier to hammer in than the screws I was trying to use.
Almost done with the coop! All of the trim is pre-painted 1x4 all cut to fit. I measured each one as I went. The trim on the platform is all 1x6 lumber. The corners on the pop door and the coop doors are all 45 degree miter cut. All the others are just square cut. There are latches on both doors with raccoon-proof hooks. Eventually I'll put human proof locks on both doors.
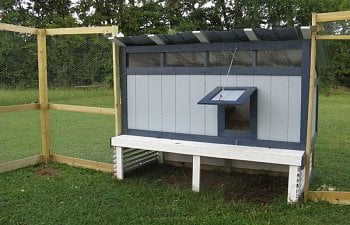
This shot shows the coop done. The pop door is hinged at the top to allow for more rain protection. There are hooks all over the place to lock this place up tight.
The inside has roosts at one end and nest boxes at the other. I love using milk crates as nest boxes. My LF fit cozily inside and they seem to love them. One bag of shavings covers the floor to about 5" deep.
The run was my last step. I use 3' high 1/2" hardware cloth on the bottom and 4' high 1" chicken wire on the top. The hardware cloth is stapled to the vertical 4x4 posts first. A 2x4 was used to connect to the existing run. I screw a 2" screw about halfway in to get the top wire up. Chicken wire is tricky to install by yourself. The screw helps to hold the chicken wire up so you can get it stapled in place. I staple it to the center post first in the middle of the wire. I can then stretch it tight in all four directions. Once the wire was stretched and stapled to the posts, I screwed the 1x6s and 1x4s in place. Again, the screw trick works great on manhandling the high 1x4s. A strategically placed screw for one end to rest on while you screw the other end down works great! After attaching the 1xs I stapled the daylights out of the wire to the backside of the lumber. Again, the pneumatic stapler is your friend. At the coop I cut a slot in the roof to fit the 2x4 and then screwed the 2x4 to the coop itself. The wire is stapled to both the 2x4 and the coop.
This side of the coop is the roost side. The door height allows for a wheelbarrow to be pulled up to the door and the floor scooped out straight into the wheelbarrow. Lazy, lazy, lazy...
This is the run door side. Despite my best intentions, some of my measurements were off. This last post wasn't quite vertical and was a little too far from the other one. Sigh. It's just a chicken coop... it's just a chicken coop... it's just a chicken coop...
Things left to do- I still need to cover the top of the run with netting. We have the occasional hawk in the area. The netting won't stop a determined predator, but it might slow them down a little. I still need to finish with the touch up painting and the remaining little bits of trim. I need to add a piece over the coop from 2x4 to 2x4. I need something to attach the netting to. I'm thinking maybe a 1x6 up there. I'm trying to decide if I want to paint the run. I've left the others bare, but I may break down and paint the whole deal eventually. I am repainting the red roofed coops as they somehow annoy me. One will be this blue and the other a light green. I have plans to plant roses around the whole complex. I'm thinking the thorns would be a deterrent and the sweet smell can only help offset the poop. Plus, the roses ought to thrive with all the organic fertilizer run off!
So that's the blue coop. I built it all by myself and I'm a middle aged woman with nominal carpentry skills. I got a really good book on shed building and sort of went from there. It helps to have the appropriate tools to start with. A good miter/chop saw, a circular saw, a pneumatic stapler and a good quality battery powered screw gun all works wonders. I am horrible at hammering things so I generally screw things together. That way when I have to redo it, it's not such a hard thing to get it apart.
My Materials List:
(1) sheet of exterior grade 3/4" plywood (could also be another sheet of T-111)
(1) sheet of exterior grade 1/2" plywood
(2) sheets of T-111 exterior siding
(24) pressure treated 2x4x8
(10) 1x6x8
(24) 1x4x8
(4) 4x4x8
(8) 1x2x8
(1) roll 4'x50' 1" chicken wire
(2) rolls 3'x25' 1/2" hardware cloth
(3) sheets of 3'x4.5' galvanized tin roofing
(1) bag of gravel
(2) 60lb bags of concrete mix
one box of roofing nails, 1/2" staples, 3" screws, 2" screws, 1 5/8" screws and 1" screws
(built by girl power)

Once upon a time there was a bundle of wood. It looks like such a small bundle, doesn't it? Doesn't look like a coop's worth of lumber, but indeed it is. My first discovery was that for a small nominal fee, Home Depot will deliver all sorts of things to the exact spot you want it. They will bring this tiny little pile of lumber out on a great big truck with a zippy little pallet lift and just zip that lumber all over. The second discovery was that chickens are scared of zippy little pallet lifts. I'm not sure their opinion of bundles of lumber.

So job number one was to clear the site. For me that meant clearing the site of chickens.

The posts went in first. I used 4x4s sunk about a foot down in concrete. I wimped out and hired someone to auger the holes for me. I have discovered that they lie when they call it a one-man auger. The holes were dug to about 18". I added 6" of gravel and then set the posts so that they were 7' above grade. Scrap bits were screwed in as bracing so it would stay plumb and vertical while the concrete dried. It takes half a bag of concrete per post. (So for the four posts I used two 60lb bags of dry concrete mix. I used one bag of gravel for all four.) My posts are spaced 8' on center down each side. The coop end is 16' from post to post.
Fred the Cat is my project supervisor.

I set the posts one evening so they could cure overnight. The next morning I started on the base. I am a lazy carpenter and tend to make everything just match the standard lumber sizes. The base is 4'x8' and stands 2' off the ground. It used (4) 2x4s for the frame topped with a 4'x8' sheet of 1/2" exterior grade plywood. The legs are pressure treated 2x4s and it took (2) 2x4s cut up to leg it. Make sure at this point that you have positioned it correctly between the posts. Mine is set so that 1' of the base is inside the run. A string run from post to post helps with this process. It is offset so that one side is 3' from the post and the other around 5' from the post. You'll want to make one side the door to the run side.

The wall framing happened next. The front side is 4' tall and 8' long and built out of 5 1/2 2x4s. The middle 2x4 is a foot down from the top and the top vertical supports are spaced 2' on center. The right and left longer lower supports are offset to make it easier to screw them in. The top supports are seen, so I wanted them to be even. The tricky part of this was figuring the angle for the top piece. I'm not sure that it's all that important, but I like the idea of the roof sitting flush on the top. I didn't like it enough to do the back wall that way. Did I mention that I'm a lazy carpenter? My angles were all off just a little. The third big lesson was that it's a chicken coop and not a great masterpiece. Gaps are okay if it only mars the aesthetics of the place.
As I am a lazy worker, I painted everything as I went. It is A LOT easier to not have to cut in and just roll everything. At this point in the process I had already painted the base and the fronts and backs of the wall wood. Since the top of the front wall got wire on it and was visible, I went ahead and painted it the trim color and then stapled on the window screening. I used hardware cloth cut to fit. A pneumatic staple gun is your friend. There is a lot of stapling once you get to the run.

The back wall is 3'x8' and was built out of 4 1/2 2x4s. I spaced the vertical supports to match the front wall. The back wall sits flush against the back of the floor. The front wall sits with the front edge 1' from the platform edge. They are connected in the center at the 3' mark. The ends are braced so the bottom of the horizontal brace is 6" from the top. A second 2x4 was fit over the first so that the end was flush to the outside edge. In this picture it looks like the wall facing has been attached. It is merely clamped on at this point. I took it off to cut the pop door. I just wanted to see what it looked like. I'm an impatient carpenter too.
I built the roosts all at one end. The nest boxes will be at the other. The roosts are about 16" off the floor.

This next photo shows a number of steps. The walls have been faced. I used (2) sheets of T-111 because I liked the look. The sheets come 8' long with the lines run the long way. I cut each sheet into a 3' section and a 5' section. T-111 is made with an overlap so the end of one piece fits on top of the end of the next. It keeps the pattern going. It also means that (2) four foot panels are actually wider than 8'. I didn't think of that and didn't think to trim it to a true 8' width. This kind of bit me in the tushie later. Go ahead and trim it to fit flush with the ends of your frame. The 5' sections fit on the back wall. The 3' sections go on the front. It should fit neatly to the top edge of the middle horizontal 2x4. Make sure you cut your pop door hole first.
The sides I made out of plywood purchased for another project. It's 3/4" exterior grade plywood and had already been cut into a couple of 3' sections. I cut the top angle first off each 3'x4' piece. Three feet is your width and four feet the height. The angle is drawn from 3' high in the back and 4' in the front. Once this angle was trimmed off, I made a another cut so the piece was 6" high in the back and 18" in the front. That piece becomes the permanently attached top piece. The remaining 3' wide by 2 1/2 foot panel becomes the door.
The roof supports are 4 1/2' sticks of 1x4. These are easier if pre-painted. I put these up and then had to move the end two once I put the trim up.
For the sides of the bottom platform I stapled hardware cloth to the 2x4 legs and then screwed the pre-painted 1x2s on top of the screen. This part is outside of the run proper, so I wanted it as predator proof as possible. I also added a 2x4 along the bottom (at the ground level) so that the bottom edge is even with the platform edge.

This shot shows the doors on. The one hinges on the back edge. The other side hinges on the front edge. I had a good reason for that at one point, but I can't remember why. The one hinges on the front is that way so I can scoop litter easier. This door is for egg collection. I'm guessing my reasoning was due to the run gate. Beats me. I've started putting the roof up in this picture. My local co-op sells cut to order roofing tin in a variety of colors. It comes in 3' widths. I ended up getting (3) 4 1/2' pieces. The pieces overlap on a ridge, so hopefully it will keep water from leaking. Home Depot sells roofing nails that have a little rubber washer on them. They are a LOT easier to hammer in than the screws I was trying to use.

Almost done with the coop! All of the trim is pre-painted 1x4 all cut to fit. I measured each one as I went. The trim on the platform is all 1x6 lumber. The corners on the pop door and the coop doors are all 45 degree miter cut. All the others are just square cut. There are latches on both doors with raccoon-proof hooks. Eventually I'll put human proof locks on both doors.

This shot shows the coop done. The pop door is hinged at the top to allow for more rain protection. There are hooks all over the place to lock this place up tight.
The inside has roosts at one end and nest boxes at the other. I love using milk crates as nest boxes. My LF fit cozily inside and they seem to love them. One bag of shavings covers the floor to about 5" deep.

The run was my last step. I use 3' high 1/2" hardware cloth on the bottom and 4' high 1" chicken wire on the top. The hardware cloth is stapled to the vertical 4x4 posts first. A 2x4 was used to connect to the existing run. I screw a 2" screw about halfway in to get the top wire up. Chicken wire is tricky to install by yourself. The screw helps to hold the chicken wire up so you can get it stapled in place. I staple it to the center post first in the middle of the wire. I can then stretch it tight in all four directions. Once the wire was stretched and stapled to the posts, I screwed the 1x6s and 1x4s in place. Again, the screw trick works great on manhandling the high 1x4s. A strategically placed screw for one end to rest on while you screw the other end down works great! After attaching the 1xs I stapled the daylights out of the wire to the backside of the lumber. Again, the pneumatic stapler is your friend. At the coop I cut a slot in the roof to fit the 2x4 and then screwed the 2x4 to the coop itself. The wire is stapled to both the 2x4 and the coop.
This side of the coop is the roost side. The door height allows for a wheelbarrow to be pulled up to the door and the floor scooped out straight into the wheelbarrow. Lazy, lazy, lazy...

This is the run door side. Despite my best intentions, some of my measurements were off. This last post wasn't quite vertical and was a little too far from the other one. Sigh. It's just a chicken coop... it's just a chicken coop... it's just a chicken coop...

Things left to do- I still need to cover the top of the run with netting. We have the occasional hawk in the area. The netting won't stop a determined predator, but it might slow them down a little. I still need to finish with the touch up painting and the remaining little bits of trim. I need to add a piece over the coop from 2x4 to 2x4. I need something to attach the netting to. I'm thinking maybe a 1x6 up there. I'm trying to decide if I want to paint the run. I've left the others bare, but I may break down and paint the whole deal eventually. I am repainting the red roofed coops as they somehow annoy me. One will be this blue and the other a light green. I have plans to plant roses around the whole complex. I'm thinking the thorns would be a deterrent and the sweet smell can only help offset the poop. Plus, the roses ought to thrive with all the organic fertilizer run off!
So that's the blue coop. I built it all by myself and I'm a middle aged woman with nominal carpentry skills. I got a really good book on shed building and sort of went from there. It helps to have the appropriate tools to start with. A good miter/chop saw, a circular saw, a pneumatic stapler and a good quality battery powered screw gun all works wonders. I am horrible at hammering things so I generally screw things together. That way when I have to redo it, it's not such a hard thing to get it apart.
My Materials List:
(1) sheet of exterior grade 3/4" plywood (could also be another sheet of T-111)
(1) sheet of exterior grade 1/2" plywood
(2) sheets of T-111 exterior siding
(24) pressure treated 2x4x8
(10) 1x6x8
(24) 1x4x8
(4) 4x4x8
(8) 1x2x8
(1) roll 4'x50' 1" chicken wire
(2) rolls 3'x25' 1/2" hardware cloth
(3) sheets of 3'x4.5' galvanized tin roofing
(1) bag of gravel
(2) 60lb bags of concrete mix
one box of roofing nails, 1/2" staples, 3" screws, 2" screws, 1 5/8" screws and 1" screws