The Cookie Tin Heater
for Your Metal or Plastic Water Fount
for Your Metal or Plastic Water Fount
Start with gathering all of your supplies:
1. ceramic light socket
2. large round cookie tin (3.5 inches in height or more)
3. threaded lamp nipples (allows cord to slide through)
4. Locknuts to fit over the nipple
5. cheap 6 ft (or whatever fits your needs) extension cord

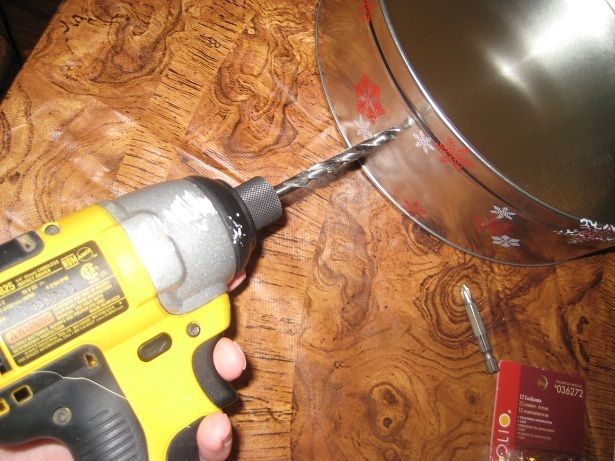
(Picture BELOW) Place your ceramic light socket on the inside of your cookie tin and decide where to drill your hole so that the light will be about at the half way point inside the tin.
(Picture BELOW)
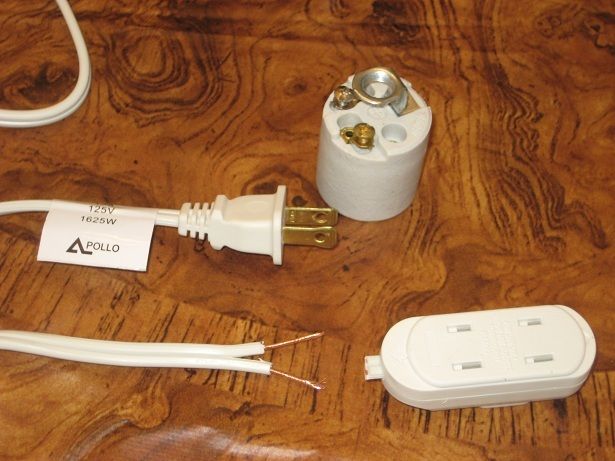
1. Cut off the end of your extension cord-- leaving the plug ON. Then cut in the groove of the cord to separate out the ends of the wires. Then use your scissors or exacto knife to CAREFULLY cut a line all the way around each wire to strip off the rubber covering. I don't cut all the way through- I cut into it enough that I can then twist the rubber off the wire and pull it off. You don't want to cut into your wire. Strip your wire down about half and inch or more. Re-twist the wire together if it separates out a bit in this process.
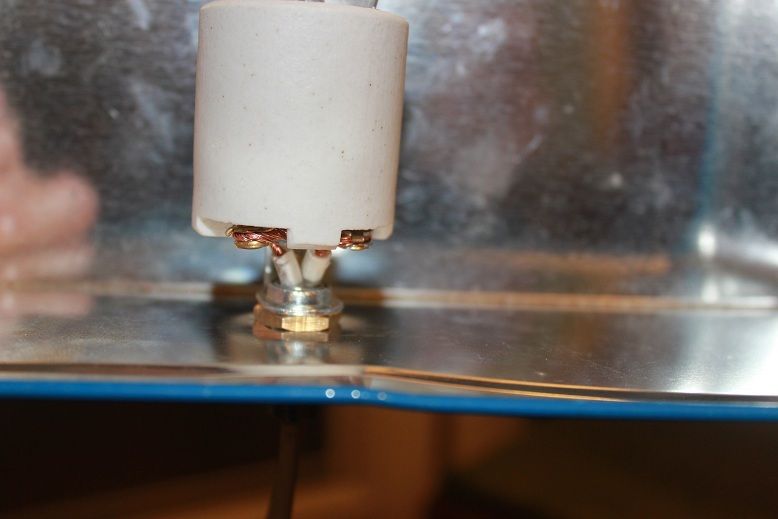
2. Thread your nipple into the opening you drilled into the cookie tin and place your locknut on the nipple that is on the inside of the tin and screw it down midway giving room for the socket to be screwed on next. Then screw on your ceramic socket just enough that it is stable on the lamp nipple (not too far down!). Then, put a nut on the extension cord (don't worry if it slides down the cord for now) and thread the cord/wire through the nipple and pull through into the cookie tin and up through the nipple and under the ceramic socket. (This is where I will sometimes pull the nipple out of the tin <on the inside of the tin> and pull through about a foot of cord so that I have enough room to move it around and get to the wires to screw them down onto the socket-- after it's screwed down, you can put it back into the hole in the tin and secure with nuts on either side)
3. Thread the cord through the threaded hole in the ceramic light socket and screw it into your nipple. Then wrap your wire ends around the two screws (doesnt matter which wire is to which screw) and tighten up your screws so they are snug. You might need to twist your wires up nice and tight before hooking them onto the screws so you get a snug fit. It also helps if you have your wires wrapped IN the direction the screws are being twisted down-- or the wires may not stay under the screws.
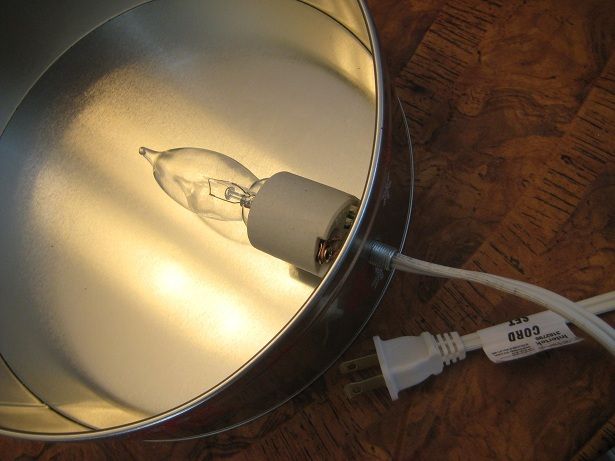
(Picture BELOW) You should wind up with something that looks like this below. I used a 40 watt chandelier bulb in the socket so that it would be thin enough to fit into the cookie tin with the lid on. Plug it in to check that it is functioning (light comes on). No insulation is necessary, and I would avoid it since it could be a fire hazard. Place your lid on top of the cookie tin, plug it in, and set your water fount on top of the tin! You're ready for freezing temperatures!
*Note: I did not do this, but you could also add a bead of silicone around the outside of the nipple to prevent water/moisture from getting in. I've been using my tin this winter already and it is working great.")
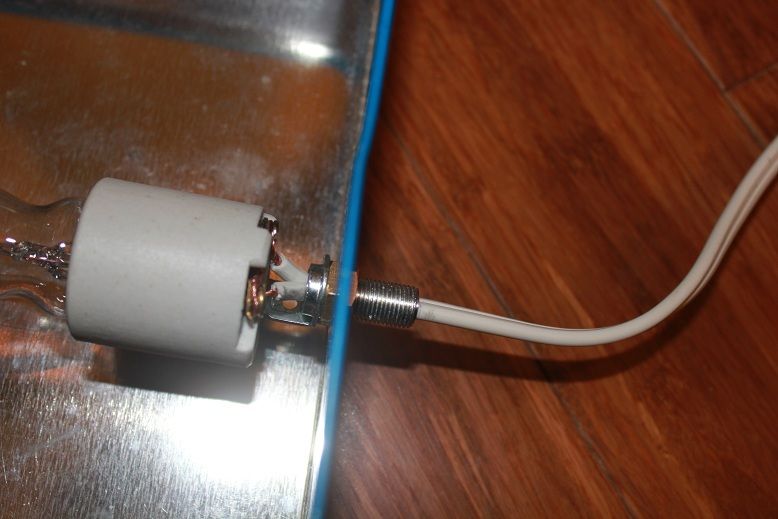
(BELOW) Okay, so a tip would be to tell you to thread on your nut BEFORE you put the cord through the lamp nipple. Don't worry about the nut slidding down the cord, you won't need it until after you've wired up the ceramic socket and are ready to tighten it up. You need a nut on BOTH sides to tighten it down so that the "lamp" stays in the correct spot on the inside and does not droop down.
(BELOW) Second tip would be to go ahead and thread your socket arm onto the nipple just a bit-- don't thread it down a lot. Look at pictures below to see the right amount. Then push your bare wires up through the nipple hole and pull them to the side and screw them down. You don't want wires touching the metal of the nipple. See the NUT that is right below the socket arm? This holds the socket upright so it won't fall downwards towards the bottom of the tin.
(BELOW) Nuts on either side of tin, and they hold the socket up right so that it won't fall down wards in the tin. This is what your wiring should look like. And BTW--- it does NOT matter which wire you wire up to the screws-- just pick one and go with it. No right or wrong on this. But see the amount of rubber covering? That's great, you don't want bare wire touching the nipple or you'll get a shock!")
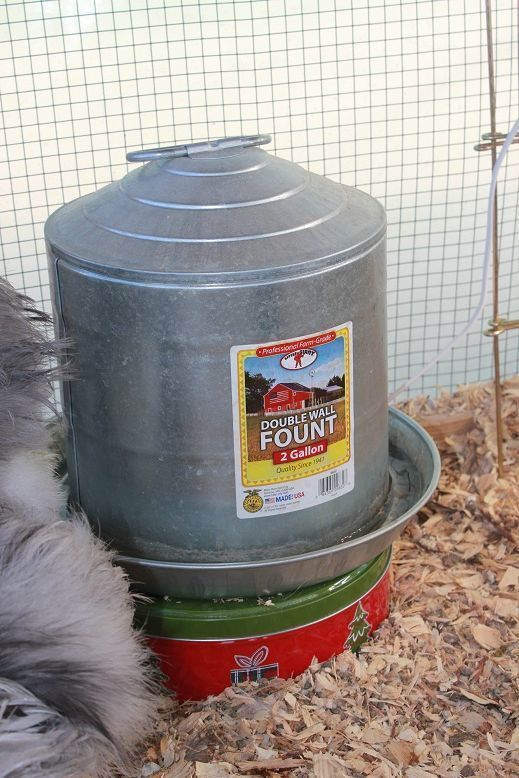
(BELOW) And here it is in USE! The tin only gets warm-- not hot, so it won't catch anything on fire. I am using ONLY a 40 watt chandelier bulb. Do NOT use anything bigger than that! You can use smaller and be fine, also if you are worried about the amount of heat you are getting. The day this picture was taken-- it was 18 degrees outside and the water is NOT frozen!
1. ceramic light socket
2. large round cookie tin (3.5 inches in height or more)
3. threaded lamp nipples (allows cord to slide through)
4. Locknuts to fit over the nipple
5. cheap 6 ft (or whatever fits your needs) extension cord
(Picture BELOW) Place your ceramic light socket on the inside of your cookie tin and decide where to drill your hole so that the light will be about at the half way point inside the tin.
(Picture BELOW)
1. Cut off the end of your extension cord-- leaving the plug ON. Then cut in the groove of the cord to separate out the ends of the wires. Then use your scissors or exacto knife to CAREFULLY cut a line all the way around each wire to strip off the rubber covering. I don't cut all the way through- I cut into it enough that I can then twist the rubber off the wire and pull it off. You don't want to cut into your wire. Strip your wire down about half and inch or more. Re-twist the wire together if it separates out a bit in this process.
2. Thread your nipple into the opening you drilled into the cookie tin and place your locknut on the nipple that is on the inside of the tin and screw it down midway giving room for the socket to be screwed on next. Then screw on your ceramic socket just enough that it is stable on the lamp nipple (not too far down!). Then, put a nut on the extension cord (don't worry if it slides down the cord for now) and thread the cord/wire through the nipple and pull through into the cookie tin and up through the nipple and under the ceramic socket. (This is where I will sometimes pull the nipple out of the tin <on the inside of the tin> and pull through about a foot of cord so that I have enough room to move it around and get to the wires to screw them down onto the socket-- after it's screwed down, you can put it back into the hole in the tin and secure with nuts on either side)
3. Thread the cord through the threaded hole in the ceramic light socket and screw it into your nipple. Then wrap your wire ends around the two screws (doesnt matter which wire is to which screw) and tighten up your screws so they are snug. You might need to twist your wires up nice and tight before hooking them onto the screws so you get a snug fit. It also helps if you have your wires wrapped IN the direction the screws are being twisted down-- or the wires may not stay under the screws.
(Picture BELOW) You should wind up with something that looks like this below. I used a 40 watt chandelier bulb in the socket so that it would be thin enough to fit into the cookie tin with the lid on. Plug it in to check that it is functioning (light comes on). No insulation is necessary, and I would avoid it since it could be a fire hazard. Place your lid on top of the cookie tin, plug it in, and set your water fount on top of the tin! You're ready for freezing temperatures!
*Note: I did not do this, but you could also add a bead of silicone around the outside of the nipple to prevent water/moisture from getting in. I've been using my tin this winter already and it is working great.
(BELOW) Okay, so a tip would be to tell you to thread on your nut BEFORE you put the cord through the lamp nipple. Don't worry about the nut slidding down the cord, you won't need it until after you've wired up the ceramic socket and are ready to tighten it up. You need a nut on BOTH sides to tighten it down so that the "lamp" stays in the correct spot on the inside and does not droop down.
(BELOW) Second tip would be to go ahead and thread your socket arm onto the nipple just a bit-- don't thread it down a lot. Look at pictures below to see the right amount. Then push your bare wires up through the nipple hole and pull them to the side and screw them down. You don't want wires touching the metal of the nipple. See the NUT that is right below the socket arm? This holds the socket upright so it won't fall downwards towards the bottom of the tin.
(BELOW) Nuts on either side of tin, and they hold the socket up right so that it won't fall down wards in the tin. This is what your wiring should look like. And BTW--- it does NOT matter which wire you wire up to the screws-- just pick one and go with it. No right or wrong on this. But see the amount of rubber covering? That's great, you don't want bare wire touching the nipple or you'll get a shock!
(BELOW) And here it is in USE! The tin only gets warm-- not hot, so it won't catch anything on fire. I am using ONLY a 40 watt chandelier bulb. Do NOT use anything bigger than that! You can use smaller and be fine, also if you are worried about the amount of heat you are getting. The day this picture was taken-- it was 18 degrees outside and the water is NOT frozen!