UPDATED 2019 Hello BYC members! I would like to share my coop building design and building experience with you. Hopefully it will spark some inspiration of your own! I came up with the name the "Weekend Coop", because this coop was built only on the weekends (Which means I'm just as bad at naming things, as I am with getting things done). This task could be accomplished in one weekend if you have that much free time and really pushed it. ")
Back story: I always have built my own coop I have never bought one...it is just too pricey for what you get and I think it is more fun building your own") Keeping chick's is not new to me, I got chickens last year (2015) and I was only able to keep them for about 25 weeks because someone didn't like my rooster crowing at 5:00-6:00 a.m. So I built a coop last but did not think to document the building, but this year I am not making that mistake. All of the building is in both written and picture form...Enjoy!
Keeping chick's is not new to me, I got chickens last year (2015) and I was only able to keep them for about 25 weeks because someone didn't like my rooster crowing at 5:00-6:00 a.m. So I built a coop last but did not think to document the building, but this year I am not making that mistake. All of the building is in both written and picture form...Enjoy!
Pre-Building/Materials Needed **Will be updated as project progresses**Cost will be added upon completion**Check back through out the week for updates!
The first day we got the walls cut and the frame finished. I was able to cut out the front wall with a chicken door, but I was stopped when I got stuck on how to design the nest boxes. So that's it for day 1, off to a good start!

^^^Above: you can see the floor which is a 1/2 inch 4x8 OSB board and also we have the walls up with the frame. 1/4 inch plywood (8ftx2.5ft) was used for the side walls and 2x3's for the frame.
^^^Above: I just used a few small 2x3's to make supports for the chicken door. The length of these will depend on the size you want your door to be.
^^^Above: Getting the measurements for the end walls.
^^^Above: Got the end walls cut out with the classic peak roof.
^^^Above: End wall in place and the chicken door cut.
We brain stormed some ideas for nest boxes and this is what we cam up with^^ All of that was built using scrap! Hooray!
^^^Above: We bought some cheap linoleum tiles for a total of $10 for 32 sq. ft. We also painted the base to help the tiles stick and further protect from water damage.
Coop all primed...just needs a coat of color paint, add the roof, cut out some windows/more doors, add shingles, construct the chicken run, make a door to the chicken coop, finish the nest boxes.... 3 Months on slow work later (Remember what I said about being bad at getting things done?) I apologize for falling behind on the picture taking, I have just been so focused on getting the coop done the whole "take picture for BYC coop page" had evaded my mind. Anyways...Here are some on the final pictures and steps.
In this picture we have the whole roof complete, the roof supports in place and the ventilation triangle.
Here is the big main door of the coop all cut out. You can also see that the shingles have been put on, but in the wrong direction!  The roosts have been put in and are 18 inches high.
And here are the nest boxes...a big improvement since the last picture.
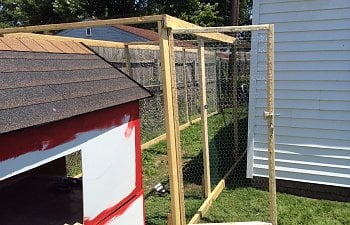
This is the run with 2x4's used for the frame.
Front on the coop with the new ramp!
The roosts have been put in and are 18 inches high.
And here are the nest boxes...a big improvement since the last picture.
This is the run with 2x4's used for the frame.
Front on the coop with the new ramp!
4/01/2019
Five years later... As I look back perhaps I was a little too optimistic in my design. Thanks for the reviews! It gives me insight on my design and hopefully steers other coop builders in the right direction.
**Yes, I used 2x3 for part of the frame and I actually used 4x4s for the legs
The biggest fault was in the run. There was not enough support for it to remain upright, looking at the last picture, the run leans heavily to the left.
The coop itself has stood the test of time and still stands today. There is weathering on the sides of the coop where water has separated the wood.
May 2019 - 5 Years later
Weather and chickens have slowly ruined the coop. The roof held together surprisingly well. The flaws come in with the side panels. I would consider using a thicker wood or learn ways to better protect against damage from moisture.

Back story: I always have built my own coop I have never bought one...it is just too pricey for what you get and I think it is more fun building your own
Keeping chick's is not new to me, I got chickens last year (2015) and I was only able to keep them for about 25 weeks because someone didn't like my rooster crowing at 5:00-6:00 a.m. So I built a coop last but did not think to document the building, but this year I am not making that mistake. All of the building is in both written and picture form...Enjoy!Pre-Building/Materials Needed **Will be updated as project progresses**Cost will be added upon completion**Check back through out the week for updates!
- 1 1/2 inch. 4x8 OSB board (Base)
- 3 1/4 inch. 4x8 plywood sheets (Walls)
- 2 19/32 inch. 4x8 plywood sheets (Roof)
- 6 2x3 (Frame)
- 3 2x4's for roof supports
- 2 inch. , 1 inch. and 1/2 inch. wood screws would be good to have for varying wood thicknesses.
- 4x4's used for the legs
- 32 linoleum tiles (optional)
- Saw
- Drill
- Ruler, tape measure
- People
The first day we got the walls cut and the frame finished. I was able to cut out the front wall with a chicken door, but I was stopped when I got stuck on how to design the nest boxes. So that's it for day 1, off to a good start!
^^^Above: you can see the floor which is a 1/2 inch 4x8 OSB board and also we have the walls up with the frame. 1/4 inch plywood (8ftx2.5ft) was used for the side walls and 2x3's for the frame.
^^^Above: I just used a few small 2x3's to make supports for the chicken door. The length of these will depend on the size you want your door to be.
^^^Above: Getting the measurements for the end walls.
^^^Above: Got the end walls cut out with the classic peak roof.
^^^Above: End wall in place and the chicken door cut.
We brain stormed some ideas for nest boxes and this is what we cam up with^^ All of that was built using scrap! Hooray!
^^^Above: We bought some cheap linoleum tiles for a total of $10 for 32 sq. ft. We also painted the base to help the tiles stick and further protect from water damage.
Coop all primed...just needs a coat of color paint, add the roof, cut out some windows/more doors, add shingles, construct the chicken run, make a door to the chicken coop, finish the nest boxes.... 3 Months on slow work later (Remember what I said about being bad at getting things done?) I apologize for falling behind on the picture taking, I have just been so focused on getting the coop done the whole "take picture for BYC coop page" had evaded my mind. Anyways...Here are some on the final pictures and steps.
4/01/2019
Five years later... As I look back perhaps I was a little too optimistic in my design. Thanks for the reviews! It gives me insight on my design and hopefully steers other coop builders in the right direction.
**Yes, I used 2x3 for part of the frame and I actually used 4x4s for the legs
The biggest fault was in the run. There was not enough support for it to remain upright, looking at the last picture, the run leans heavily to the left.
The coop itself has stood the test of time and still stands today. There is weathering on the sides of the coop where water has separated the wood.
May 2019 - 5 Years later
Weather and chickens have slowly ruined the coop. The roof held together surprisingly well. The flaws come in with the side panels. I would consider using a thicker wood or learn ways to better protect against damage from moisture.