3. Construction (Part 1)
I suggest having at least some 'basic' woodworking experience if you were going to attempt making this house. As mentioned earlier, I am not going to give you every-little-detail about joining the wood, angles, heights and positions to the millimeter/sixteenth-inch, etc..
Many materials in this design can be substituted with something else. For example: -use paint instead of oil, -or corrugated plastic instead of shingles, -etc..
Here is an approximation of the materials I used:
Boards:
-So, here are some of the smaller bits you might include in your design:

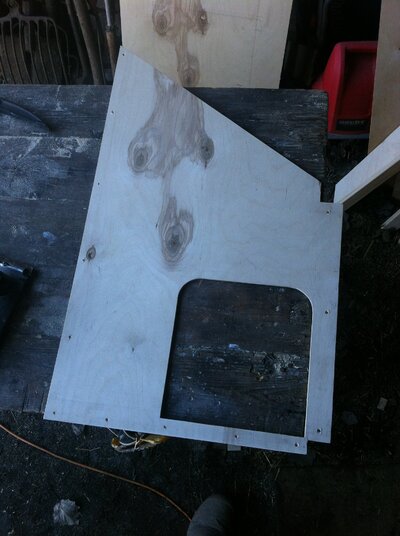
'Step #1' for me was choosing which plywood panels I liked for which side. This, for example, was the one I chose to be the front, outer-wall panel:

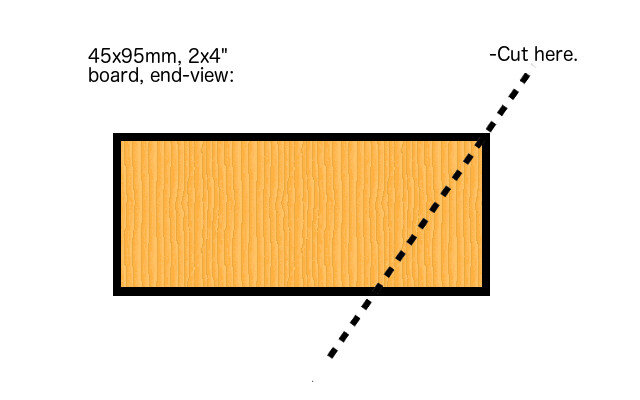
You can then take the =45x95mmx3m, =2x4"x8' board and trim one side off at an angle to match the angle of the roof. If you use a table-saw to do this, as opposed to a hand-held circular-saw, you will save so much effort and time and strain:

The 4 wall-panels should then be constructed and joined together. You can use a jigsaw or circular-saw to cut the various shapes out of the plywood, making the front and back (outer) panels, for starters. (-You'll have to forgive me for lack of pictures in the beginning here. At this point in the process I was not considering posting a 'how-to' on this website, or anywhere...) This first image is of a side-wall being built:

Here's what the front-panel will look like (for the most part), before insulation of course:

-And the back:

Here's another view of the back... of a picture I took upside-down, and now rotated. I carefully jigsawed-out the plywood for the food-storage compartment's door and egg-box door, and will re-use those exact pieces for the actual outsides of the doors, later on. You might also notice the narrow plywood strip on the right. -This will nicely cover that particular leg of the house, later. -But it is unnecessary to do it that way. I just thought the rest of the back would look nicer as one, solid piece:

During the construction of these panels, you can build your 2 windows, at least mostly. Framing them, I used =21x45mm, =1x2" boards wherever the =45x45mm, =2x2"'s were unavailable. Here is a close-up of the back window, for the rabbits. This small frame and window will be flipped-over for installation. In other words, the single window-layer you see here is the outer window piece, -the screws of which are just covered by the plywood, for aesthetics:


Here is a side-wall mounted into place, with screws and glue. Using glue for all of these joints is up to you. I just do it for a little more reliability/strength:

Next is constructing a series of boards through the center of the coop-hutch, where the floor will be:

Making some basic measurements, prepare the bottom plywood layer of the floor construction. Use a drill and a jigsaw to cut-out notches where the legs extend below the house. With the structure on its side, loosely fit it into place to confirm it will attach nicely. -This might require some bending. If using a single, giant piece of plywood for the bottom, as I did, be sure not to fully entrap the base with all of the =45x45mm, =2x2" boards that make-up the bottom of the pen(!). Once in place, go around to the other side and draw lines around all the boards, and especially around the ramp-door hole, which you should jigsaw-out before final installation. Using your lines, you can also now pre-drill through the plywood to give you a guide as to where you should be placing your ±2.5cm, ±1" screws to secure it into place:

-Attach the piece:

After attaching the bottommost plywood, connect all the legs with the final =45x45mm, =2x2" boards to create the bottom of what will be the pen. Some brackets can be used here, in addition to longer screws, and glue, if you like. While the house is still on its side, this would be a good time to seal all around the bottom, and especially the bottoms of the legs. After that, the upper floor pieces need to be cut/jigsawed into the appropriate shapes:

Before screwing them down, attach other boards (-made of =21x45mm, =1x2" wood) for support, and then add insulation:


Like any additional floor-support boards you may have added, the same should be put but for the inner-wall plywood pieces:


Within the house, a structure along these lines should be made. It will serve to create the food-storage compartment, as well as support the main divider-wall between the 'rabbit area' and 'chicken area'. You can easily get the appropriate heights and angles for the vertical boards by placing longer boards against the inner-side of the back-wall and drawing a line on them that follows the slope of the peak. Attached to one side of this inner framework, you will want to install a rectangle of plywood that will isolate the egg-boxes from the food-storage area and the rest of the house:

You can start to insulate the front and back walls, now, if you want. -Cut plywood pieces to match your various spaces. -The more space a single panel can cover, the better. I unfortunately had to cut more individual pieces than I wanted to... Here are some examples:


A rectangle can be drawn exactly where it needs to be through a rough-cut hole while holding the plywood in place. -Jigsaw along the lines, and then install:


-Cut, fit and install the floor of the food-storage area. This should be made of the thicker plywood, for strength:


The upper egg-box floor can also be made out of the thicker plywood, -supported by a few =21x34mm, =1x1.5" beams. Those small beams could easily be replaced by just brackets though, if you prefer. As you can see, the egg-boxes have small lengths of wood installed on top, towards the front and back. This will help prevent eggs from rolling-out. The egg boxes are approximately 30cm, ±1' wide by ±45cm, ±18" deep:

This might be 'overkill' for some, -but I made a beam for the strength of the peak of the house (-and to help secure the OSB) by angle-ripping some =21x45mm, ±1x2" boards. -I then screwed and glued these together, a bit long, and trimmed it later to the final length:


After any top/peak-beam is (temporarily) added, you can add other bits of plywood:

And then this final vertical post should be added. -2 walls will be attached to it: -the main-divider wall, and the wall between the rabbits' main area and the "private rabbit room". I made this particular post out of =21x45mm, =1x2" wood. -It does not need to be bigger. Secure it at the bottom with brackets:

Now, cut and install the angled-wall between the rabbit rooms. It's height should not exceed where the ceiling plywood will Be sure to add a doorway!:


The main-divider wall is quite large, and fits in-place as follows. Also, you can see that I've cut and added 4 'lateral' roof supports. (-Do not attach them with any glue yet(!), because first the ceiling plywood sheets need to be in place. -The top/peak-beam will need to be temporarily removed as well.):

-Cut a hole for the rabbits right in-front of the hole for the ramp-door (-bottom-right, w/res. to the previous picture):


...
Many materials in this design can be substituted with something else. For example: -use paint instead of oil, -or corrugated plastic instead of shingles, -etc..
Here is an approximation of the materials I used:
Boards:
- x1 =45x95mmx3m, =2x4"x8' board, untreated. (-To rip at an angle and support the roof's edge.)
- x3 =45x70mmx3m, =2x3"x8' boards, untreated. (-For legs and horizontal floor supports.)
- x16+ =45x45mmx3m, =2x2"x8' boards, untreated.
- x10 =21x45mmx3m, =1x2"x8' boards, untreated.
- x2 =21x34mmx3m, =1x1.5"x8' boards, untreated.
- x3 =10x29mmx1m, ±3/8x1&1/8x40" boards, untreated. (-For ramp steps.)
- x6 =5x29mmx1m, ±3/16x1&1/8x40" boards, untreated. (-As trim for windows and vents.)
- x2 bars/boards for roosting, at least =1m, ±3'4" long each, untreated.
- Min. x7 sheets of =1.525x1.525m, =5x5' plywood squares, of =5mm, ±3/16" thickness. (-Having 8 will make building easier. Also, this can all of course be adapted to suit =1.25x2.5m, =4x8' sheets, instead. I'll let you figure that out...)
- x1 =.83x1.25m, ±32x48" plywood sheet, of =9mm, ±3/8" thickness. (-Thicker for the ramp, food-storage floor, egg-box floor, and winter-vent-covers).
- x2 =1.25x2.5m, =4x8' OSB sheets, of =10mm, ±3/8" thickness. (-You don't actually need this much OSB. I just couldn't find any smaller sheets suitable for the large, roof pieces.)
- ±1000 ±2.5cm, ±1" wood-screws. (-Mostly for attaching the plywood.)
- ±200 ±9-10cm, ±3.5-4" wood-screws. (-For joining the various boards.)
- ±500 ±3.5cm, ±1&3/8" wood-screws. (-Mostly for joining =21mm, =1"-thick boards to others.)
- Other random screws on-hand... -especially short ones for the ramp (±1.5cm, ±5/8").
- Min. =3m², ±32ft² pack of shingles. (-Might need a bit more... -I managed to do it just barely with the one =3m², x22 shingles pack I had.)
- ±200 ±2cm, ±3/4" wide-headed nails.
- ±5m, ±15' electrical wire.
- x3 mountable, ceramic bulb-sockets. (-Ceramic for heat-resistance.)
- ±4 mountable, female electric plugs/outlets.
- x4 male plugs.
- A few plastic hooks for wire mounting, if you want.
- x7 medium/large pairs of hinges. (-Preferably with x2 of the pairs being square to more-easily match the pen's grid-mesh.)
- x1 smaller pair of hinges. (-For the ramp-door.)
- x7 =4cm, ±1.5"-wide sliding-bolt-locks.
- x1 door-chain-lock.
- ±3L, ±.75gal pine-tar-linseed-oil sealer.
- Some wood-glue. (-Optional...?)
- Min. x1 =50x50cm, ±20x20" plastic piece for windows, of whatever thickness you think is best. (-Real glass is cool, too.)
- Min. =1m, ±40" metal cable, of ±2mm, ±1/16" thickness. (-For the door-ramp. -PVC-coated will prevent rusting, but is also ingestible by the rabbits...)
- x2 matching 'cable-fasteners'.
- ±6m, ±20' 'natural' rope, of ±8mm, ±5/16" diameter. (-For the screw-eye handles. -Feel free to simply buy pre-made handles instead.)
- x±20 ±2cm, ±3/4"(deep) screw-eyes, with min. =8mm, ±5/16" eye-opening. (-Get only ±4 screw-eyes if you're opting-out of making the rope handles.)
- x8 brackets for pen doors.
- x10+ brackets for pen legs.
- x10-20 additional brackets.
- Wire-mesh grid with max. =13x13mm, =1/2x1/2" 'eyes', and min. =3.5m, ±12' length, with =100cm, ±40" width.
- ±10-12m², ±100-130ft² mineral-wool (or other) insulation, of ±5cm, ±2" thickness.
- ... -Anything else I forgot. ...
-So, here are some of the smaller bits you might include in your design:

'Step #1' for me was choosing which plywood panels I liked for which side. This, for example, was the one I chose to be the front, outer-wall panel:

You can then take the =45x95mmx3m, =2x4"x8' board and trim one side off at an angle to match the angle of the roof. If you use a table-saw to do this, as opposed to a hand-held circular-saw, you will save so much effort and time and strain:
The 4 wall-panels should then be constructed and joined together. You can use a jigsaw or circular-saw to cut the various shapes out of the plywood, making the front and back (outer) panels, for starters. (-You'll have to forgive me for lack of pictures in the beginning here. At this point in the process I was not considering posting a 'how-to' on this website, or anywhere...) This first image is of a side-wall being built:

Here's what the front-panel will look like (for the most part), before insulation of course:

-And the back:
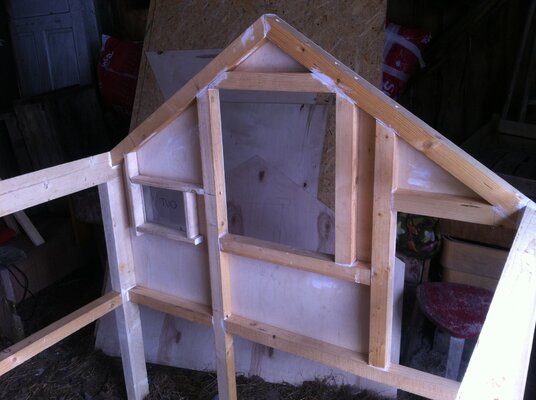
Here's another view of the back... of a picture I took upside-down, and now rotated. I carefully jigsawed-out the plywood for the food-storage compartment's door and egg-box door, and will re-use those exact pieces for the actual outsides of the doors, later on. You might also notice the narrow plywood strip on the right. -This will nicely cover that particular leg of the house, later. -But it is unnecessary to do it that way. I just thought the rest of the back would look nicer as one, solid piece:

During the construction of these panels, you can build your 2 windows, at least mostly. Framing them, I used =21x45mm, =1x2" boards wherever the =45x45mm, =2x2"'s were unavailable. Here is a close-up of the back window, for the rabbits. This small frame and window will be flipped-over for installation. In other words, the single window-layer you see here is the outer window piece, -the screws of which are just covered by the plywood, for aesthetics:


Here is a side-wall mounted into place, with screws and glue. Using glue for all of these joints is up to you. I just do it for a little more reliability/strength:
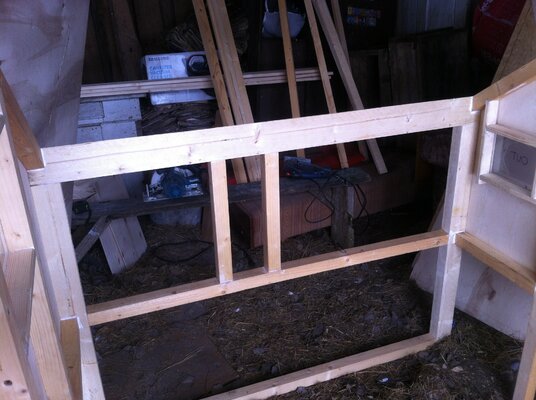
Next is constructing a series of boards through the center of the coop-hutch, where the floor will be:

Making some basic measurements, prepare the bottom plywood layer of the floor construction. Use a drill and a jigsaw to cut-out notches where the legs extend below the house. With the structure on its side, loosely fit it into place to confirm it will attach nicely. -This might require some bending. If using a single, giant piece of plywood for the bottom, as I did, be sure not to fully entrap the base with all of the =45x45mm, =2x2" boards that make-up the bottom of the pen(!). Once in place, go around to the other side and draw lines around all the boards, and especially around the ramp-door hole, which you should jigsaw-out before final installation. Using your lines, you can also now pre-drill through the plywood to give you a guide as to where you should be placing your ±2.5cm, ±1" screws to secure it into place:
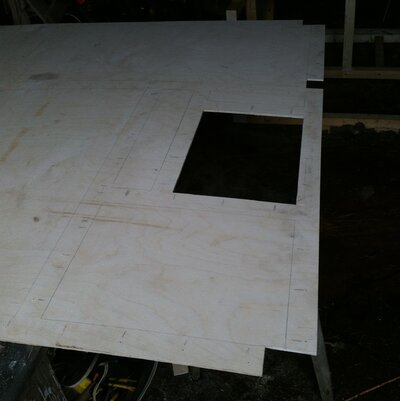
-Attach the piece:

After attaching the bottommost plywood, connect all the legs with the final =45x45mm, =2x2" boards to create the bottom of what will be the pen. Some brackets can be used here, in addition to longer screws, and glue, if you like. While the house is still on its side, this would be a good time to seal all around the bottom, and especially the bottoms of the legs. After that, the upper floor pieces need to be cut/jigsawed into the appropriate shapes:

Before screwing them down, attach other boards (-made of =21x45mm, =1x2" wood) for support, and then add insulation:
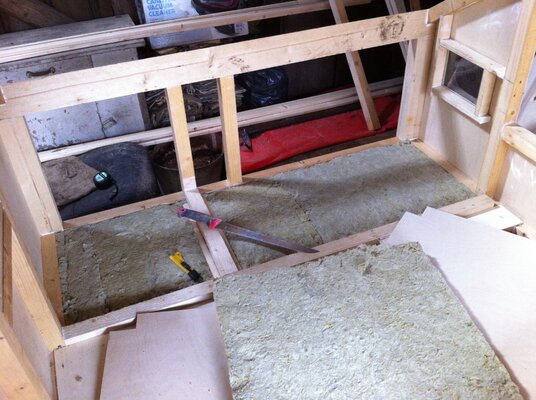


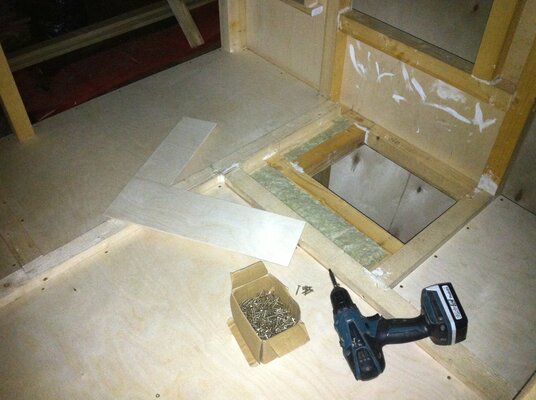
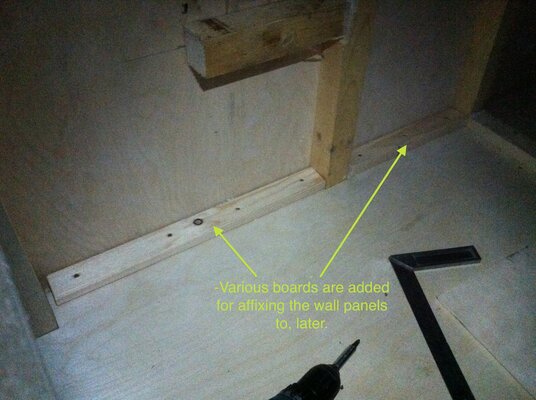
Like any additional floor-support boards you may have added, the same should be put but for the inner-wall plywood pieces:

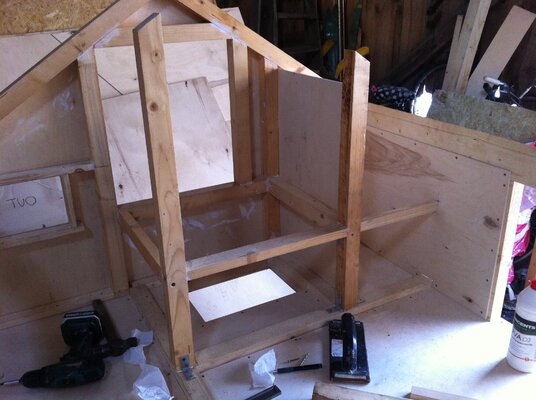
Within the house, a structure along these lines should be made. It will serve to create the food-storage compartment, as well as support the main divider-wall between the 'rabbit area' and 'chicken area'. You can easily get the appropriate heights and angles for the vertical boards by placing longer boards against the inner-side of the back-wall and drawing a line on them that follows the slope of the peak. Attached to one side of this inner framework, you will want to install a rectangle of plywood that will isolate the egg-boxes from the food-storage area and the rest of the house:
You can start to insulate the front and back walls, now, if you want. -Cut plywood pieces to match your various spaces. -The more space a single panel can cover, the better. I unfortunately had to cut more individual pieces than I wanted to... Here are some examples:


A rectangle can be drawn exactly where it needs to be through a rough-cut hole while holding the plywood in place. -Jigsaw along the lines, and then install:


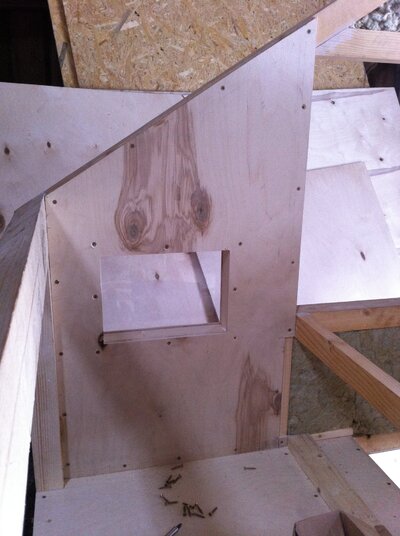
-Cut, fit and install the floor of the food-storage area. This should be made of the thicker plywood, for strength:
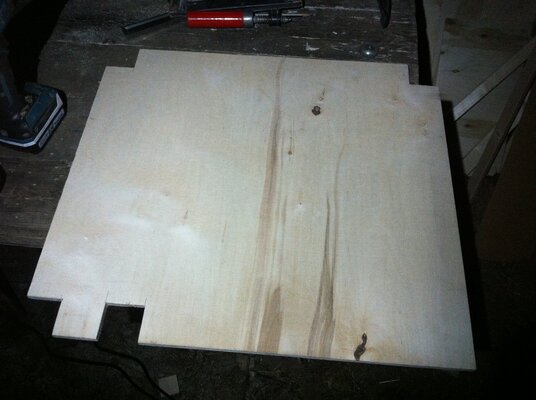

The upper egg-box floor can also be made out of the thicker plywood, -supported by a few =21x34mm, =1x1.5" beams. Those small beams could easily be replaced by just brackets though, if you prefer. As you can see, the egg-boxes have small lengths of wood installed on top, towards the front and back. This will help prevent eggs from rolling-out. The egg boxes are approximately 30cm, ±1' wide by ±45cm, ±18" deep:
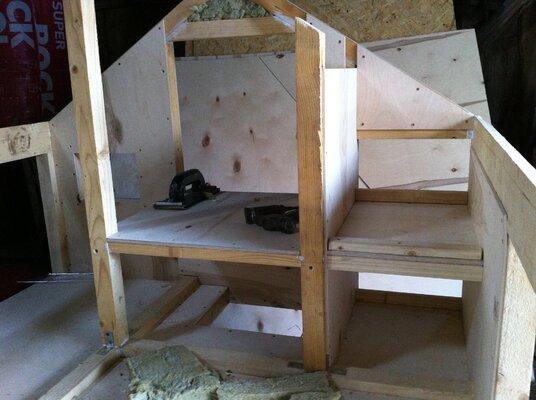
This might be 'overkill' for some, -but I made a beam for the strength of the peak of the house (-and to help secure the OSB) by angle-ripping some =21x45mm, ±1x2" boards. -I then screwed and glued these together, a bit long, and trimmed it later to the final length:

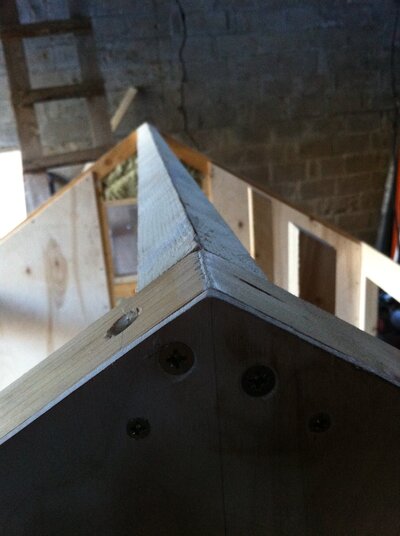
After any top/peak-beam is (temporarily) added, you can add other bits of plywood:

And then this final vertical post should be added. -2 walls will be attached to it: -the main-divider wall, and the wall between the rabbits' main area and the "private rabbit room". I made this particular post out of =21x45mm, =1x2" wood. -It does not need to be bigger. Secure it at the bottom with brackets:

Now, cut and install the angled-wall between the rabbit rooms. It's height should not exceed where the ceiling plywood will Be sure to add a doorway!:

The main-divider wall is quite large, and fits in-place as follows. Also, you can see that I've cut and added 4 'lateral' roof supports. (-Do not attach them with any glue yet(!), because first the ceiling plywood sheets need to be in place. -The top/peak-beam will need to be temporarily removed as well.):

-Cut a hole for the rabbits right in-front of the hole for the ramp-door (-bottom-right, w/res. to the previous picture):


...

"(2022-3-4) Update/Clarification:
Since many people have pointed-out a size 'problem' with this coop, it is worth strongly emphasizing that this coop is designed to be placed within a giant, 9x9m (~30x30ft), 81m² (~900ft²)(!), predator-proof pen, -far more 'round-the-clock space per bird/rabbit than countless setups I've seen. Under ideal conditions, the bottom, boutique "pen" of this house should remain open at all times. Overall, if you believe only 3 chickens, say, should sleep inside this particular house at any one time, than that's your prerogative. Regardless, this was the first time I had attempted something like this, and of course I would change many, many things in future builds. ~Thanks for looking!"