After 17 years...we decided to moved back home to Colorado. I was so excited to 1) slow down from the fast paced life we had been living and 2) raise chickens. When I walked into the Big R Supply Store my heart raced...there they were...baby chicks. It would have been smart to build a coop first, but patience has never been my virtue so I bought 8 of them and made a make-shift home for them in my enclosed front porch.
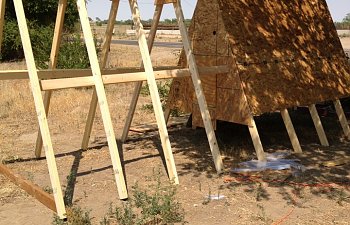
Now to build a chicken coop. There were hundreds of ideas for coops on the internet. My husband and brother said they were willing to build it for me, however, my job was to pick one I liked. Deciding on the type was time consuming but finally I chose an A-Frame style. My reason for the choice was ease in construction. Shade would be provided under the coop and I just thought it would look cool. This coop was similar to those on the internet, but I did make a few minor adjustments.

The coop required 4 sheets of OSB plywood, and 8 foot 2x4s. As you can see from the pictures, we made doors on the side to open for the nests. Inside there is plenty of room for the roost on one side and the nests on the other. Underneath the coop provides shade during the heat of the day, and during the cold days, we've enclosed the space underneath so the girls can get out of the elements. The nests are inexpensive plastic tote boxes from Walmart so they can be washed out easily when I clean the coop.
My Easter Egg pullets wouldn't be ready to lay until February, so I decided to purchase six laying hens: three Buff Opingtons, and three Speckled Sussix. Although the run extends out from the coop, I could see the pullets increasing size and the hens overbearing nature was requiring me to look at increasing their floor space.
This was solved by building another A-frame without a coop then build a walk-way between. They love it! Now when I'm ready to build another coop, I'll simply build an A-Frame and connect it to the A-Frame run.
Now to build a chicken coop. There were hundreds of ideas for coops on the internet. My husband and brother said they were willing to build it for me, however, my job was to pick one I liked. Deciding on the type was time consuming but finally I chose an A-Frame style. My reason for the choice was ease in construction. Shade would be provided under the coop and I just thought it would look cool. This coop was similar to those on the internet, but I did make a few minor adjustments.
The coop required 4 sheets of OSB plywood, and 8 foot 2x4s. As you can see from the pictures, we made doors on the side to open for the nests. Inside there is plenty of room for the roost on one side and the nests on the other. Underneath the coop provides shade during the heat of the day, and during the cold days, we've enclosed the space underneath so the girls can get out of the elements. The nests are inexpensive plastic tote boxes from Walmart so they can be washed out easily when I clean the coop.
My Easter Egg pullets wouldn't be ready to lay until February, so I decided to purchase six laying hens: three Buff Opingtons, and three Speckled Sussix. Although the run extends out from the coop, I could see the pullets increasing size and the hens overbearing nature was requiring me to look at increasing their floor space.
This was solved by building another A-frame without a coop then build a walk-way between. They love it! Now when I'm ready to build another coop, I'll simply build an A-Frame and connect it to the A-Frame run.