We live in Eastern Ontario, Canada and our climate has had a very large influence on the design of the chicken coop that we just finished building.
The summer temperatures here vary between 75˚F and 90˚F and the winter temperatures at night time are between 0˚F and -30˚F. Because of this, we felt that having a well insulated coop was very important. My research on this site indicated that chickens were able to do well in below freezing temperatures so long as they still had access to water and their coop was not too humid. As you read through this post you will see how we have addressed these requirements.
We chose to have 5 chickens which means that the coop had to be at least 20 square feet. The final coop is actually about 27 square feet but this includes the nesting boxes that are mounted inside of the coop. The run is 66 square feet which meets the 10 square feet per bird recommendation I have read about here plus some extra.
While we have only had the birds for about a week, they seem to be content with the arrangement and they certainly have more space than the farm where they came from.
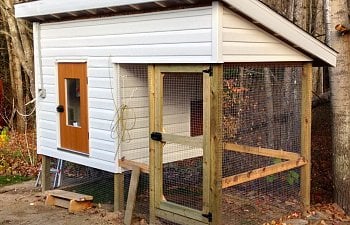
Here is a picture of the almost completed coop. The electrical has yet to be completed in this picture and the pulley system for the pop hole has yet to be installed on the exterior.

When planing the coop, I designed in 3.5" of Styrofoam for the insulation. I didn't want the hassle of vapour barrier and this foam is fairly easy to work with. It does not have the same R value as the blue or pink foam board but it is also cheaper. This meant that the walls would be 2x4 construction at a minimum and thicker where an airspace was required. (i.e. the pop hole wall and the roof space) The coop house has outside dimensions of 72"x72". This was chosen because the siding comes in 12 ft lengths and I didn't want to have lots of wastage. In this next picture you can see the floor system for the coop being built and insulated. As mentioned above, there is 3.5" of foam sandwiched between 2 sheets of OSB. A plywood floor will be added to this later because the OSB simply isn't rigid enough as a flooring material.
The floor is approximately 30" off of the ground. This was chosen because it allowed 18" of the 48" wide hardware cloth to be sunk below ground level around the perimeter of the building. It also allows for easy access to the birds for collecting eggs or adding food and water. Finally, a wheelbarrow is lower than the floor of the coop at clean out time so this should be easy too. This next photo shows the walls being framed.
As you can see here, the pop hole is integrated into the wall design. This allows for better insulation but also means that this wall was 2x6 construction. The wall is framed so that the area below the pop hole door is cut away and any bedding materials that get tracked into the pop hole mechanism simply fall through this void and out the bottom of the floor system and onto the ground below. We should never have a situation where the door wont close because of a build up of bedding material.
OSB was used to sheath the coop inside and out. This was painted on the inside with exterior grade paint that is used for the floors of wooden porches. The outside was covered in vinyl siding. This next picture shows the sheathing applied to the inside of the structure and a window installed on the exterior side wall. This window is made of 2 sheets of 1/4" plexiglass that I was able to salvage at an earlier date. While not thermal pane, 2 sheets separated by a 3.5" air gap have to be better than one.
The next phase was to install the upper portion of the front coop wall. This wall extends the whole length of the structure and supports the front of the roofing system.
This too was sheathed on the inner surface and the insulating started.
Now that first roof members were in place over the exterior walls, I could install the pulley system for the pop hole. Since the mechanism was buried in the wall, I never wanted to have to repair it, hence the heavy gage clothes line shown in the picture. This is fed through PVC electrical conduit out to the front of the coop. The electrical conduit is used so that the insulation wont affect the movement of the clothes line.
With the insulating done, it was time to move onto the roof system. It is a simple shed style roof. The whole structure has a 6 ft x 11 ft foot print, this allowed me to use a roof that was 8 ft x 12 ft (3 sheets of ply). This makes for eves that are about 9" front and back and 6" on each side.
In this next photo I have installed the door as well as started to install the J-groove and corner pieces for the siding.
I was lucky to have my brother come home from school for a weekend and we were able to install the roof insulation and sheeting. This type of work goes much faster with an extra pair of hands. Here is the roof with the shingles in place. As you can see, I chose asphalt shingles, this is simply because they are cheap and readily available in our area. Steel may have been faster to install but it would have been a special order so I didn't look into it any further.
One thing that came up in my reading was that ventilation was very important in a chicken coop. Specifically that the coop should be well ventilated but not draughty. Initially these seemed like opposed requirements but I think that I came up with a reasonable compromise. Our coop has a fan on a timer. This fan will draw the stale air from the coop and make-up air will enter the coop along the ceiling. Since the chickens are either on the floor of the coop or on their roost, they will be protected from this airflow by some ducts that I installed on the underside of the ceiling. We will have to see how this system works out. The fan is currently set to run 10 minutes out of every hour, this may need to be increased in the summer.
This first picture shows a sketch of the system and the next two show the vents before and after duct installation.
I should take a moment to discuss the electrical for the coop. Since it is reasonable to expect snow here any time between November and April, electrical heating of the coop was a must. This is done through the use of a "Thermo Cube" outlet (http://www.amazon.com/Farm-Innovators-TC-3-Thermostatically-Controlled/dp/B0006U2HD2) that energizes a trouble light inside of a steel box under the water tray. When the temperature inside of the coop falls below 35˚F the trouble light comes on and heats the water and coop until the Thermo Cube senses a coop temperature of 45˚F and then it shuts the light off. In addition the coop also has a light on a timer that ensures the chickens get 16 hrs of light per day. This timer is meant for indoor use so I'll have to see how it holds up to the cold outdoor temperatures that it will see this winter. The timer (http://www.amazon.com/Leviton-VPT24...d=1352085613&sr=1-1&keywords=leviton+vpt24-1p) allows for up to 50 program cycles and is even able to compensate for daylight savings time. We are using one for the fan and one for the light in the coop.
Here is a photo of my wife and daughter getting the chickens from the farmer who hatched them.
And here is a picture of the smallest hen in the coop (she is only about one month old). Note the metal box under the waterer, it contains the trouble light discussed above.
While we will never get enough eggs to pay for the coop, I hope that we have many years of enjoyment out of it.
The summer temperatures here vary between 75˚F and 90˚F and the winter temperatures at night time are between 0˚F and -30˚F. Because of this, we felt that having a well insulated coop was very important. My research on this site indicated that chickens were able to do well in below freezing temperatures so long as they still had access to water and their coop was not too humid. As you read through this post you will see how we have addressed these requirements.
We chose to have 5 chickens which means that the coop had to be at least 20 square feet. The final coop is actually about 27 square feet but this includes the nesting boxes that are mounted inside of the coop. The run is 66 square feet which meets the 10 square feet per bird recommendation I have read about here plus some extra.
While we have only had the birds for about a week, they seem to be content with the arrangement and they certainly have more space than the farm where they came from.
Here is a picture of the almost completed coop. The electrical has yet to be completed in this picture and the pulley system for the pop hole has yet to be installed on the exterior.
When planing the coop, I designed in 3.5" of Styrofoam for the insulation. I didn't want the hassle of vapour barrier and this foam is fairly easy to work with. It does not have the same R value as the blue or pink foam board but it is also cheaper. This meant that the walls would be 2x4 construction at a minimum and thicker where an airspace was required. (i.e. the pop hole wall and the roof space) The coop house has outside dimensions of 72"x72". This was chosen because the siding comes in 12 ft lengths and I didn't want to have lots of wastage. In this next picture you can see the floor system for the coop being built and insulated. As mentioned above, there is 3.5" of foam sandwiched between 2 sheets of OSB. A plywood floor will be added to this later because the OSB simply isn't rigid enough as a flooring material.
The floor is approximately 30" off of the ground. This was chosen because it allowed 18" of the 48" wide hardware cloth to be sunk below ground level around the perimeter of the building. It also allows for easy access to the birds for collecting eggs or adding food and water. Finally, a wheelbarrow is lower than the floor of the coop at clean out time so this should be easy too. This next photo shows the walls being framed.
As you can see here, the pop hole is integrated into the wall design. This allows for better insulation but also means that this wall was 2x6 construction. The wall is framed so that the area below the pop hole door is cut away and any bedding materials that get tracked into the pop hole mechanism simply fall through this void and out the bottom of the floor system and onto the ground below. We should never have a situation where the door wont close because of a build up of bedding material.
OSB was used to sheath the coop inside and out. This was painted on the inside with exterior grade paint that is used for the floors of wooden porches. The outside was covered in vinyl siding. This next picture shows the sheathing applied to the inside of the structure and a window installed on the exterior side wall. This window is made of 2 sheets of 1/4" plexiglass that I was able to salvage at an earlier date. While not thermal pane, 2 sheets separated by a 3.5" air gap have to be better than one.
The next phase was to install the upper portion of the front coop wall. This wall extends the whole length of the structure and supports the front of the roofing system.
This too was sheathed on the inner surface and the insulating started.
Now that first roof members were in place over the exterior walls, I could install the pulley system for the pop hole. Since the mechanism was buried in the wall, I never wanted to have to repair it, hence the heavy gage clothes line shown in the picture. This is fed through PVC electrical conduit out to the front of the coop. The electrical conduit is used so that the insulation wont affect the movement of the clothes line.
With the insulating done, it was time to move onto the roof system. It is a simple shed style roof. The whole structure has a 6 ft x 11 ft foot print, this allowed me to use a roof that was 8 ft x 12 ft (3 sheets of ply). This makes for eves that are about 9" front and back and 6" on each side.
In this next photo I have installed the door as well as started to install the J-groove and corner pieces for the siding.
I was lucky to have my brother come home from school for a weekend and we were able to install the roof insulation and sheeting. This type of work goes much faster with an extra pair of hands. Here is the roof with the shingles in place. As you can see, I chose asphalt shingles, this is simply because they are cheap and readily available in our area. Steel may have been faster to install but it would have been a special order so I didn't look into it any further.
One thing that came up in my reading was that ventilation was very important in a chicken coop. Specifically that the coop should be well ventilated but not draughty. Initially these seemed like opposed requirements but I think that I came up with a reasonable compromise. Our coop has a fan on a timer. This fan will draw the stale air from the coop and make-up air will enter the coop along the ceiling. Since the chickens are either on the floor of the coop or on their roost, they will be protected from this airflow by some ducts that I installed on the underside of the ceiling. We will have to see how this system works out. The fan is currently set to run 10 minutes out of every hour, this may need to be increased in the summer.
This first picture shows a sketch of the system and the next two show the vents before and after duct installation.
I should take a moment to discuss the electrical for the coop. Since it is reasonable to expect snow here any time between November and April, electrical heating of the coop was a must. This is done through the use of a "Thermo Cube" outlet (http://www.amazon.com/Farm-Innovators-TC-3-Thermostatically-Controlled/dp/B0006U2HD2) that energizes a trouble light inside of a steel box under the water tray. When the temperature inside of the coop falls below 35˚F the trouble light comes on and heats the water and coop until the Thermo Cube senses a coop temperature of 45˚F and then it shuts the light off. In addition the coop also has a light on a timer that ensures the chickens get 16 hrs of light per day. This timer is meant for indoor use so I'll have to see how it holds up to the cold outdoor temperatures that it will see this winter. The timer (http://www.amazon.com/Leviton-VPT24...d=1352085613&sr=1-1&keywords=leviton+vpt24-1p) allows for up to 50 program cycles and is even able to compensate for daylight savings time. We are using one for the fan and one for the light in the coop.
Here is a photo of my wife and daughter getting the chickens from the farmer who hatched them.
And here is a picture of the smallest hen in the coop (she is only about one month old). Note the metal box under the waterer, it contains the trouble light discussed above.
While we will never get enough eggs to pay for the coop, I hope that we have many years of enjoyment out of it.