Automated Feeding System With Dosage Control
Building an automated feeding system came second nature to me. It was a must. I used several scrap components that I had gathered from my workplace on clean up days to help with this project. I know that most of you will not have experience with the components I will be talking about but I will do my best to explain how I made this and how it works.
First I tried to understand the needs of my chickens. Using experimentation and data collection I determined that each of my chickens eat about 5/8 cup of grain every day. Using that information I determined how much grain I needed to provide them each day. 16 chickens * 5/8 cup = 10 cups / day (this included wasted feed). This was the minimal starting criteria for dosage controlled feeding.
Second I needed to understand my needs. I did not want something I needed to fill up every day or even every week. I also wanted it to be very maintenance free. It needed to be rodent proof.
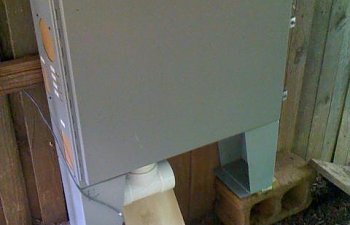
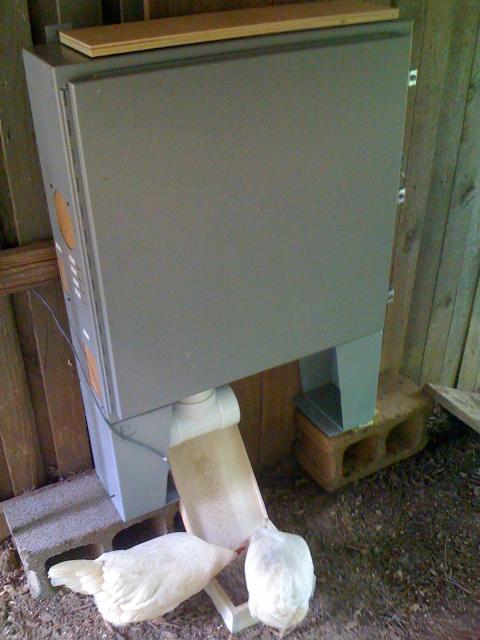
With this all determined I had an old electrical enclosure that I found to be perfect for the job.

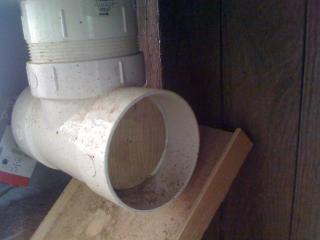
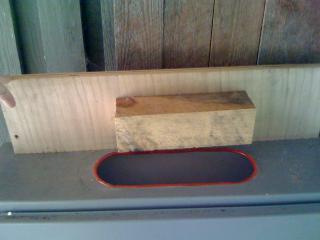
Now I needed to figure out how to dispense the grain. I had an old 90 degree rotary actuator (check Ebay) that is powered by 24V AC or DC. I decided to build a drum that would fit inside a 4" pipe "T" (Lowe's) and connect the drum to the rotary actuator. I made the drum from "Ash" wood that I turned on a lathe to fit perfectly inside the "T". Once I got the drum to fit I used JB Weld to secure a metal rod to one end of the drum which connected to the rotary actuator. Next I used a 1" bit and drilled a hole into the bottom of the "T" and 1/2 the distance into the side of the drum. This determined the dump position and the extended rotary position. Next I rotated the drum 90 degrees which closed the bottom hole in the "T". When the drum was in position I drilled a hole into the top if the drum from inside the hopper until it connected with the cross hole that I had previously drilled. Next I added a plug with the same size hole inside the hopper so when the drum starts to turn it will close off the hole into the drum and will deliver just the amount of grain that is stored in the drum each cycle. This amount came to about 3/4 cup . Excellent!
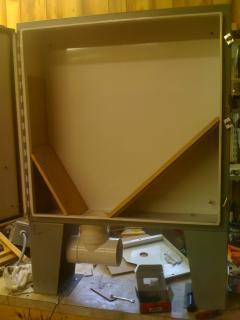
The last step in getting the feed to the dispenser was to build a director inside the hopper to keep the grain directed to the right place. I just used plywood to block all the existing holes in the hopper and added the angled boards to direct the flow. I also added a hole and lid on the top for filling and monitoring the levels.
The only thing remaining was for me to install the hopper, fill with feed, build a pan for the chickens to eat from, and write a program to dispense enough grain for all my chickens each day. After I installed it I determined the hopper would hold over 100 lbs of grain and I was extremely happy with this. I used a "PLC" (Programmable logic controller) (under $100 on the Internet) to setup the control system for my chicken coop and programed it to dispense 1 dose of grain every hour starting at 5:00 AM and the last at 8:00 PM. By metering the amount of grain they get every hour I have had very little wasted feed. They eat all they get and are very happy. I know the wiring is a mess and one of my next projects will be to put it all in an enclosure. I consider this project a total success!!
Here is a link to my you tube video so you can see it in action
http://www.youtube.com/watch?v=zqDPL30W5q4
Building an automated feeding system came second nature to me. It was a must. I used several scrap components that I had gathered from my workplace on clean up days to help with this project. I know that most of you will not have experience with the components I will be talking about but I will do my best to explain how I made this and how it works.
First I tried to understand the needs of my chickens. Using experimentation and data collection I determined that each of my chickens eat about 5/8 cup of grain every day. Using that information I determined how much grain I needed to provide them each day. 16 chickens * 5/8 cup = 10 cups / day (this included wasted feed). This was the minimal starting criteria for dosage controlled feeding.
Second I needed to understand my needs. I did not want something I needed to fill up every day or even every week. I also wanted it to be very maintenance free. It needed to be rodent proof.
With this all determined I had an old electrical enclosure that I found to be perfect for the job.
Now I needed to figure out how to dispense the grain. I had an old 90 degree rotary actuator (check Ebay) that is powered by 24V AC or DC. I decided to build a drum that would fit inside a 4" pipe "T" (Lowe's) and connect the drum to the rotary actuator. I made the drum from "Ash" wood that I turned on a lathe to fit perfectly inside the "T". Once I got the drum to fit I used JB Weld to secure a metal rod to one end of the drum which connected to the rotary actuator. Next I used a 1" bit and drilled a hole into the bottom of the "T" and 1/2 the distance into the side of the drum. This determined the dump position and the extended rotary position. Next I rotated the drum 90 degrees which closed the bottom hole in the "T". When the drum was in position I drilled a hole into the top if the drum from inside the hopper until it connected with the cross hole that I had previously drilled. Next I added a plug with the same size hole inside the hopper so when the drum starts to turn it will close off the hole into the drum and will deliver just the amount of grain that is stored in the drum each cycle. This amount came to about 3/4 cup . Excellent!
The last step in getting the feed to the dispenser was to build a director inside the hopper to keep the grain directed to the right place. I just used plywood to block all the existing holes in the hopper and added the angled boards to direct the flow. I also added a hole and lid on the top for filling and monitoring the levels.
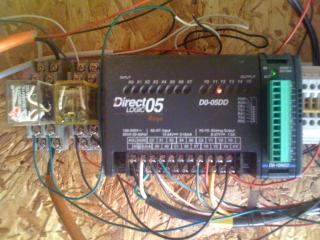
The only thing remaining was for me to install the hopper, fill with feed, build a pan for the chickens to eat from, and write a program to dispense enough grain for all my chickens each day. After I installed it I determined the hopper would hold over 100 lbs of grain and I was extremely happy with this. I used a "PLC" (Programmable logic controller) (under $100 on the Internet) to setup the control system for my chicken coop and programed it to dispense 1 dose of grain every hour starting at 5:00 AM and the last at 8:00 PM. By metering the amount of grain they get every hour I have had very little wasted feed. They eat all they get and are very happy. I know the wiring is a mess and one of my next projects will be to put it all in an enclosure. I consider this project a total success!!
Here is a link to my you tube video so you can see it in action
http://www.youtube.com/watch?v=zqDPL30W5q4