Our first chicken coop! A work in progress...
Updates:
Coop Progress:
3/1/2010
We worked on the coop over the weekend and so far we have four 4x4 posts set in concrete for the coop platform to sit on. The posts are exactly 6' to the outside edges of the posts. With 2x6 joists attached to the posts, this should give us a 6'3" x 6'3" square platform on which to build our coop. Hopefully the coop will be more than large enough for our flock, and give us room to expand should we choose to.
Last week on Thursday, Feb 25th 2010, we ordered 8 chickens from MyPetChicken.com. We will have 2 easter eggers, 1 dominicker, 1 silver laced wyandotte, 1 gold laced wyandotte, 1 light brown leghorn, 1 buff polish, and 1 white crested blue polish!
Pics:

This is the work site where our new coop will go.
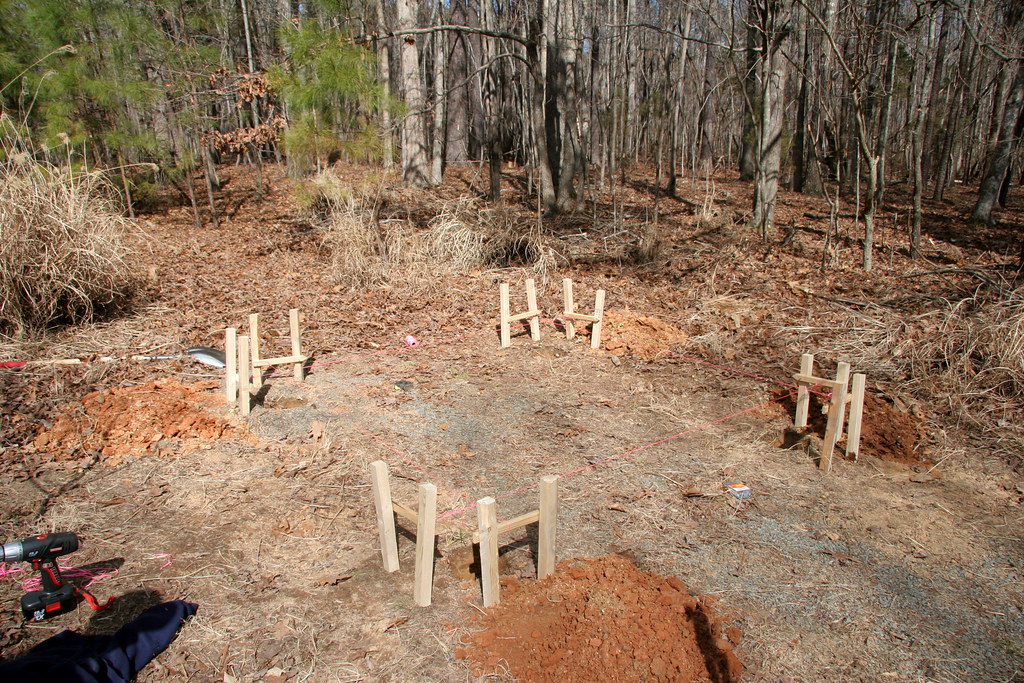
Here we have finally finished digging the post holes for the 4x4's.
You can see in the pictures that we have strung mason line between stakes on the outsides of all of the holes. This let us get each post exactly in place so that the platform built on top of it will be perfectly square. We will go back next weekend and cut the posts off at the same height and build our platform on top of it. The posts look a bit crooked, but that is in part because the mason line stakes are crooked, and partly due to the wide angle camera lens and perspective. I can assure that they are all vertical, and measured as exactly as my Stanley tape measure can get.
Each post that I put in the ground is approximately 22" deep, and on the tall side will only stick up out of the ground about 12". On the low side the posts will be taller because the ground slopes gently forward from the back to the front of the coop.
Lessons learned: it takes a LOT more planning and measuring to make sure you get a set of posts in the ground exactly square. Without a square and level foundation, everything else will be out of alignment that you put on top of it. So getting it right the first time is crucial!
Also we used far more concrete than I had ever imagined, the total was four 80lb bags and one 40lb bag, for a total of 360lbs of concrete! There will be no doubt about it, this coop foundation will be sturdy!
More pics can be found on my Flickr page: http://www.flickr.com/photos/bwknight/sets/72157623409060899/
Next weekend plans: get the 4x4 posts all cut to the same height, and get 2x6 joists put up with a 3/4" sheet of plywood over it for the floor. We are also going by the habitat for humanity store to see what options they have for inexpensive windows so that I can finalize the wall framing and get a good estimate on the materials we will need.
3/8/2010
After another beautiful weekend in NC, we have some more progress to report. On Saturday we were able to get the floor joists installed, and on Sunday we laid down the 3/4" plywood subfloor.
Also on Saturday we went out shopping for some vinyl flooring scraps to cover the coop floor. After stopping by a few different flooring stores, we found a 7'x9' scrap for $40 that will cover our entire coop floor with one sheet, and also cover the poop boards later in the project. We will be waiting till the day before or day of framing the walls to glue down the vinyl flooring though, that way we will have the walls in place right as the glue is drying so there will be no chances the vinyl will ever curl up at the edges.
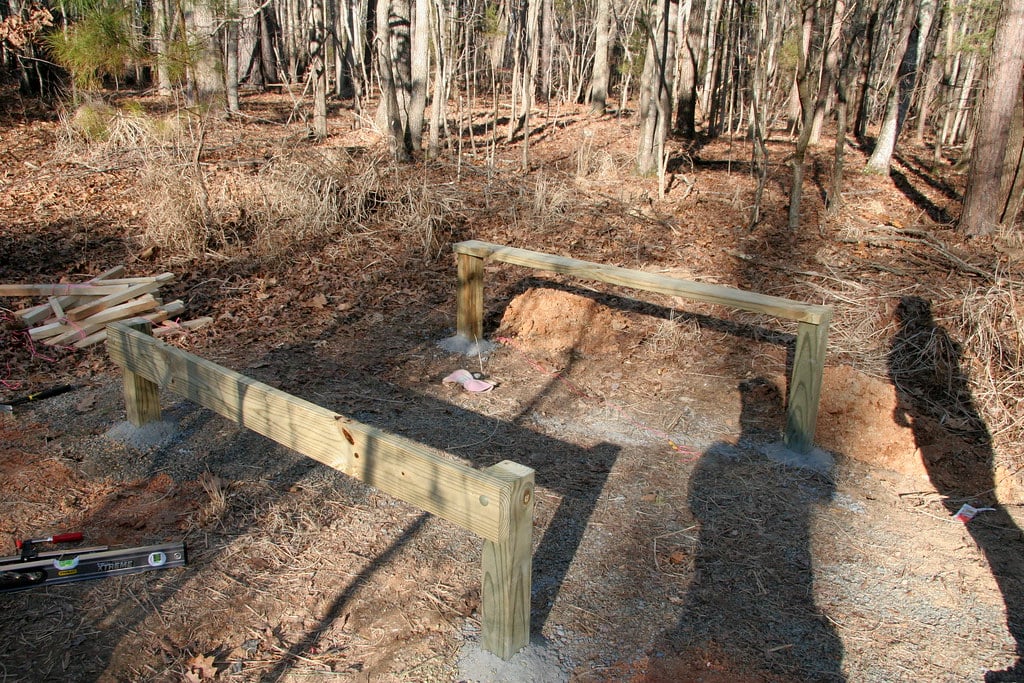
We started by cutting off all of the 4x4 posts to the same height as the shortest post. This will give us plenty of height under the coop for the chickens to have a shady area to chill during the day. This picture shows the first of six 2x6 joists to be installed. We bolted the outside joists to the 4x4 posts with some huge 1/2" carriage bolts. These things will be rock solid.
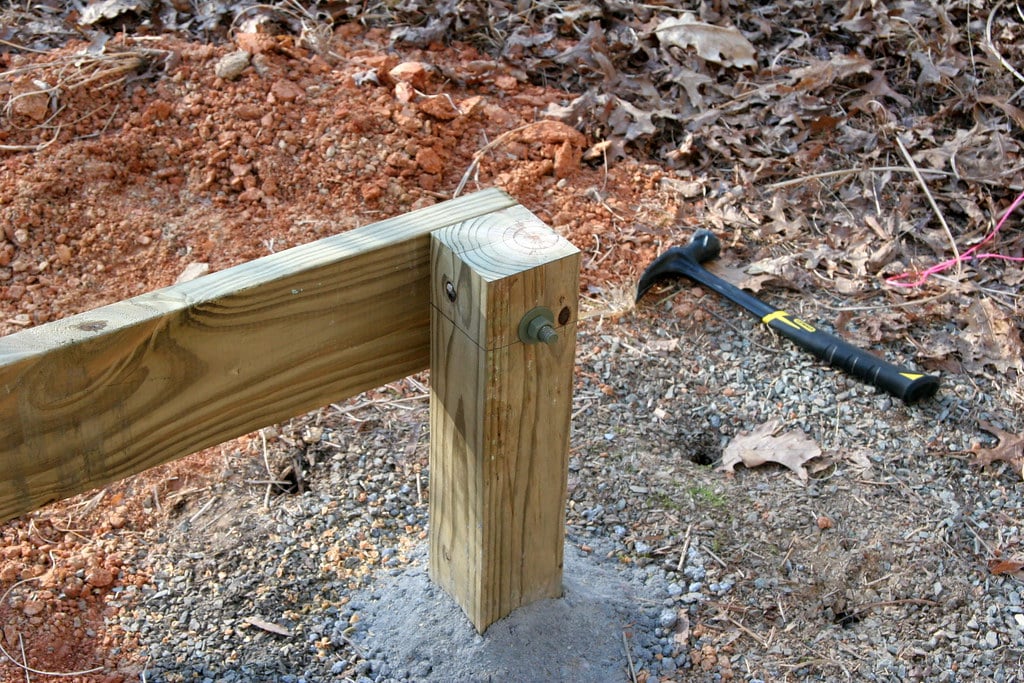
Closeup view of the bolt corner, I had to stagger them so the next bolt through the 4x4 will not intersect with the one I just put in. You'll see the detail shot of the others later.
Detail of the inside of the bolt hardware, I believe I set the center of the bolt 2" down from the top of the post.
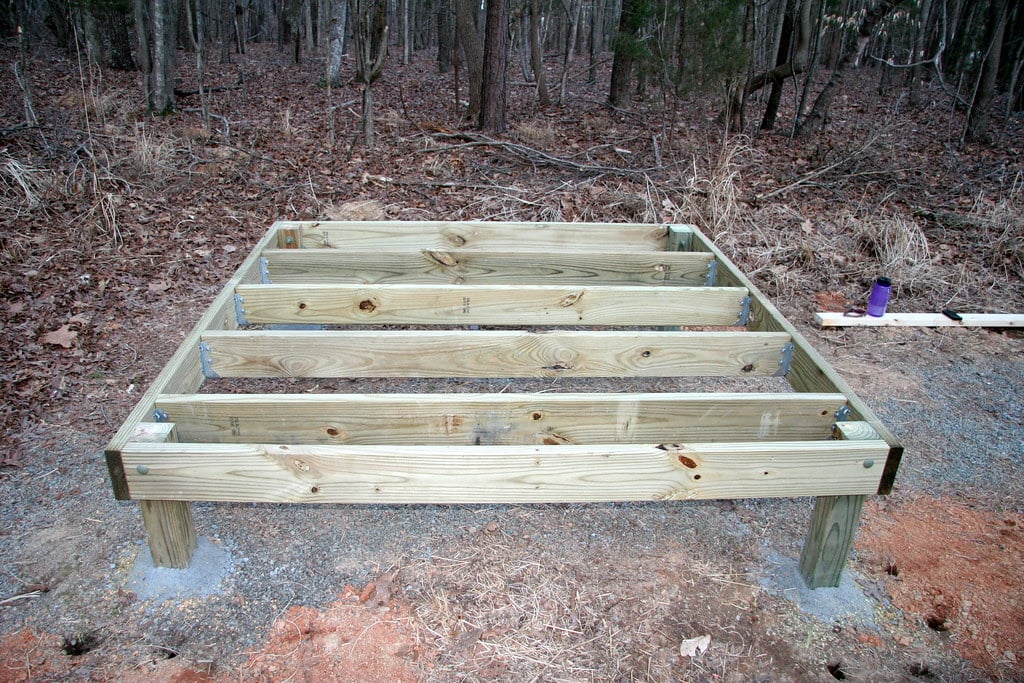
All four 2x6 joists bolted to the 4x4 posts, and a quick double check with the level and everything is still level, as it should be.
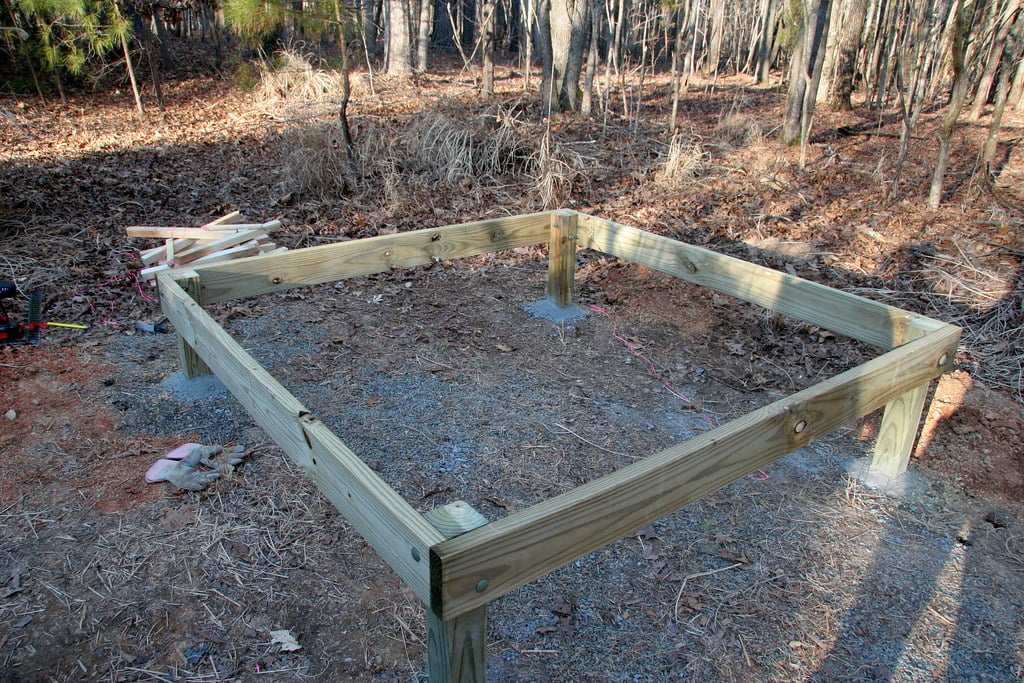
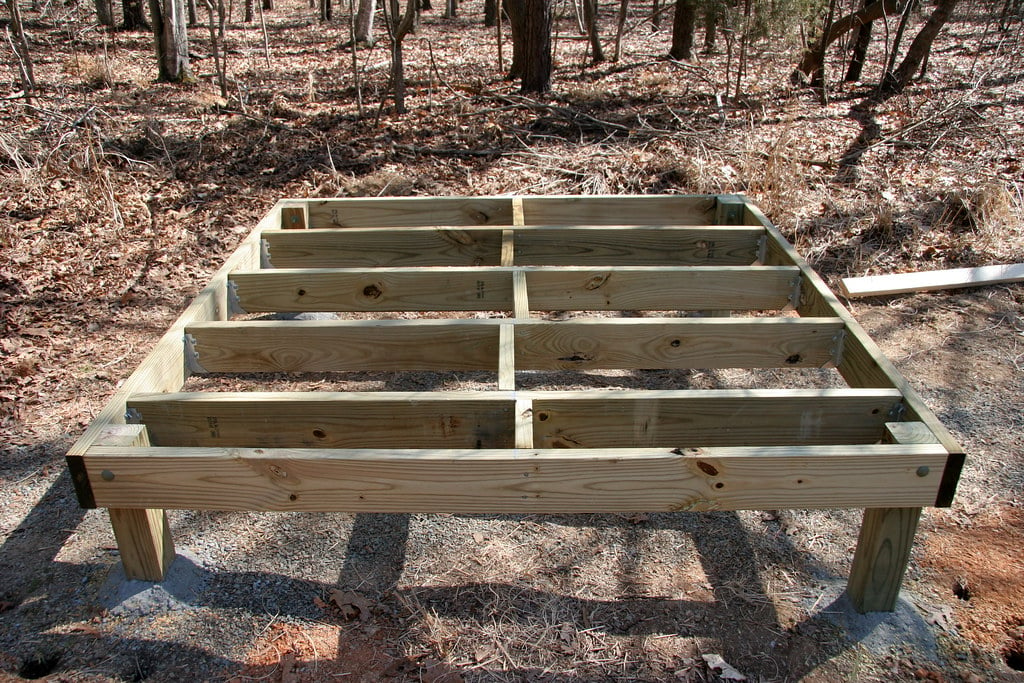
All of the 2x6 joists are installed in joist hangers at 16" on center. Notice how the ground slopes from left to right? The back side of the coop is about 10" tall under the joist, the front side is about 16" tall under the joist. Should be enough room for chickens to run around if I decide to enclose two sides of the coop in the run.
I had lots of scrap 2x6 material leftover, so on Sunday I decided to install blocking between the joists. Probably a bit overkill for a chicken coop, but this thing will last.
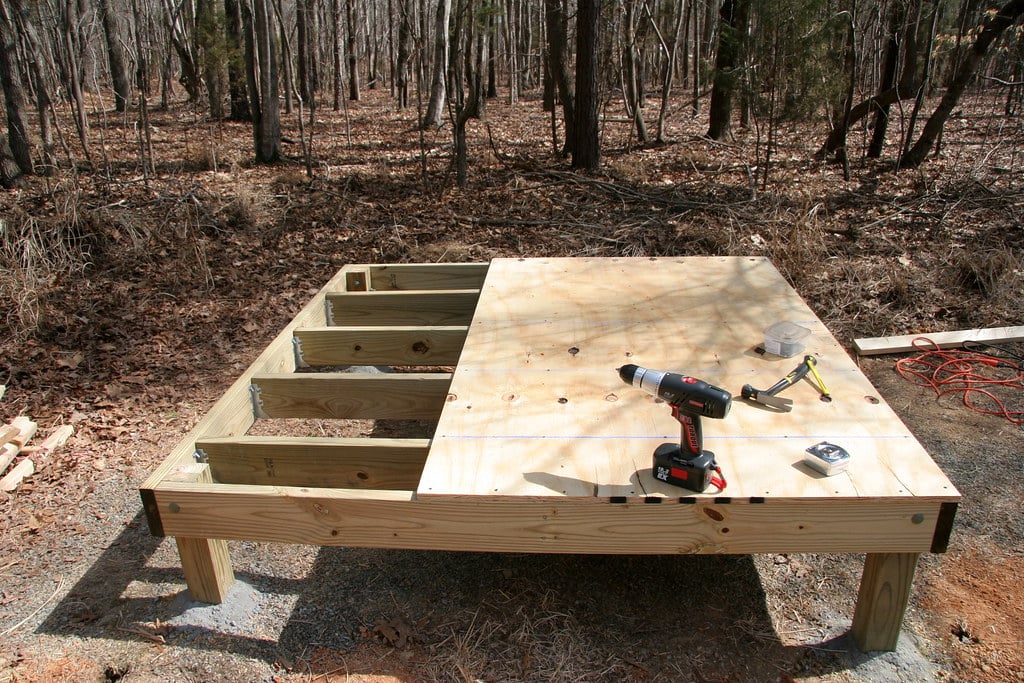
First shot of the 3/4" plywood subfloor going down. We laid down a 1/4" bead of construction adhesive along the joists then put the plywood down on top of it. I screwed down the perimeter at 6" on center and 12" on center along the joists. The deck screws we used had torx heads on them instead of regular phillips heads, I didnt strip out a single screw head getting any of them in. Highly recommended instead of nailing down the decking material.
Final shot of all the subfloor glued and screwed down. We still have a sheet of vinyl flooring to put on top of this before the walls go up, but that can wait for another weekend.
This platform is very sturdy so far, I'm very happy with how everything went together. The only thing I would have done differently would have been to put down the plywood so that the seams fell on top of one of the 2x6 joists. That way I wouldnt have to fill in the tiny gap between the sheets of flooring with expandable foam. After daylight saving time changes this coming Sunday, we will be able to get more work done on the coop every afternoon.
Only SEVEN weeks till our chicks ship from MPC!
Again, more pictures up on my flickr page
Stay tuned for another update next week!
Updates:
- 3/1/2010 - first coop pictures posted, four posts in the ground!
- 3/8/2010 - second weekend of work done, all joists and subfloor installed!
Coop Progress:
3/1/2010
We worked on the coop over the weekend and so far we have four 4x4 posts set in concrete for the coop platform to sit on. The posts are exactly 6' to the outside edges of the posts. With 2x6 joists attached to the posts, this should give us a 6'3" x 6'3" square platform on which to build our coop. Hopefully the coop will be more than large enough for our flock, and give us room to expand should we choose to.
Last week on Thursday, Feb 25th 2010, we ordered 8 chickens from MyPetChicken.com. We will have 2 easter eggers, 1 dominicker, 1 silver laced wyandotte, 1 gold laced wyandotte, 1 light brown leghorn, 1 buff polish, and 1 white crested blue polish!
Pics:

This is the work site where our new coop will go.
Here we have finally finished digging the post holes for the 4x4's.

You can see in the pictures that we have strung mason line between stakes on the outsides of all of the holes. This let us get each post exactly in place so that the platform built on top of it will be perfectly square. We will go back next weekend and cut the posts off at the same height and build our platform on top of it. The posts look a bit crooked, but that is in part because the mason line stakes are crooked, and partly due to the wide angle camera lens and perspective. I can assure that they are all vertical, and measured as exactly as my Stanley tape measure can get.
Each post that I put in the ground is approximately 22" deep, and on the tall side will only stick up out of the ground about 12". On the low side the posts will be taller because the ground slopes gently forward from the back to the front of the coop.
Lessons learned: it takes a LOT more planning and measuring to make sure you get a set of posts in the ground exactly square. Without a square and level foundation, everything else will be out of alignment that you put on top of it. So getting it right the first time is crucial!
Also we used far more concrete than I had ever imagined, the total was four 80lb bags and one 40lb bag, for a total of 360lbs of concrete! There will be no doubt about it, this coop foundation will be sturdy!
More pics can be found on my Flickr page: http://www.flickr.com/photos/bwknight/sets/72157623409060899/
Next weekend plans: get the 4x4 posts all cut to the same height, and get 2x6 joists put up with a 3/4" sheet of plywood over it for the floor. We are also going by the habitat for humanity store to see what options they have for inexpensive windows so that I can finalize the wall framing and get a good estimate on the materials we will need.
3/8/2010
After another beautiful weekend in NC, we have some more progress to report. On Saturday we were able to get the floor joists installed, and on Sunday we laid down the 3/4" plywood subfloor.
Also on Saturday we went out shopping for some vinyl flooring scraps to cover the coop floor. After stopping by a few different flooring stores, we found a 7'x9' scrap for $40 that will cover our entire coop floor with one sheet, and also cover the poop boards later in the project. We will be waiting till the day before or day of framing the walls to glue down the vinyl flooring though, that way we will have the walls in place right as the glue is drying so there will be no chances the vinyl will ever curl up at the edges.
We started by cutting off all of the 4x4 posts to the same height as the shortest post. This will give us plenty of height under the coop for the chickens to have a shady area to chill during the day. This picture shows the first of six 2x6 joists to be installed. We bolted the outside joists to the 4x4 posts with some huge 1/2" carriage bolts. These things will be rock solid.

Closeup view of the bolt corner, I had to stagger them so the next bolt through the 4x4 will not intersect with the one I just put in. You'll see the detail shot of the others later.
Detail of the inside of the bolt hardware, I believe I set the center of the bolt 2" down from the top of the post.
All four 2x6 joists bolted to the 4x4 posts, and a quick double check with the level and everything is still level, as it should be.
All of the 2x6 joists are installed in joist hangers at 16" on center. Notice how the ground slopes from left to right? The back side of the coop is about 10" tall under the joist, the front side is about 16" tall under the joist. Should be enough room for chickens to run around if I decide to enclose two sides of the coop in the run.
I had lots of scrap 2x6 material leftover, so on Sunday I decided to install blocking between the joists. Probably a bit overkill for a chicken coop, but this thing will last.
First shot of the 3/4" plywood subfloor going down. We laid down a 1/4" bead of construction adhesive along the joists then put the plywood down on top of it. I screwed down the perimeter at 6" on center and 12" on center along the joists. The deck screws we used had torx heads on them instead of regular phillips heads, I didnt strip out a single screw head getting any of them in. Highly recommended instead of nailing down the decking material.

Final shot of all the subfloor glued and screwed down. We still have a sheet of vinyl flooring to put on top of this before the walls go up, but that can wait for another weekend.
This platform is very sturdy so far, I'm very happy with how everything went together. The only thing I would have done differently would have been to put down the plywood so that the seams fell on top of one of the 2x6 joists. That way I wouldnt have to fill in the tiny gap between the sheets of flooring with expandable foam. After daylight saving time changes this coming Sunday, we will be able to get more work done on the coop every afternoon.
Only SEVEN weeks till our chicks ship from MPC!
Again, more pictures up on my flickr page
Stay tuned for another update next week!