How we built our chicken coop

We used recycled materials as much as possible to build our chicken coop. All materials are not necessary pressure treated or galvanized, but hey it's our first chicken coop. We will be willing to rebuild new + more efficient chicken coop if it starts decomposing itself... ") We spent only $30-$40 for building this coop (+$50 for pen). We spent only $30-$40 for building this coop (+$50 for pen).Considering our previous kitchen remodel we did summer 2006, building chicken coop was FUN! No need to be super meticulous about it. We drew some ideas on paper, but didn't even decide on how wide and tall the coop will be. We built it as we go... Here are how we built out chicken coop... (Some store names shown belows are all in Seattle, WA.) |
|
| We found these concrete blocks at Bedrock for free. Wanted to raise floor a little to avoid the chicken coop flood in winter. These frames were originally motorcycle container which we got for free from local BMW store. We used them for framing coop and making floor. |
| Walls up! |
|
|
| Nice hardwood floor! |
| It was a bit tricky to build a decent frame for roof, but again it's chicken house and it will settle on top of the wall once the roof shingles are installed. |
|
|
| Made 3 nest boxes with the left over plywood from our kitchen remodel project. |
Walls were originally the back panel of our 65 year-old kitchen cabinet. We saved them when we demolished our old kitchen. That's why the part of interior wall color is red... |
|
|
| Roof is up! We had to buy the plywood for roof since we couldn't find big enough piece to recycle from our previous project... |
Doors and wood framed window above egg collecting door are from Re-store in Ballard . Egg collecting door opens like below...
|
|
|
| We found this big square window from our basement (previous owner left two of them), and used it as part of side wall . We are glad we did it because we can see the inside of coop w/o bothering chickens. |
We got a free latex paint from King County's recycle store (color = beige), and painted the outside wall.
|
|
|
| We had our first chickens moved in before we had roof shingles installed. Roof was only covered by tar paper at this moment...
|
| Found a free roof shingles and tar paper thru Craigslist. Nice color and 30 years guaranteed! |
|
|
| Finished with a fake twiggy window and a little handmade ramp for girls.We also installed a light inside to provide more lights especially in winter. |
|
| Look! Our first eggs!! And they turned out to be a yummy breakfast!!
|
OK, these pictures are actually from "Phase 1" of our project.
We ended up w/six lovely chickens moved into our coop in summer 2006. 8 month later, they were attacked and killed by two Akita dogs who escaped from a house 20 blocks away from us... (it was really really sad...)
3 months later, we became ready to have chickens again. Before we adapted 7 girls in summer 2007, we decided to move the coop to the corner of our back yard and build a fully fenced pen to provide them more secure place to hang out.
Here are the pictures of our project "phase 2".
|
| Our coop was very heavy, there is no way we lift it up and move for 30 feet... So we used the ancient method - put them on the several round trunks and rolled them to the new location. It worked very well! |
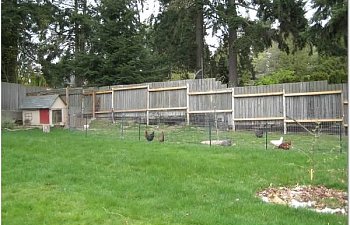
Next step was to build a fully covered pen. We had to buy several 2x4's and concrete footing this time, but was able to recycle wire fencing materials we had. It's 8' wide x 12' deep x 6' tall. It should be enough free access outdoor area for 7 birds. |
|
Instead of varying the fence in the ground, we extended it a couple of feet away from the pen and staked it well. We are told that it should discourage any predators digging under the fence to get in. | |
Added a human size door to the left of the coop. Found this door thru craigslist. The guy who used to own chickens was giving it away. Since we have a pair of crows who seems to know where to find the food (food for our chickens). We always feed girls our food scraps along with chicken feed every morning. In order to avoid crows getting the food scraps, we usually open this door, and dump the food scraps inside of the enclosed pen. |
|
|
| Added another door and paint it red! Isn't it cute? This door comes in handy when you just want to fill up the feeder or refill water bucket. |
We also added narrow 60' long outdoor fenced area right next to the new pen. This provides them more greens & bugs, larger area to wonder around and enjoy dust bath. They seem to love it! |
|
|
| The narrow fenced area has only 4' tall wall fence (ceiling is not covered), so we only open the little door to let them running around during day time when we are around. We close the little door every evening and every time we leave our house. |
This setup works very well for both of us (human & chickens). They have safe outdoor place even though we are not around. New location is away from our house (and neighbors house), and we have easy access to feed, water, eggs and for cleaning the coop. |
|
|
| We also would like to mention how great to have chickens along with compost bins. This system works out wonderfully and totally make sense, especially you are an organic gardener.
|
|
|
|
Lastly, this is our current chicken coop/pen layout.
- Coop : 8' wide x 4' deep x 3' tall (wall)/5' tall (top of the roof)
- Fully Fenced Pen : 12' wide x 8' deep x 6' tall
- Extended fenced pen : 60' wide x 8' deep with 4' tall wire fence w/T-posts.
Our Wish List
- If we will have a chance to build another chicken coop in the future, we would probably build it w/human size door. It will be easier for us to clean.
- It would be cool to have auto-refill water system connected to one of our rain barrels.
- Some way to avoid walking on mud in our enclosed pen, maybe stepping stone or something. Otherwise my shoes get pretty messy every time I go in due to our winter rain in Seattle.