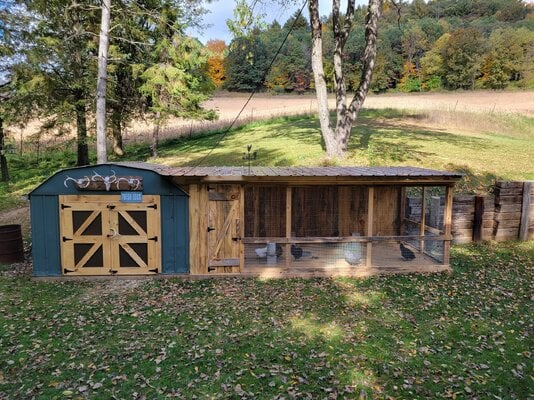
New Build
8' X 18' run, 6" deep

I started out with this old shed that I figured some day to make a coop out of, and the location gave me the chance to make a good sized run, so between a skid steer and my tractor with a bucket, a shovel, pick i got a nice flat, deep spot for my run.
Now to get the lumber, paint the shed and go from there.
Coopers ready to build with rough cut pine from a local sawmill

I found an Amish sawmill not to far away and bought all of the rough cut lumber to get me going. I would need more as I progressed.
2x8s for the run border, 4x4s for the corner uprights, 2x6s for the backwall and lots of other spots, and 2x4s for all different places.
I had a plan in the back of my head to make it sort of like my last run and coop I had before I moved.
2 X 8s and 4 X 4s in place
It's always hard, and good to get started. And I got the shed painted.
Doors are a work in progress
I used the old metal doors as a frame and just attached the wood framing to them. They will hinge to the outside and give a big opening for cleaning out the coop, but I'll only use the right hand door as my daily door to go in to the coop.
After 9 skid steer buckets of sand
My neighbor/farmer uses sand as cow bedding so I bought a dump truck load, 17 yds and had it delivered to his farm and used his skid steer to bring 9 buckets to my run. It made a mess of the yard, but that's all repairable. I used about a half a load.
back wall is made up of 1 X 6s
After I got the rest of the framing up I attached the 2x6s and some 2x8s to the back wall. I used my chainsaw to cut off the tops even with the top framing. They go down below the level of the sand to the ground.
You can see the 2x4 uprights between the 4x4s.
Got a roof now with 1 sheet of clear
The metal roofing came from a local lumber yard that sells cutoffs/odd pcs for $1 a foot. That one piece of clear cost more than all of the rest of it. But the light going into the coop through the big window was a must have. And I still needed one piece/metal more to connect to the coop later when I finally got to that.
I have roof raked it several times so far this winter. Works well!
Coopers thrilled with his BIG sand box

Once the sand was in there, he was in heaven. He had the time of his life till I closed it off, now he goes in with my to see the chickens.
Hardware cloth buried on the bottom and chicken wire on top, everything stapled
I pulled the sand away from the 2x8s and attached the 3' hardware cloth to the bottom of the 2x8s and to the 1x4s above with my stapler. I attached the 4' chicken wire the same way, and when I was done I hammered in real nail type staples to fasten it all.
Made a door for the run and got the doors on the coop
I really enjoyed making my own run door and handles. I finished making the coop doors and painted and hung them both
made a window and door for the west side and attached hardware cloth
I made this frame and door in the garage and cut the opening and fastened it. Later I added hardware cloth to the inside, because in nicer weather this will be open most of the time. The door closes solidly anytime needed, like now in the winter.
You can see openings in the run side. The big opening is for a 2'x3' window hinged on the top and of course the bottom is the pop door
closed for the winter but will be open soon
I made 2 handles like this for the door to the run and here out of some dead branches on my burn pile.
attached OSB to the sidewalls and insulation above-metal sheds get too hot in the summer
The problem with a metal shed being a coop is well, that it is metal! So I bought and attached 7/16" OSB to the side walls from the outside with deck screws and when I was all done, with my grinder, ground off all of the points on the inside.
I bought 2" insulation for the ceilings and peaks to keep the summer sun from turning it into an oven.
The big window and pop door are now framed out ready for a window.
The door on the right that I will not use daily is latched top and bottom.
big window facing the run, can open and close a weather dictates and of course a pop door
This big window will have hardware cloth attached from the inside. I has a chain and hook to dictate how wide I have it open depending the the temp inside and out.
the tricky part was connection these two wierd buildings, but it worked out well, used scraps of wood and another piece of tin
I spent several days thinking about this issue. I finally just went at it and connected the roof first. It was for sure trial and error. But in the end, I WON!
the sides I used left over cutoffs and a piece at a time tied it in.
I also got some gutters from the salvage yard and attached them.
The pop door steps I saved from my last coop.
and a piece of vinyl flooring from HD
This was a no brainer, just cut to fit and lay it down. I think I bought a 10x12 and the coop in 8x10
gutters from the scrap installed
I just started cutting and fitting till I was done. Everything to the right is downhill
ventilation and light for the north side
I added these different days, added the vent first, then the window and had to attach the hardware cloth to the outside so I could open the widow from the inside
made nesting boxes and hung the food, and waterer sits on a heated base for the winter
I made the nesting boxes from plans in a book that I have and hung the feeder in the center of the coop. The water sits on a cement block. The pop door is connected to a line that goes out to the front of the coop so I can open and close it from the outside and is working perfectly.
I started with 4 bales of bedding and have since added a couple more.
Roost bar with poop board and PDZ
I have moved the roost bar and nest boxes to this.
The roost bar is now 8' and unlike my last coop I have a poop board. WOW, I can't belive how much they crap in a night. I keep a thin layer of PDZ and it also has a piece of vinyl flooring on it, and I clean it every two, sometimes 3 days. I'll probably only change my bedding once a year with this setup.
added reinforced plastic for the winter
No wind, rain, sleet or snow for my flock!
It is reinforced with nylon webing, and I'll use it again and again.
As I recall I left about 8" open on top
pop door is on a line that I open and close from the outside
I have replaced the waterer and heater, so later I'll add that page.
As long as the electric plug is visible, I ran an extension cord safely secured at both ends
cement block is for the 5 gal waterer
This will get moved to the back wall so it will be out of the sun at all times
Look what they gave me for breakfast

This is my 1st attempt to edit my article: I started late last fall with 7 mixed group of mostly eastereggers and after a while, 1 died and I replaced with 2 more from the same group. I added Henry in the middle of all of this. He is the same age, born spring of 2022.
My sig shows what I now have and have been getting 4 to 9 eggs a day, more recently 7-9. and that is with me switching feeds.
New and improved heated waterer


Last month I found this water heater base and 2, 5 gal waterers on CL plus 1, 3 gal waterer
It is a much improved system for me, and in the spring it will go in the run minus the heater