So our, my, chicken journey officially started on May 24th when I went and picked up 11 chicks for my wife. I knew had limited time to build a coop, and after exhaustive reading on backyard chickens, I believed I was ready. But nothing prepares you for everything...lol.
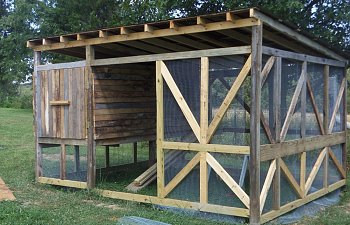
The dimensions of my coop & run are 11'x13'x 7'. This would give me plenty of room in the run plus the ability to make it a little bigger in the future. My coop is 4.5'x11' which is plenty of room for the girls (as you can see below). Each end of the coop has large doors for easy coop cleaning. I will have 3 nesting boxes. I also have left room for a 36 inch people door into the run. I'm thinking that will just make things easier when cleaning, repairing or other general tasks I haven't thought of yet.

Many of the supplies i used I scavenged, asked for, and I was given a great load of wood. At my day job we were going through a remodel and I was able to get quite a few 2x4s and other pieces to help in construction. Also, I have a friend who does construction so I raided his burn pile on more than one occasion. He also gave me a bunch of oak 1x3s, treated 4x4s, and other lumber that he wasn't going to use so he could clean up his place. So a big thanks goes out to my friend Stanley.
I also had six 4x4s which I purchased real cheap because the state road department didn't need them.n They only cost me about $6 each and were 9' long. The windows I got from my wife's grandfather.
In the end I still had to buy a few things. Half inch hardware cloth; 3 rolls to do the whole project which cost me $144 from Amazon. Three to four boxes of deck screws of varying lengths which cost me $60 and washers so I could secure the hardware cloth to the framing. I did end up having to buy some lumber for the rafters and run supports which has cost me another $140, plus I got a deal on the 7 sheets of tin for only $21. Then finally J-clips to join the seams in the hardware cloth where it overlaps, $3 from my local MFA. So all together I have about $400 into the coop which isn't bad, all things being equal, it could have cost me a lot more.
I can't say what design I specifically copied since there are so many on the forums but I went with the great suggestions of multiple chicken parents. I am still in the process of the build but it is only a few hours from completion.
Like any good project as soon as I got my chicks in the makeshift brooder (another idea from BYC) it rained 3 solid weeks. I couldn't believe it, I thought I had plenty of time. (Which goes back to building you coop and run before you get your chicks.)
So now I'm officially behind and my chicks are going to be chickens really quick.
I did most of the framing by myself and the coop floor. I had sunk the 4x4 posts into the ground, approximately, 18 inches. I say approximately because I did put about 2 inches worth of rock in the hole before I set the post. I had heard this helps with water dissipation and will lengthen the life of even a treated post. I then concreted the posts in.
Then next thing was the job I really dreaded. Digging the 'moat' around my entire coop and run area. This extra security measure will definitely put our mind at ease but digging it wasn't any fun. In the end it wasn't too bad. I used my tiller to break the ground up and it got down about 7-8 inches. I also found out that if I waited a day or two after it rains the ground is easier to dig.
So once that was done I started adding the framing. I should have phoned-a-friend to get an extra pair of hands but I ended up getting most of the framing done and the coop floor in about 3 evenings.
However, one of my friends showed up to help me finish the framing. Here is a picture of my buddy Mike coming over to help me finish up the framing. Another huge thank you to him because he also helped me roof the whole thing.
So once the framing was done we went ahead and enclosed the coop and added the windows. I finished 'enclosing' the coop temporarily to be able to get our very large chicks out of the brooder.
As you can tell from the first picture I have the 5 gallon bucket with poultry water nipples which they took too right away. My 6 year old son built the feeder after I cut the pieces for him. The feeder and waterer are working great. However, just today 7-19-14, we found a BR that had crawled inside the feeder to reach the food in the bottom (this is a design flaw I have to fix). (I have pictures which I will upload later.) Apparently the feed had run lower a lot faster than I thought and when my wife went to check the chickens there she was stuck inside the 4 inch opening. Luckily I hadn't glued all the pieces together so I was able to take it all apart and get her out without any trouble. I know many people glue them together, I probably will when they get older, but for know it stays together just fine.
I added a half cap to the feeder to keep them from crawling in again...lol. Future chicken rescues averted. Plus it will save on feed. I have noticed that with the 45 degree angle of the pipe our girls throw hardly any feed. I like the cost savings there.
So now it was time to add the hardware cloth. I made sure it was secured to the framing with deck screws and washers. I had toyed with the idea of borrowing a friends air compressor and staple gun to make the job easier but I'm glad I went this direction. It was relatively cheap and my daughter came out and placed the washers on all the screws. Plus the hardware cloth goes about a foot into the ground. I'm sure some of the depths are not quite 12 inches but I've convinced myself they are all the same depths.
Security is very important in my neighborhood. About the time I planted my 6 posts we found out that we not only a fox in the neighborhood but a coyote as well. That doesn't even begin to factor in the other wonderful wildlife I'm sure are living close by. My buddy Mike told me he lost at least 2 chicks to a skunk just this week. Also, my neighbors across the road said their sons are having major issues with raccoons. How did they get in, digging under the fence. I feel better all the time.
The other thing I wanted to mention was sealing the overlapping seams in the hardware cloth. It took me awhile of find some information about the best/easiest way to do this but in the end I went with J-clips, instead of sewing the cloth together with wire. With an $8 J-clip tool and $3 worth of clips, about 1 lb., I was able to seal up my overlapping wire quickly, easily, and cheaply. Plus I have a bunch of clips left over if I want to really overdue it.
So I'm currently finishing the coop and run this week. The list of things I have to finish are all minor:
I've never attempted anything this large or complex before. The only other big project was a rabbit hutch for my kids, who will be the chickens neighbors.
I'm very happy with the end result. I want to thank all the members of BYC whose ideas have helped me in my build. I'll be honest I drew up plans and then everyday I would plan the small portions I was going to be doing that day. Which means I over-analyzed what was going to be going on but it is how I roll.
I'll continue to update as more pictures are available and I get closer to completion.
Have a great day.
The dimensions of my coop & run are 11'x13'x 7'. This would give me plenty of room in the run plus the ability to make it a little bigger in the future. My coop is 4.5'x11' which is plenty of room for the girls (as you can see below). Each end of the coop has large doors for easy coop cleaning. I will have 3 nesting boxes. I also have left room for a 36 inch people door into the run. I'm thinking that will just make things easier when cleaning, repairing or other general tasks I haven't thought of yet.
Many of the supplies i used I scavenged, asked for, and I was given a great load of wood. At my day job we were going through a remodel and I was able to get quite a few 2x4s and other pieces to help in construction. Also, I have a friend who does construction so I raided his burn pile on more than one occasion. He also gave me a bunch of oak 1x3s, treated 4x4s, and other lumber that he wasn't going to use so he could clean up his place. So a big thanks goes out to my friend Stanley.
I also had six 4x4s which I purchased real cheap because the state road department didn't need them.n They only cost me about $6 each and were 9' long. The windows I got from my wife's grandfather.
In the end I still had to buy a few things. Half inch hardware cloth; 3 rolls to do the whole project which cost me $144 from Amazon. Three to four boxes of deck screws of varying lengths which cost me $60 and washers so I could secure the hardware cloth to the framing. I did end up having to buy some lumber for the rafters and run supports which has cost me another $140, plus I got a deal on the 7 sheets of tin for only $21. Then finally J-clips to join the seams in the hardware cloth where it overlaps, $3 from my local MFA. So all together I have about $400 into the coop which isn't bad, all things being equal, it could have cost me a lot more.
I can't say what design I specifically copied since there are so many on the forums but I went with the great suggestions of multiple chicken parents. I am still in the process of the build but it is only a few hours from completion.
Like any good project as soon as I got my chicks in the makeshift brooder (another idea from BYC) it rained 3 solid weeks. I couldn't believe it, I thought I had plenty of time. (Which goes back to building you coop and run before you get your chicks.)
So now I'm officially behind and my chicks are going to be chickens really quick.
I did most of the framing by myself and the coop floor. I had sunk the 4x4 posts into the ground, approximately, 18 inches. I say approximately because I did put about 2 inches worth of rock in the hole before I set the post. I had heard this helps with water dissipation and will lengthen the life of even a treated post. I then concreted the posts in.
Then next thing was the job I really dreaded. Digging the 'moat' around my entire coop and run area. This extra security measure will definitely put our mind at ease but digging it wasn't any fun. In the end it wasn't too bad. I used my tiller to break the ground up and it got down about 7-8 inches. I also found out that if I waited a day or two after it rains the ground is easier to dig.
So once that was done I started adding the framing. I should have phoned-a-friend to get an extra pair of hands but I ended up getting most of the framing done and the coop floor in about 3 evenings.
However, one of my friends showed up to help me finish the framing. Here is a picture of my buddy Mike coming over to help me finish up the framing. Another huge thank you to him because he also helped me roof the whole thing.
So once the framing was done we went ahead and enclosed the coop and added the windows. I finished 'enclosing' the coop temporarily to be able to get our very large chicks out of the brooder.
As you can tell from the first picture I have the 5 gallon bucket with poultry water nipples which they took too right away. My 6 year old son built the feeder after I cut the pieces for him. The feeder and waterer are working great. However, just today 7-19-14, we found a BR that had crawled inside the feeder to reach the food in the bottom (this is a design flaw I have to fix). (I have pictures which I will upload later.) Apparently the feed had run lower a lot faster than I thought and when my wife went to check the chickens there she was stuck inside the 4 inch opening. Luckily I hadn't glued all the pieces together so I was able to take it all apart and get her out without any trouble. I know many people glue them together, I probably will when they get older, but for know it stays together just fine.
I added a half cap to the feeder to keep them from crawling in again...lol. Future chicken rescues averted. Plus it will save on feed. I have noticed that with the 45 degree angle of the pipe our girls throw hardly any feed. I like the cost savings there.
So now it was time to add the hardware cloth. I made sure it was secured to the framing with deck screws and washers. I had toyed with the idea of borrowing a friends air compressor and staple gun to make the job easier but I'm glad I went this direction. It was relatively cheap and my daughter came out and placed the washers on all the screws. Plus the hardware cloth goes about a foot into the ground. I'm sure some of the depths are not quite 12 inches but I've convinced myself they are all the same depths.
Security is very important in my neighborhood. About the time I planted my 6 posts we found out that we not only a fox in the neighborhood but a coyote as well. That doesn't even begin to factor in the other wonderful wildlife I'm sure are living close by. My buddy Mike told me he lost at least 2 chicks to a skunk just this week. Also, my neighbors across the road said their sons are having major issues with raccoons. How did they get in, digging under the fence. I feel better all the time.
The other thing I wanted to mention was sealing the overlapping seams in the hardware cloth. It took me awhile of find some information about the best/easiest way to do this but in the end I went with J-clips, instead of sewing the cloth together with wire. With an $8 J-clip tool and $3 worth of clips, about 1 lb., I was able to seal up my overlapping wire quickly, easily, and cheaply. Plus I have a bunch of clips left over if I want to really overdue it.
So I'm currently finishing the coop and run this week. The list of things I have to finish are all minor:
- Run the rope to open the pop door from the outside.
- Place 'steps' on the gang plank so the girls can easily walk down to the run.
- Build the people door.
- Finish the hardware cloth to the new roof line.
- Enclose the coop to the new roof line.
- Build the nesting boxes.
I've never attempted anything this large or complex before. The only other big project was a rabbit hutch for my kids, who will be the chickens neighbors.
I'm very happy with the end result. I want to thank all the members of BYC whose ideas have helped me in my build. I'll be honest I drew up plans and then everyday I would plan the small portions I was going to be doing that day. Which means I over-analyzed what was going to be going on but it is how I roll.
I'll continue to update as more pictures are available and I get closer to completion.
Have a great day.