TIPS FOR HAVING A GREAT HATCH!
Hachability Hints and Secrets, from members of the 2012 annual Mahonri Easter Hatchalong....
1. Keep the oyster shell available at all time free choice. The hen can regulate her intake. Shell quality is really important because after about Day 10, the chick somehow takes calcium out of the shell to help build its skeleton! Wow! (I've lost the link.)
2. My tip is to be sure your breeder stock is healthy and fed appropriately for hatching. from this link
It is of basic importance to realize that hens can still produce eggs even though the dietary levels of vitamins will not allow the eggs to hatch. The nutrient deficiencies most likely to give rise to reduced hatchability, unless adequate breeder supplements are used, are Vitamin B2 (riboflavin), and some others of the B group (eg biotin), Vitamin E, manganese, zinc, phosphorus.
3. Don't forget your roosters when considering egg hatchability. Their lighting requirements and feed intake are just as important as the hens. A breeder told me that he increases his roosters lighting to 14 hours before putting them in their breeding pens in January (he lives north of me in WI). Those of you farther south may not have this issue.
4. Choose clean, large, normally shaped eggs. Smaller eggs and double yolkers are poor candidates; smaller eggs may not have the proper room for development and double yolkers rarely make it to term. Long skinny eggs also have a hard time hatching.
5. DARK COLORED EGGS-- from ChooksChicks - I only sand until I'm just through the color, and then I mist the eggs with betadine-water, mixed to the color of iced tea. This covers the contamination that could occur now that I've removed the bloom.
The idea is to promote evaporation to allow the chick to grow smaller than it would if it contained all of the moisture it started with. I have had too many chicks large enough that they couldn't pip or hatch properly- fully formed chicks that didn't make it at hatch. Once I started using this method (got it from an Emu farmer!) I have had significantly better success with shipped eggs. It doesn't seem to really be necessary with local eggs (my own) and I'm not certain why. When hatching in a really nice incubator, like a Sportsman or an rcom, it also doesn't appear to be necessary, but with most affordable models, it's a helpful method.
I do increase humidity at the end of my hatch, as per my Incubation Cheater, the same for Marans as for other eggs. My feeling is that if you have evaporated the proper amount during the first 18 days, you can't drown them with humidity at the end. Humidity merely prevents evaporation, it doesn't make eggs 'take-on' water.
This works well for me, but like most on BYC, I don't consider myself and egg-spert... I just like to share my egg-speriences to help anyone else who might be able to learn from them!
MORE - Regarding sanding the Marans (or Penedescenca, or Wellies, etc.) eggs, I use an emery board or 400+ grain sandpaper. I use a circular motion and make sure I'm moving the hand with the sander, not the egg.
I then put the eggs on a paper towel and mist them with a 30% povidone iodine to 70% water blend
I then wait for it to dry, turn, repeat, dry, turn, repeat. You can't be too careful about making sure the whole thing gets lightly misted, but don't
saturate it.
Regarding field peas in feed recipes, I use them in my feed recipe, and it's been working exceedingly well for me. I use no more than 6% of any one type, and they are not heated. I have a soy-free, low corn recipe that uses peanuts and lots of diversity for a wide amino acid profile. My eggs ship VERY well and hatch great most of the time. There are always exceptions, of course, but not often.
6. From Gamamachick -- A touch of Oxine in the drinking water and also when incubator is running and hatching the wee little babes...put a little oxine in the water pan and clean the incubator out with Oxine diluted with water....Avia Charge is a great product for the breeders....Tips for helping to hatch the new babies
7. From Spangled -- If separated before egg collection begins, give the rooster and hens enough time to get to know each other before the beginning of egg collection. Three to four weeks seems a safe bet. Sometimes the hens take a little bit of time to get used to the new guy on the block before she starts accepting his advances.
8. I believe it is beneficial to open the incubator for a few minutes daily. I like to mimic the natural conditions of a hen's care, and she gets up to walk around, eat, drink, poo, etc., for about a half-hour daily- sometimes twice.
This gives me time to turn (if need be), smell, and candle my eggs if I like. I just open it for a few minutes if I'm not intending to handle them. I do this most days until 'confinement.' Some will be aghast and argue this is insane behavior...but I'm just sharing what works for me.
9. BY FAR the best thing you can o is to be certain your hens are getting good vitamins and minerals. This has already been mentioned, of course, but I can't stress it enough! Fresh Kale, Chard and spinach are fabulous treats, and I would also suggest salmon and tuna in the egg-collection week. I supplement my feed with fish meal, and I use an organic nutrient supplement to assure proper vitamins and minerals in the feed. I use Molasses for vitamin B and Iron, and I use a liquid nutrient supplement for additional Omegas and vitamin E.
10. If you get eggs that has ends that are somewhat similar and you can't be sure which end is the air-cell end, candle to see which end is correct. Sometimes they are not what you'd guess. If the egg is particularly fresh and you still can't tell due to lack of air-cell altogether, set the egg on its side when you set them and wait a couple of days: there will be a darker hue and the air-cell will be defined. Now put the right side up!
11. WORMING OUR BIRDS!!!!!!!!!!! the one I use, it's called verm-x and it's so very good!!!!!!!! my egg production is coming back now and this was just the first time I did it!!!!!!!!!! I am geting more this week!!!!!!!! verm-x is THE BEST!!!!!!!!!!!
12. One way to really get a good control on your temp when using an LG incubator is to get yourself an old dimmer knob or stove knob and superglue it to the adjustment peg on the incubator. It allows you to make much more slight adjustments with a good idea of just what, exactly, you did. The thing that always kills me about the silly white pegs is you have no idea how much it really gave when you touched it...and then you have to go back and check on it again and again...it's brutal.
13. In preparing for the healthiest eggs possible by feeding the hens optimum food and treats, we must cut back on treats with lower nutritive value, particularly keeping protein content above 16%.
I have used canned tuna to boost protein quickly, and the birds adore it. If you can find turkey or gamebird STARTER, that tends to be around 30% protein and you can mix it with scratch 4 or 5:1 to give them something fun to eat and still have overall higher protein. This also works if you mix wild with gamebird starter- and wild bird mix has a much lower corn content, so you'll be diversifying their feed better.
You can also use black oil sunflower seeds to treat them, as it's about the right protein content. If you have a feed mill near you, ask for 5# of 'peanut pickouts' to take home and treat the flock with- this is just raw unsalted peanuts, which are exceptional for protein and amino acid profile for breeders. Much cheaper from the mill
14. Oh, another one, but it's for AFTER they hatchHave baby parrot formula on hand for the freshly hatched chicks. This is a powdered feed that is high in protein, contains large, easily absorbed amounts of vitamins and minerals, and pre- and pro-biotics for establishing appropriate gut flora right away. This is an essentia l tool to have on hand for weak chicks, and it tastes great, so it really gets them going if you sprinkle it over their feed.
A small dish of sand, an old branch of fallen wood, and a plug of garden soil with grass (roots and all) are excellent things to add to the brooder for entertainment as well as microbes and appropriate environmental exposure. If you have these and you keep your heat source in one corner so that the chicks can control their own temperature by going nearer or farther, you won't have any issues with mucky bums at all.
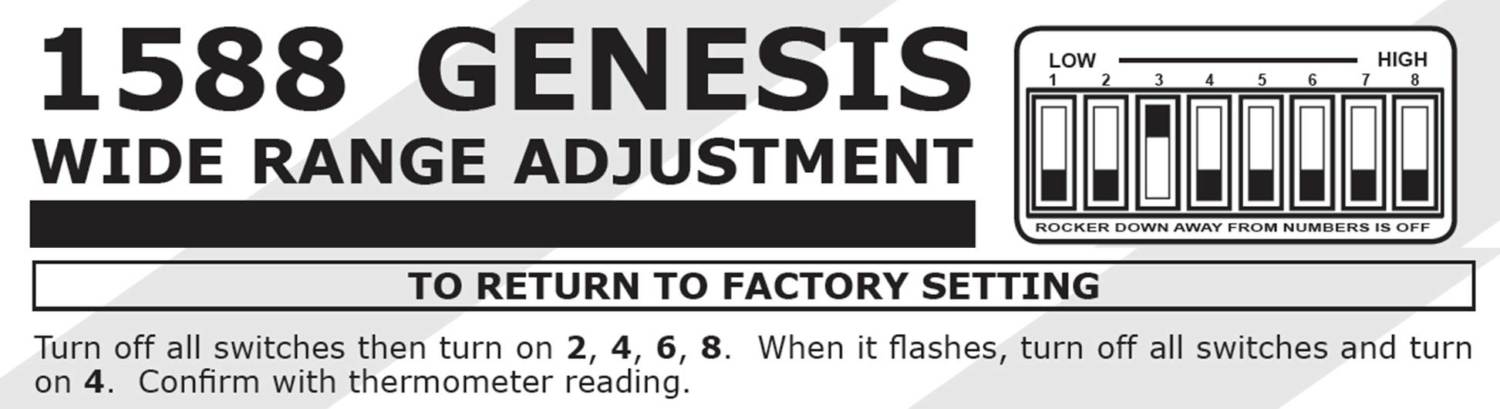
15.Genesis temperature adjustment: I might be crazy, but I keep mine plugged in, (1) turn off all switches, (2) turn on 2, 4, 6, and 8 like in the "return to factory setting" directions, (3) wait for light to flash, (4) turn all off, and finally (5) turn on the switch I want. I hope something works for you!!!

Hachability Hints and Secrets, from members of the 2012 annual Mahonri Easter Hatchalong....
1. Keep the oyster shell available at all time free choice. The hen can regulate her intake. Shell quality is really important because after about Day 10, the chick somehow takes calcium out of the shell to help build its skeleton! Wow! (I've lost the link.)
2. My tip is to be sure your breeder stock is healthy and fed appropriately for hatching. from this link
It is of basic importance to realize that hens can still produce eggs even though the dietary levels of vitamins will not allow the eggs to hatch. The nutrient deficiencies most likely to give rise to reduced hatchability, unless adequate breeder supplements are used, are Vitamin B2 (riboflavin), and some others of the B group (eg biotin), Vitamin E, manganese, zinc, phosphorus.
3. Don't forget your roosters when considering egg hatchability. Their lighting requirements and feed intake are just as important as the hens. A breeder told me that he increases his roosters lighting to 14 hours before putting them in their breeding pens in January (he lives north of me in WI). Those of you farther south may not have this issue.
4. Choose clean, large, normally shaped eggs. Smaller eggs and double yolkers are poor candidates; smaller eggs may not have the proper room for development and double yolkers rarely make it to term. Long skinny eggs also have a hard time hatching.
5. DARK COLORED EGGS-- from ChooksChicks - I only sand until I'm just through the color, and then I mist the eggs with betadine-water, mixed to the color of iced tea. This covers the contamination that could occur now that I've removed the bloom.
The idea is to promote evaporation to allow the chick to grow smaller than it would if it contained all of the moisture it started with. I have had too many chicks large enough that they couldn't pip or hatch properly- fully formed chicks that didn't make it at hatch. Once I started using this method (got it from an Emu farmer!) I have had significantly better success with shipped eggs. It doesn't seem to really be necessary with local eggs (my own) and I'm not certain why. When hatching in a really nice incubator, like a Sportsman or an rcom, it also doesn't appear to be necessary, but with most affordable models, it's a helpful method.
I do increase humidity at the end of my hatch, as per my Incubation Cheater, the same for Marans as for other eggs. My feeling is that if you have evaporated the proper amount during the first 18 days, you can't drown them with humidity at the end. Humidity merely prevents evaporation, it doesn't make eggs 'take-on' water.
This works well for me, but like most on BYC, I don't consider myself and egg-spert... I just like to share my egg-speriences to help anyone else who might be able to learn from them!
MORE - Regarding sanding the Marans (or Penedescenca, or Wellies, etc.) eggs, I use an emery board or 400+ grain sandpaper. I use a circular motion and make sure I'm moving the hand with the sander, not the egg.
I then put the eggs on a paper towel and mist them with a 30% povidone iodine to 70% water blend
I then wait for it to dry, turn, repeat, dry, turn, repeat. You can't be too careful about making sure the whole thing gets lightly misted, but don't
saturate it.
Regarding field peas in feed recipes, I use them in my feed recipe, and it's been working exceedingly well for me. I use no more than 6% of any one type, and they are not heated. I have a soy-free, low corn recipe that uses peanuts and lots of diversity for a wide amino acid profile. My eggs ship VERY well and hatch great most of the time. There are always exceptions, of course, but not often.
6. From Gamamachick -- A touch of Oxine in the drinking water and also when incubator is running and hatching the wee little babes...put a little oxine in the water pan and clean the incubator out with Oxine diluted with water....Avia Charge is a great product for the breeders....Tips for helping to hatch the new babies
7. From Spangled -- If separated before egg collection begins, give the rooster and hens enough time to get to know each other before the beginning of egg collection. Three to four weeks seems a safe bet. Sometimes the hens take a little bit of time to get used to the new guy on the block before she starts accepting his advances.
8. I believe it is beneficial to open the incubator for a few minutes daily. I like to mimic the natural conditions of a hen's care, and she gets up to walk around, eat, drink, poo, etc., for about a half-hour daily- sometimes twice.
This gives me time to turn (if need be), smell, and candle my eggs if I like. I just open it for a few minutes if I'm not intending to handle them. I do this most days until 'confinement.' Some will be aghast and argue this is insane behavior...but I'm just sharing what works for me.
9. BY FAR the best thing you can o is to be certain your hens are getting good vitamins and minerals. This has already been mentioned, of course, but I can't stress it enough! Fresh Kale, Chard and spinach are fabulous treats, and I would also suggest salmon and tuna in the egg-collection week. I supplement my feed with fish meal, and I use an organic nutrient supplement to assure proper vitamins and minerals in the feed. I use Molasses for vitamin B and Iron, and I use a liquid nutrient supplement for additional Omegas and vitamin E.
10. If you get eggs that has ends that are somewhat similar and you can't be sure which end is the air-cell end, candle to see which end is correct. Sometimes they are not what you'd guess. If the egg is particularly fresh and you still can't tell due to lack of air-cell altogether, set the egg on its side when you set them and wait a couple of days: there will be a darker hue and the air-cell will be defined. Now put the right side up!
11. WORMING OUR BIRDS!!!!!!!!!!! the one I use, it's called verm-x and it's so very good!!!!!!!! my egg production is coming back now and this was just the first time I did it!!!!!!!!!! I am geting more this week!!!!!!!! verm-x is THE BEST!!!!!!!!!!!
12. One way to really get a good control on your temp when using an LG incubator is to get yourself an old dimmer knob or stove knob and superglue it to the adjustment peg on the incubator. It allows you to make much more slight adjustments with a good idea of just what, exactly, you did. The thing that always kills me about the silly white pegs is you have no idea how much it really gave when you touched it...and then you have to go back and check on it again and again...it's brutal.
13. In preparing for the healthiest eggs possible by feeding the hens optimum food and treats, we must cut back on treats with lower nutritive value, particularly keeping protein content above 16%.
I have used canned tuna to boost protein quickly, and the birds adore it. If you can find turkey or gamebird STARTER, that tends to be around 30% protein and you can mix it with scratch 4 or 5:1 to give them something fun to eat and still have overall higher protein. This also works if you mix wild with gamebird starter- and wild bird mix has a much lower corn content, so you'll be diversifying their feed better.
You can also use black oil sunflower seeds to treat them, as it's about the right protein content. If you have a feed mill near you, ask for 5# of 'peanut pickouts' to take home and treat the flock with- this is just raw unsalted peanuts, which are exceptional for protein and amino acid profile for breeders. Much cheaper from the mill
14. Oh, another one, but it's for AFTER they hatchHave baby parrot formula on hand for the freshly hatched chicks. This is a powdered feed that is high in protein, contains large, easily absorbed amounts of vitamins and minerals, and pre- and pro-biotics for establishing appropriate gut flora right away. This is an essentia l tool to have on hand for weak chicks, and it tastes great, so it really gets them going if you sprinkle it over their feed.
A small dish of sand, an old branch of fallen wood, and a plug of garden soil with grass (roots and all) are excellent things to add to the brooder for entertainment as well as microbes and appropriate environmental exposure. If you have these and you keep your heat source in one corner so that the chicks can control their own temperature by going nearer or farther, you won't have any issues with mucky bums at all.
15.Genesis temperature adjustment: I might be crazy, but I keep mine plugged in, (1) turn off all switches, (2) turn on 2, 4, 6, and 8 like in the "return to factory setting" directions, (3) wait for light to flash, (4) turn all off, and finally (5) turn on the switch I want. I hope something works for you!!!