Welcome to my first chicken coop attempt. I don't even have a chicken, but love the idea of them.
Should I spend all this time and energy in building a coop, just for some semi-domesticated animals. Yes, my wife made me realise it was a good idea, after she pointing out that she felt that I was nothing more than a semi-domesticated animal myself.

Never kept chickens, but always wanted to. I know that by the time I have spent money looking after them, I could have bought my eggs cheaper from the shops, but there is just more to chickens than eggs and meat isnt there?
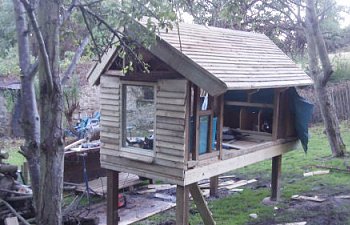
I have never done this before, all I know is that I want it off the floor and to be around 8 feet by 4 feet, with windows. I will have to see if the window cleaner will add the chicken coop to his list. Can't see him doing the Inside though.

I cleared an area and concreted the 4x4 posts in. I thought I would build it a good 40 feet from the house so that its close enough to see, but far enough away to smell.
You may think that you don't want a coop that can't be moved, and I feel the same way. But the beauty of my coop is that, if I want to move it, I can pack the underneath near each leg with concrete blocks or bricks, and just cut through the legs near the base, and that's it. The plus of building it on concreted posts is that I have a stable foundation to work on. If it stays were it is though, Ive made sure it is stable enough to withstand the toughest winds.
To start with, it was important that I spent anough time, just putting the posts in the right place, keeping the whole thing square. Starting right means finishing right, and everything you do after getting the base right, will be so much easier.

I mixed concrete and let the posts set for 3 days. I used grit sand and cement. You can use post-fix or something like that, but it is expensive and you will need about 2/3 of a wheel barrow per post. I ordered a tonne of grit sand so that the sand I have left I can throw on the floor in the run underneath the coop. That will mix with the soil and make the soil much lighter and will drain easier. It should also be easier to clean.
The posts are set and now its time for the floor, nest boxes and double glazed windows. I saved the glass from our house windows that were replaced earlier in the year. I knew they would come in handy somewhere. They will be much better in the chicken coop, much warmer and less drafty than normal glass like greenhouse glass.
It is important that you use galvanised or zinc coated screws and nails, and sink the head of the nail or screw into the wood where you can. There would be nothing worse than rust running down the coop. Well, that's not true, worse than that would the screws and nails rusting to bits and the coop falling apart, leaving the chickens stood there wondering what just happened to their house.

I was told that it was likely that I would only need 1 nest box for 3 chickens, because we were only going to have rescue chickens, some of them might not lay, and more often than not, most birds want to share the same nest box. We plan on having 6 rescue hens. If this proves a problem, I could easily make more nest boxes above the ones already there. Might even get a rooster because our nearest neighbour is across the road and about 300 yards away, we have a pair of nesting buzzards nearby, and foxes and stoats that live pretty close as well, and we are told badgers too. I will be on guard duty every night by the looks of things.
More pictures just as soon as I get a dry day to do some more work on it. Had a dry day today 10 Oct 2012, so thought I would try and get the roof on to protect the wooden nest boxes and floor for a while.
I have made a sliding door to the ladder, so I can just push it in or pull it out, instead of messing about with trap doors and hatches. I am putting a window near the slider too, just in case any chickens are stood on it when I pull it out, and they end up dropping to the ground. Which would be quite funny, but kind of wrong. I will also fix hardware cloth to the sliding door so that critters can't chew their way in from the top of the ladder if the manage to find a way into the run beneath. Better safe than sorry.
You can see that the nest box supports are extended from the base of main coop. I did this because all the external coops I had seen online, had nest boxes hanging on the side of the coops, like an after thought. They just didn't look strong enough to withstand a creature pulling and tugging at them, trying to get at the chooks. I wanted the nest box to be as strong, if not stronger then the main coop area.
My wife came out with coffee and food (she is good to me) and asked if I could put a bit of an oriental look to it. It wasn't to late, so I have angled the roof in on both sides. The best I could do at that stage. But I like the look.
The roof structure is complete, and I have boarded it over. Now I will put a waterproof roofing sheet over that, and feather edge boards to give a nice look and extra protection from the rain and cold. It is a nice day today, so I will get out now and put the feather edge boards on.
Here I have put the waterproof roofing sheeting on. This stuff is only cheap and will last for donkeys years, especially when it is covered again with another surface like the feather edge boards. When nailing the boards to the roof, it is important to make sure the nails go into the roof supports, because you don't want the chickens jumping up and banging their funny little heads on any nails sticking throught the roof into the coop. The last thing I want is to come out to the coop in the morning to find half a dozen chicken decorations hanging from the roof.
Now for the feather edge boards. This is a little harder because I will be on my tiptoes on the short step ladder I have. Should have a longer ladder I know.
Its a simple case of putting the boards on starting at the bottom, and putting the next row on top, covering half of the one underneath. I made a little T shape out of 2 bits of wood to help me keep the space even on each row. I didnt care how much each board overlapped the edge of the coop, because I would just cut them all off to create a straight edge, and I will likely use all the off-cuts on the sides of the coop. All the timber I used on this project was pressure treated so it will last for many many years. I will still treat it every year as well.
.And here it is, all trimmed off and edged to protect the edges of the feather edge boards. I just stripped down pieces of feather edge boards to create the edging, its cheaper than buying strips of wood just to do that.
It want it to match my garden projects like my BBQ/Chair, and my wood store, pictured here:
I made good time today between the showers, so I managed to start cladding one side, again the whole thing will be clad in feather edge boards. And the inside wall will be boarded too, so that the walls are double skinned for protection and to keep the wind and weather out.
In the picture above, the window looks all the way to the nest boxes on the other side of the coop, so I can see what is going on. I built the coop just 25 feet from a stream that runs through our property all year round, so if I decide to free-range them, I know they will have plenty of water when they want.
Well afterr days of rain and bad weather, I managed to get stuck into doing some more on the coop. I have cut circles into the underside of the roof and covered them with fly mesh to cut down on the wind and to help keep big bugs out.
I have managed to finish one side, and work out how to do it. By putting a shape on the roof as and after thought, created some head scratching, but I think it looks great.
The nest box is finished and it is really heavy. So heavy that a bear would have trouble lifting it, let alone a fox or badger. I wanted it to be wind proof and protected from the rain. I added a catch to the lid though, just in case.
Well the weather held out, and I managed to get the side and front window area completed. The glass is double glazed and is safety glass so it will be strong enough to keep any animal out, and the chickens in. If the chickens decide to peck the glass and make any pits in it, then I will put a mess on the inside of the coop so they cant get to it, but I am not worried, I think it will be fine. The windows are on the Noth and East sides. I thought about putting the windows on the South and West sides, but after reading about how the chickens don't like to much intense light, and how a window in direct sun could turn my coop into an oven, I decided against it.
I had a comment saying the ladder needed adjusting, so I have lifted the ladder off the floor, and screwed it to wood off the ground, the angle of the ladder is much better now.
People here say I should have hardware cloth around the edge of the coop to stop critters, so I used 3 foot hardware cloth and u nailed it to the back of the wood you can see at the base of the coop, on the inside, then I laid the cloth out on the ground and used tent pegs to pin it to the ground, so it is about 2 1/2 feet out from the coop, and it is 1/2 inch by 1/2 inch squares. I then made frames of timber to go around the coop and u nailed and stapled hardware cloth to the inside of the wooden frame, so it looks nice really. The front frame lifts up and the small front door opens too, but the other three sides are screwed to the legs of the coop so that if I want to, I can unscrew them and take them off.
I have made one of the lower sides solid, with hardare cloth behind the wood for extra protection. I did this because the wind can be nasty from that side of the coop, and I though I would make them some shelter from it. I know, a little O T T, but I can't help myself.
The rear door is hinged to drop down. This is because of the angle of the roof, and I wanted it to be as big a door as it could be, for easy cleaning inside. As you can see, the door like every other part of the coop is double skinned to help keep the draft down. Nearly done, not too much more to do now. The chickens will be ready for collection from the battery farm in a few weeks, so I am please with how I have done so far. Do you like my little chicken that I cut out of ply?
Well, it's done, after weeks of dodging the weather, I have finished. And I think I have done a great job for my first time, if I do say so myself. If I could have done something differently, I would have not put the door in the floor, and instead built it on the outside and made it broader underneath in the run so the chooks can walk out to the side and go down into the run without critters getting them. During the building, and after the floor and door were installed, I read that the deep litter method would be the way to go, and here I am with a hole in the floor for deep litter to fall through, ah well, I will just have to keep topping up the litter. But then, the chickens will know that the door is in the floor and if I am lucky, they will scratch away at it moving the litter away.
Now it's just a case of getting a feeder, a waterer, some bedding for the nests, some sawdust and shavings, some food, it never stops does it? All I can say is I had better get an egg or two. If not, I have a large freezer than can hold quite a few chickens.
A couple of tweeks. I have PVA'd the floor, sides and nest box with PVA and two thirds water. And I have adjusted the steps so that they are not as steep.
19 November 12, and we have just heard from the farm that all the chickens will be removed and killed at the end of this month, all 6000 of them, and we wont be able to rescue any. They are not well and are on pill to keep them going. They are not allowed to give us any. But there is some good news. They will give us 6 of there new arrivals when they get them the first week in Jan 13.
We will still be saving these birds from a year and a half of forced egg laying, after which they would be killed. No at least we have young ones that might live a full life.
Here is where they will be allowed to freerange.
Well, it's New Years Eve 2012, and within a week I will hopefully have 6 super egg laying chickens to pick up. I will be good, I just know it. We were told we could collect them in the first week in January 2013 at a cost of £5 each. I just hope I can look after them well.
It's now the 11th of January 2013, and we picked up our first ever chooks today at 1pm. By 4pm they were home in their new coop and looked like they loved it. Im just going to worry like mad with it being their first night in. Fingers crossed.
This was them arriving at home. We used a dog cage to transport them, and they just lay their taking it easy. We expected to get out of the car after the trip, looking like we had been tarred and feathered, and the car knee deep in crap, but no, they hardly made a sound and didn't seem to care.
Here they are on the patio, chilling while I got their food and water ready in the coop.
And here they are checking out their new coop. They were already fighting over who got the nest boxes. They look so healthy too don't you think?
We are taking a walk over to the beach over the weekend to collect some shells to grind up for them. I iwll put it in a bowl of its own, away from their food. I will leave the chooks in the top part of the coop for a couple of days, before letting them in the small run underneath where I intend to feed them from then on.
During the night, about 9.30pm, I went out with my tourch to see how they were doing, and to see if anything was creeping around the coop. And I could see that one chook was underneath the coop in the run. It was stood on top of the feed box I put in there out of the way of rats and mice. I left the trap door open from the coop above, so that if they wanted they could go into the run below, but I was just going to leave them in the top coop without forcing them down into the run. Anyway, this one chook decided she wanted to be in the run. I think she must have gone down, and because it was too dark, couldn't find her way back up, maybe. So, I caught her and put her back in the top coop, because it was so cold and windy that I was scared she might die in the night, especially after such a hard day for her.
I awoke at first light and ran outside to check on them, and they were all happily moving around in the top coop, drinking and eating. I checked the egg boxes but no eggs. I wasnt expecting any for a few days, but just couldn't help myself from checking anyways.