I decided last year that I wanted chickens and I was surprised that my husband agreed. I did not want to spend a ton of money on this new venture of mine so I wanted to find ways to make this venture a reality without hurting our budget.
The coop is 8'x 10' and the run is 10'x 16'
We started with an old metal shed and lots of materials we had on hand to make our recycled coop.

We did have to purchase hardware cloth and lumber for the run and a few latches.
Our coop sits right next to my raised bed garden and I plan to let the chickens free range in the garden in the future to help with weeding and bug control.
Here are pictures and information on how we built our coop.
Here is our old metal shed, which was dented up in the back where a tree fell on it and pretty scraggly looking as you can see.
We cleaned it out and used stepping stones we had on hand to help even out the floor and to raise it off the ground.
You can see the damaged roof here. We took off one of the doors in the front. This is the back view. We also took off a lot of the panels on two sides so we could add ventilation for a more open air coop. You can also see the stepping stones and we had some hardware cloth from a old fencing project that we put over the stepping stones, then we put down some 2x4's we had on hand from one of our home projects and some sheet wood for the flooring on top.
Here's my husband putting the flooring down.
..and me putting a roll of laminate down, we bought the cheapest one at Lowes.
Here is the front door we made with some wood and hardware cloth. We did end up buying two giant rolls of hardware cloth. Most of it went on the chicken run though and some for the door and windows for the coop.
Here are the 2 windows completed. on the back and side of the coop.
Here is a inside view after the main structure of the coop was done. Now for the roosts and nest boxes.
We've collected a lot of stuff over the years with 3 kids and trying to work and stay organized so we had a lot of stuff that I could re-purpose. I decided these closet shelves would be good for nest boxes.
Here is the start of a frame for the nest boxes to get them off the floor.
and here are the completed nest boxes. We used one of the panels we took off the shed as a roof for the boxes and I put a little piece of laminate flooring in each box for easy cleaning. We put a board behind the nest boxes and cut holes in the board and in the back of the shed, so we could collect eggs from the outside of the coop.
Here are the doors we made from more scrap wood at the back of the coop. Each door has a sliding lock and a stronger lock as well. We have a lot of raccoons and opossums in our area.
Here is a pic of the chicken door for outside free range in the future, once we get more fencing up.
The back of the coop completed. I also washed the inside and outside of the coop. and painted the whole coop blue which looked a lot better then the original color of the shed.
Here is the front chicken door for access to the run,
for the run we built the sides and the front on the ground. The sides are 6' tall x 16' wide. We extended the hardware cloth a foot on the bottom side for each wall so we could bury it or cover it for digging predators later.
Both walls up and the front wall before we put the front door and the top.
We put 10' boards across the top and then stapled hardware cloth across the whole top for aerial protection. We also nailed the run to the coop.
and we added the door which took a few times to get it to fit snug but still open and close. We had a lot of wall block and stepping stones and we covered the extended hardware cloth with those to discourage digging. We also used the metal panels we took of the shed on the side of the run.
We had a ladder roost originally, but then decided to build these roosts instead to allow more floor space. I still may or may not add poop boards depending on if I am going to use the deep litter method or not. The straw and board that the brooder light is attached to will be removed once my chicks get older.
I added a tree limb for an outside roost in the run.
and I had a little hardware cloth left and I planted some herb seeds for a little chicken garden for them in the run.
We could not have built this coop and run without these handy tools:
air compressor and...
... staple gun, nail gun, drill, hammer, etc.
We started in October and I ordered my chicks for a February 11th hatch date, so we worked until they came and we still have been modifying the roof to stop leakage. We used roof tar and tarps and it looks like we no longer have leaks.
I did learn one very, very important thing. Do not order chicks in February. It is too cold even in NC. The chicks just moved into the coop yesterday at a couple weeks old and they are loving it. I have a power cord run down there and I made them a little brooder box with a roost they can run in to get warm and they have a heat lamp over their brooder box and another heat lamp inside of the coop for when they come out of the box. I plan on letting them in the run next week. I also covered the windows and door with vinyl with some areas left uncovered for ventilation. At night I have heavy moving blankets over the windows since we've been cold in NC lately. The vinyl and blankets will be removed once it warms up.
We would like to add more fencing around the coop so they can have free range later on and get into the garden and out to the yard, etc. We're thinking of ideas to help them get up to the roost in the future, so we may be adding a ladder or lower roosts for them to hop up. Right now I use sand for the floor of the coop and I have two bails of straw to use for the nest boxes.
I also painted my coop with left over paint we had and the messed up reduced price paint at Lowes. I spent a total of $5 on paint. Paint can really make anything look better I discovered.
I learned that recycling things you have around the house can really save a lot of money. If we count all of our costs we probably spent less then $500 which includes all the hardware cloth and lumber for the run. The coop itself did not cost much to build.
I have to thank my wonderful husband for all his help and hard work, I could not have started this venture without his help. I am a simple person, I don't ask for diamonds and gold, I just wanted a chicken coop and chickens, so he was happy to help with this new venture.
Also, our son helped with some of the heavy lifting and our daughter helped with painting and the run construction, so thank you both!
Good luck to anyone else building a coop. Try to have it ready before the chicks arrive because they grow fast!
I am enjoying this new venture and my 2 1/2 week old chicks are very entertaining to watch!!!
The coop is 8'x 10' and the run is 10'x 16'
We started with an old metal shed and lots of materials we had on hand to make our recycled coop.
We did have to purchase hardware cloth and lumber for the run and a few latches.
Our coop sits right next to my raised bed garden and I plan to let the chickens free range in the garden in the future to help with weeding and bug control.
Here are pictures and information on how we built our coop.
Here is our old metal shed, which was dented up in the back where a tree fell on it and pretty scraggly looking as you can see.
We cleaned it out and used stepping stones we had on hand to help even out the floor and to raise it off the ground.
You can see the damaged roof here. We took off one of the doors in the front. This is the back view. We also took off a lot of the panels on two sides so we could add ventilation for a more open air coop. You can also see the stepping stones and we had some hardware cloth from a old fencing project that we put over the stepping stones, then we put down some 2x4's we had on hand from one of our home projects and some sheet wood for the flooring on top.
Here's my husband putting the flooring down.
..and me putting a roll of laminate down, we bought the cheapest one at Lowes.
Here is the front door we made with some wood and hardware cloth. We did end up buying two giant rolls of hardware cloth. Most of it went on the chicken run though and some for the door and windows for the coop.
Here are the 2 windows completed. on the back and side of the coop.
Here is a inside view after the main structure of the coop was done. Now for the roosts and nest boxes.
We've collected a lot of stuff over the years with 3 kids and trying to work and stay organized so we had a lot of stuff that I could re-purpose. I decided these closet shelves would be good for nest boxes.
Here is the start of a frame for the nest boxes to get them off the floor.
and here are the completed nest boxes. We used one of the panels we took off the shed as a roof for the boxes and I put a little piece of laminate flooring in each box for easy cleaning. We put a board behind the nest boxes and cut holes in the board and in the back of the shed, so we could collect eggs from the outside of the coop.
Here are the doors we made from more scrap wood at the back of the coop. Each door has a sliding lock and a stronger lock as well. We have a lot of raccoons and opossums in our area.
Here is a pic of the chicken door for outside free range in the future, once we get more fencing up.
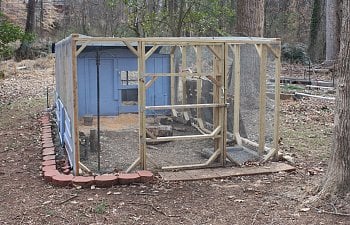
The back of the coop completed. I also washed the inside and outside of the coop. and painted the whole coop blue which looked a lot better then the original color of the shed.
Here is the front chicken door for access to the run,
for the run we built the sides and the front on the ground. The sides are 6' tall x 16' wide. We extended the hardware cloth a foot on the bottom side for each wall so we could bury it or cover it for digging predators later.
Both walls up and the front wall before we put the front door and the top.
We put 10' boards across the top and then stapled hardware cloth across the whole top for aerial protection. We also nailed the run to the coop.
and we added the door which took a few times to get it to fit snug but still open and close. We had a lot of wall block and stepping stones and we covered the extended hardware cloth with those to discourage digging. We also used the metal panels we took of the shed on the side of the run.
We had a ladder roost originally, but then decided to build these roosts instead to allow more floor space. I still may or may not add poop boards depending on if I am going to use the deep litter method or not. The straw and board that the brooder light is attached to will be removed once my chicks get older.
I added a tree limb for an outside roost in the run.
and I had a little hardware cloth left and I planted some herb seeds for a little chicken garden for them in the run.
We could not have built this coop and run without these handy tools:
air compressor and...
... staple gun, nail gun, drill, hammer, etc.We started in October and I ordered my chicks for a February 11th hatch date, so we worked until they came and we still have been modifying the roof to stop leakage. We used roof tar and tarps and it looks like we no longer have leaks.
I did learn one very, very important thing. Do not order chicks in February. It is too cold even in NC. The chicks just moved into the coop yesterday at a couple weeks old and they are loving it. I have a power cord run down there and I made them a little brooder box with a roost they can run in to get warm and they have a heat lamp over their brooder box and another heat lamp inside of the coop for when they come out of the box. I plan on letting them in the run next week. I also covered the windows and door with vinyl with some areas left uncovered for ventilation. At night I have heavy moving blankets over the windows since we've been cold in NC lately. The vinyl and blankets will be removed once it warms up.
We would like to add more fencing around the coop so they can have free range later on and get into the garden and out to the yard, etc. We're thinking of ideas to help them get up to the roost in the future, so we may be adding a ladder or lower roosts for them to hop up. Right now I use sand for the floor of the coop and I have two bails of straw to use for the nest boxes.
I also painted my coop with left over paint we had and the messed up reduced price paint at Lowes. I spent a total of $5 on paint. Paint can really make anything look better I discovered.
I learned that recycling things you have around the house can really save a lot of money. If we count all of our costs we probably spent less then $500 which includes all the hardware cloth and lumber for the run. The coop itself did not cost much to build.
I have to thank my wonderful husband for all his help and hard work, I could not have started this venture without his help. I am a simple person, I don't ask for diamonds and gold, I just wanted a chicken coop and chickens, so he was happy to help with this new venture.
Also, our son helped with some of the heavy lifting and our daughter helped with painting and the run construction, so thank you both!
Good luck to anyone else building a coop. Try to have it ready before the chicks arrive because they grow fast!
I am enjoying this new venture and my 2 1/2 week old chicks are very entertaining to watch!!!