I dragged my city loving husband out to "the country" (not really that rural, but he likes to complain) five years ago. I often joke that I was born 200 years too late, and knew from the moment we set ourselves up that I wanted to get some chickens. Of course, life, work and having a baby got in the way, but this year I was determined to finally make it happen. The easiest way to make sure you follow through? Tell your 3-year old that we're getting chickens "just like pop-pop". Can't disappoint a small child now, can we?
We spent a full day going around to all the feed stores in the area so we could get an idea of what breeds we could get, and whether we could buy a ready made coop or if we would have to DIY. We decided on starting with 8 birds, and figured we might as well get different breeds so we could have some different eggs and see what we might want to get more of in the future. And we quickly decided that we would have to build our own coop to get exactly what we wanted.
Before we could start building though, we needed to clear an area.

This brush pile was here when we moved in, although we've certainly been contributing to it. We have a lot of trees which just LOVE to dump sticks on the lawn. And for some reason, my husband thinks we should save our Christmas tree instead of letting the town take care of it. Unfortunately, that massive pile of sticks was exactly where I wanted to put the coop.
Please tell me I'm not the only person who finds it impossible to start a new project without buying new toys. This one required TWO new toys, a wood chipper for me, and a chain saw for my husband. Eh, he's supportive of my chicken obsession, the least he deserves is a sharp power tool, right?
After one day of work. The center part right behind the garage was mostly large logs. Peter chopped a ton of them into manageable pieces. The pile next to the tree is what still needs to be cut and split.
Gabriella is a big help by providing the entertainment. Here she is "riding my horsey"
From a bit further back on the property. The area closest to the camera is our "back garden" which is a space we've dedicated to the plants that do okay when you let them go wild, squash, potatoes, asparagus, black raspberries and horseradish. Unfortunately, we've been fighting (and losing spectacularly) with a groundhog for control of this space. We're going to be installing a fence around this space when we fence in the chicken run, and I'm going to win this year.
After day 3 of hard labor, there's still a ton of junk to deal with, but at least it's been moved out of the chicken area.
The piles that still need to be chipped
The already split logs we gathered from the area, along with the 40-some bricks we scavenged from under the brush.
The chicken yard fence with be on the right side of the 4x4 on the ground. We want to have a walking/drainage path to the left of it. Peter dug down a good 18 inches or so to take out some random jungle gym pieces and a huge old stump, then started filling back in with large rocks. The fieldstone pieces were all buried under the brush, probably left over from the patio that the previous owners installed. We're going to lay them for the path, with gravel around them.
Finally time to start building! We're planning an 8'x8' shed style coop, with an external nest box.
We spent a great part of the first day trying to get the "foundation" level. I'm sure there's an easier way to do it, but this is what you get when a pharmacist and computer geek build things.
Floor framed!
Our inspector Tada! Still level!
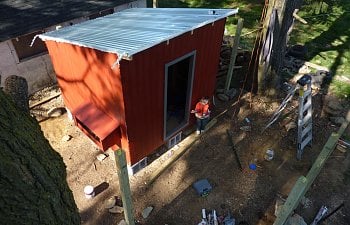
Aerial view provided by my monkey of a husband
Build day 2
We start bright and early with the easiest piece, the back wall.
The front wall, with a door and two windows
The right side wall, with chicken (and Gabriella) door
Finally the left side wall, with nest box.
Day 3
We started the day by laying down the flooring, which we promptly pulled back up because my husband wanted to Liquid Nails it before we screwed it down. That accomplished, we screwed while our daughter documented the process.
She probably thought we were done for the day and could go play.
Back wall up.
Nest box wall up
Starting to look like an actual building
Rafters and purlins up. Unfortunately we had to stop before we actually got the roof on, so the whole shebang got wrapped in tarps for a couple of days.
Day 4
My in-laws kept Gabriella for us so that Peter and I could go out for the evening. The plan was for them to bring her back to our house and spend the day helping with our project. Peter and I managed to get 3/4 of the roof up before they got to our house and I lost my husband to digging post holes with his father.
Since I'm only 5'5", that last piece of roofing wasn't going up without while I was mostly on my own, so I got started on the siding.
Yeah, that doorway is why you're supposed to measure twice and cut once. At least if you cut it too short, you can go back with a jigsaw and cut it the the right height. Not that I'd know anything about that.
Day 5
We did get that last piece of roofing up. By moonlight, but it was up!
Sick of rigging up those tarps, it's time to make ourselves a door.
Gabriella has her own tools. She wants to use her 4 oz hammer to help with the door.
And 10 minutes later, her nail is in!
Test fit
And finished by moonlight again.
Day 6
Hole cut for nest box
Framing out the nest box
Siding and hinges attached.
Day 7
Painting trim. No, it was not cold enough to justify the hat, but what can I say? The kid's got style!
Gabriella was a little confused as to why we were using red barn paint, since it's a chicken coop, not a barn. Very literal that one.
First coat finished.
We spent a full day going around to all the feed stores in the area so we could get an idea of what breeds we could get, and whether we could buy a ready made coop or if we would have to DIY. We decided on starting with 8 birds, and figured we might as well get different breeds so we could have some different eggs and see what we might want to get more of in the future. And we quickly decided that we would have to build our own coop to get exactly what we wanted.
Before we could start building though, we needed to clear an area.
This brush pile was here when we moved in, although we've certainly been contributing to it. We have a lot of trees which just LOVE to dump sticks on the lawn. And for some reason, my husband thinks we should save our Christmas tree instead of letting the town take care of it. Unfortunately, that massive pile of sticks was exactly where I wanted to put the coop.
Please tell me I'm not the only person who finds it impossible to start a new project without buying new toys. This one required TWO new toys, a wood chipper for me, and a chain saw for my husband. Eh, he's supportive of my chicken obsession, the least he deserves is a sharp power tool, right?
After one day of work. The center part right behind the garage was mostly large logs. Peter chopped a ton of them into manageable pieces. The pile next to the tree is what still needs to be cut and split.
Gabriella is a big help by providing the entertainment. Here she is "riding my horsey"
The piles that still need to be chipped
The already split logs we gathered from the area, along with the 40-some bricks we scavenged from under the brush.
The chicken yard fence with be on the right side of the 4x4 on the ground. We want to have a walking/drainage path to the left of it. Peter dug down a good 18 inches or so to take out some random jungle gym pieces and a huge old stump, then started filling back in with large rocks. The fieldstone pieces were all buried under the brush, probably left over from the patio that the previous owners installed. We're going to lay them for the path, with gravel around them.Finally time to start building! We're planning an 8'x8' shed style coop, with an external nest box.
We spent a great part of the first day trying to get the "foundation" level. I'm sure there's an easier way to do it, but this is what you get when a pharmacist and computer geek build things.
Floor framed!
Our inspector Tada! Still level!
Aerial view provided by my monkey of a husband
Build day 2
We start bright and early with the easiest piece, the back wall.
The front wall, with a door and two windows
The right side wall, with chicken (and Gabriella) door
Finally the left side wall, with nest box.
Day 3
We started the day by laying down the flooring, which we promptly pulled back up because my husband wanted to Liquid Nails it before we screwed it down. That accomplished, we screwed while our daughter documented the process.
She probably thought we were done for the day and could go play.
Back wall up.
Nest box wall up
Starting to look like an actual building
Rafters and purlins up. Unfortunately we had to stop before we actually got the roof on, so the whole shebang got wrapped in tarps for a couple of days.
Day 4
My in-laws kept Gabriella for us so that Peter and I could go out for the evening. The plan was for them to bring her back to our house and spend the day helping with our project. Peter and I managed to get 3/4 of the roof up before they got to our house and I lost my husband to digging post holes with his father.
Since I'm only 5'5", that last piece of roofing wasn't going up without while I was mostly on my own, so I got started on the siding.
Yeah, that doorway is why you're supposed to measure twice and cut once. At least if you cut it too short, you can go back with a jigsaw and cut it the the right height. Not that I'd know anything about that.
Day 5
We did get that last piece of roofing up. By moonlight, but it was up!
Sick of rigging up those tarps, it's time to make ourselves a door.
Gabriella has her own tools. She wants to use her 4 oz hammer to help with the door.
And 10 minutes later, her nail is in!
Test fit
And finished by moonlight again.
Day 6
Hole cut for nest box
Framing out the nest box
Siding and hinges attached.
Day 7
Painting trim. No, it was not cold enough to justify the hat, but what can I say? The kid's got style!
Gabriella was a little confused as to why we were using red barn paint, since it's a chicken coop, not a barn. Very literal that one.
First coat finished.