I have received many inquiries from people in my neighborhood about chickens and coops. Recently I agreed to make one for a dear friend of ours based on the design I used for our coop.
You can see it here:
https://www.backyardchickens.com/a/seattle-chicken-condo
I am trying to provide some step by step instructions here for anyone who may need them.
Keep checking back as I am adding more pictures and information as I have time.
Thanks for your patience!
Our friend has limited space so we decided to make hers a bit smaller. She will make the run out of normal chicken wire and aviary netting for the roof. I am attempting to list the materials used along with measurements with some pictures showing it in more of a "How-to" in case anyone needs some extra help. The basic coop dimensions will be 3' deep x 4' wide x 4'3" tall at the peak.
Materials:
1 4x8 sheet of plywood 1/4" to make the side walls
1 4x8 sheet of plywood 1/4" to make the front and back walls
1 3x4 piece of plywood 1/2" we used a piece smooth on one side to make it easier to tile the floor.
1 4x5 piece of plywood 1/4" to make the roof.
6 2x4x8 studs
10 2x4x92 studs
6 1x4 boards (the cheaper ones you see at a lumber store (you can use the straight edge or the rounded edge either way is fine).
6 hinges
1 door latch (bolt type)
Peel and stick floor tiles
Silicone sealant
Screws 1 5/8" , 2" , 2 1/2" , 3 1/2"
Drill
Circular saw (hand held)
Chop saw (we have one with a stand but you can just use a circular saw if that's all you have).
*** it was very useful for cutting the angles we needed*
So let's get started.
1) When you go buy the plywood...have them cut the plywood as follows:
Here are pictures of the pieces described above:

Above: the back wall 4'3" tall by 4' wide
Above: the front wall (the nest boxes and doors will be cut out of this piece)
Above: The floor piece 3' x 4' smooth on one side
Above: both side pieces will look like the one on the right. High side is 4'3", low side is 3'9".
2) The frame:
You need 2 pieces cut at 9 degrees where the low side is 69". You will need 2 more pieces where the high side is 75". Use the 92" studs to make these pieces. For a better understanding, here is a picture:
Above: framing pieces showing angle.
Cut 4 pieces 33" long (use the 92" studs for this) .
Now take a 69" piece and 75" piece and connect them using a 33" board. The bottom of the 33" board should be at the 2' mark. Leave 1 1'2" from each edge for connecting a the cross boards later.
Above: See image below for detail
Now we need to connect the tops and the other sides of what we just did. We are trying to make the following:
Here is detail for the bottom pieces:
And the tops:
I attached them using metal straps that have cleats on one side. You place it and hit it in with a mini sledge or hammer.
Now cut two 45" pieces from the 92" studs. Connect them along the sides to join the two frames we just built.
Above: 45" pieces are on the left and right.
Then attach the two remaining 33" boards along the middle where the floor will go.
Above: Two 33" pieces across the middle.
You now have the free standing frame. I will leave it to you whether or not you put more 2x4's along the bottom to make it more stable.
3) Floor: Take the 3' x 4' piece of plywood that is smooth on one side. You will need to cut notches out so that it fits right on top of our frame. I just used leftover 2x4 scrap as a guide for marking where I needed to cut. Use the circular saw to make most of the cut and cut the rest with a hand saw and it will come out very neat.
Above: The floor with the notches cut out.
Above: Detail of notches for floor.
Attach the back wall to the frame. This wall should be 4 wide x 4'3" tall.
Above: Back wall attached.
Attach the side wall where the door will go.
Above: Side door with door cut out.
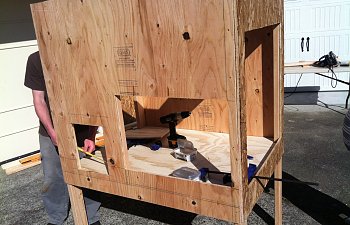
Attach front wall. This is the piece of plywood that is 4' wide x 3'9" tall. The nest box hole and door have been cut out already.
Above: Front wall with nest box and door cut outs.
Attach the other side wall. The cut out for the window is already cut.
Above: Side wall with window cut out (screen has already been installed).
Notice that the bottom has been trimmed to allow a clean out space (1" clearance from floor)
You can see it here:
https://www.backyardchickens.com/a/seattle-chicken-condo
I am trying to provide some step by step instructions here for anyone who may need them.
Keep checking back as I am adding more pictures and information as I have time.
Thanks for your patience!
Our friend has limited space so we decided to make hers a bit smaller. She will make the run out of normal chicken wire and aviary netting for the roof. I am attempting to list the materials used along with measurements with some pictures showing it in more of a "How-to" in case anyone needs some extra help. The basic coop dimensions will be 3' deep x 4' wide x 4'3" tall at the peak.
Materials:
1 4x8 sheet of plywood 1/4" to make the side walls
1 4x8 sheet of plywood 1/4" to make the front and back walls
1 3x4 piece of plywood 1/2" we used a piece smooth on one side to make it easier to tile the floor.
1 4x5 piece of plywood 1/4" to make the roof.
6 2x4x8 studs
10 2x4x92 studs
6 1x4 boards (the cheaper ones you see at a lumber store (you can use the straight edge or the rounded edge either way is fine).
6 hinges
1 door latch (bolt type)
Peel and stick floor tiles
Silicone sealant
Screws 1 5/8" , 2" , 2 1/2" , 3 1/2"
Drill
Circular saw (hand held)
Chop saw (we have one with a stand but you can just use a circular saw if that's all you have).
*** it was very useful for cutting the angles we needed*
So let's get started.
1) When you go buy the plywood...have them cut the plywood as follows:
- ,Cut one sheet into 2 pieces 3'9" x 4" and 4'3" x 4'. These will be the front and back walls.
- Cut one sheet to be 5' x 4' for the roof.
- Usually they will have a 4' x 4' sheet you can buy. Have them cut one to 3' x 4' for the floor (one side should be smooth if you want to make it covered with tile for easier clean-outs.
- The sides have to be cut at home because they will not cut angles for you. You can get both side walls out of one piece of plywood. From the bottom, measure up the 8 foot side to 3' 9" make a mark, on the other side measure up to 4' 3" make a mark. Use a square to mark a line at an angle connected the two marks you made.
Here are pictures of the pieces described above:
Above: the back wall 4'3" tall by 4' wide
Above: the front wall (the nest boxes and doors will be cut out of this piece)
Above: The floor piece 3' x 4' smooth on one side
Above: both side pieces will look like the one on the right. High side is 4'3", low side is 3'9".
2) The frame:
You need 2 pieces cut at 9 degrees where the low side is 69". You will need 2 more pieces where the high side is 75". Use the 92" studs to make these pieces. For a better understanding, here is a picture:
Above: framing pieces showing angle.
Cut 4 pieces 33" long (use the 92" studs for this) .
Now take a 69" piece and 75" piece and connect them using a 33" board. The bottom of the 33" board should be at the 2' mark. Leave 1 1'2" from each edge for connecting a the cross boards later.
Above: See image below for detail
Now we need to connect the tops and the other sides of what we just did. We are trying to make the following:
Here is detail for the bottom pieces:
And the tops:
I attached them using metal straps that have cleats on one side. You place it and hit it in with a mini sledge or hammer.
Now cut two 45" pieces from the 92" studs. Connect them along the sides to join the two frames we just built.
Above: 45" pieces are on the left and right.
Then attach the two remaining 33" boards along the middle where the floor will go.
Above: Two 33" pieces across the middle.
You now have the free standing frame. I will leave it to you whether or not you put more 2x4's along the bottom to make it more stable.
3) Floor: Take the 3' x 4' piece of plywood that is smooth on one side. You will need to cut notches out so that it fits right on top of our frame. I just used leftover 2x4 scrap as a guide for marking where I needed to cut. Use the circular saw to make most of the cut and cut the rest with a hand saw and it will come out very neat.
Above: The floor with the notches cut out.
Above: Detail of notches for floor.
Attach the back wall to the frame. This wall should be 4 wide x 4'3" tall.
Above: Back wall attached.
Attach the side wall where the door will go.
Above: Side door with door cut out.
Attach front wall. This is the piece of plywood that is 4' wide x 3'9" tall. The nest box hole and door have been cut out already.
Above: Front wall with nest box and door cut outs.
Attach the other side wall. The cut out for the window is already cut.
Above: Side wall with window cut out (screen has already been installed).
Notice that the bottom has been trimmed to allow a clean out space (1" clearance from floor)