Hello all!
After a lot of research, designing on graph paper, and simply reviewing coop after coop on BYC, over the summer of 2013 we decided to dive head first into our own little flock and backyard coop. Of all the things I have learned while building my own coop, I'd like to emphasis two points:
1) Building your own coop is not an over night venture.
2) Chickens have been around a long, long time. At the end of the day, they just need a few walls and a roof to keep them warm and dry, then nature will take it from there.
Lastly, I would like to give half the credit to my brother-in-law (B.I.L.) Rowdy who is a construction foreman. Without his help on the frame and general design, this would look more like the house the crooked man lives in. And with that said...
In the beginning it started with 6 chicks, a heat lamp, and a cardboard box...

We started our coop by setting 6 4"x4" posts in the corner of our yard in cement. The plan is to have a 4'x14' run, including the coop. The front posts were cut at 8ft, the back at 7ft., set two feet deep:
Then we nail 2"x4"s along the base, top, and every 2' except for where the coop is going (closest side):
My B.I.L. and nephew working on framing the coop itself. He nailed in 2"x6"s between the back 4x4s to support the floor. He also created the roof's base, spacing the purlins 2' apart to support corrugated roof panels:
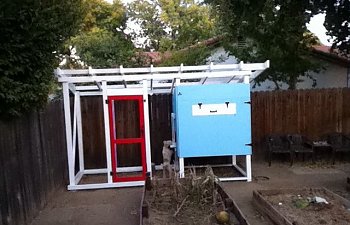
Later, 3/4" plywood was nailed to the right hand side of the coop, as well as a floor and roof, forming the box that the girls will roost in. Then came my personally favorite part: priming and painting. Oh, and that is Charlie peeking in on the chickens.
Once this coop frame was complete, we moved them outside and they lived in the unfinished coop for sometime since they had out grown the cardboard box. As you can see, we put down linoleum on the floor and up half the wall to make cleaning easier. I highly suggest this for any coop, as the wood will be protected from chicken and water damage. The roosting bar is made from closet rod brackets and an actual closet rod:
Next using a staple gun we attached chicken wire along the inside of the frame. A nylon string runs from the door to the outside of the run to allow the closing of the coop from outside. We chose hay for the run bedding since we compost. FYI: Wood shavings take longer to decompose than straw, though we do use wood shavings INSIDE the coop for better absorption:
Here is a picture of our DIY roosting boxes made out of 5 Gal. buckets and make-shift chicken feeder made from PVC. As you can see, we made one full side of the coop hinged, allowing for easy cleanup and coop access. 2x4s were secured to the floor as the bedding would fall out freely otherwise:
Finally, corrugated metal panels were attached to the top of the roof, finished Casa de Polo and our summer project for 2013:
I hope you enjoyed the small play by play of our humble little coop. At the end of the day, just remember to enjoy the process as a whole, from building the coop to waiting for your first egg. Which reminds me, here is our very first egg laid by none other than our spunky little alpha chicken, Ethel (A Leghorn):
After a lot of research, designing on graph paper, and simply reviewing coop after coop on BYC, over the summer of 2013 we decided to dive head first into our own little flock and backyard coop. Of all the things I have learned while building my own coop, I'd like to emphasis two points:
1) Building your own coop is not an over night venture.
2) Chickens have been around a long, long time. At the end of the day, they just need a few walls and a roof to keep them warm and dry, then nature will take it from there.
Lastly, I would like to give half the credit to my brother-in-law (B.I.L.) Rowdy who is a construction foreman. Without his help on the frame and general design, this would look more like the house the crooked man lives in. And with that said...
In the beginning it started with 6 chicks, a heat lamp, and a cardboard box...
We started our coop by setting 6 4"x4" posts in the corner of our yard in cement. The plan is to have a 4'x14' run, including the coop. The front posts were cut at 8ft, the back at 7ft., set two feet deep:
Then we nail 2"x4"s along the base, top, and every 2' except for where the coop is going (closest side):
My B.I.L. and nephew working on framing the coop itself. He nailed in 2"x6"s between the back 4x4s to support the floor. He also created the roof's base, spacing the purlins 2' apart to support corrugated roof panels:
Later, 3/4" plywood was nailed to the right hand side of the coop, as well as a floor and roof, forming the box that the girls will roost in. Then came my personally favorite part: priming and painting. Oh, and that is Charlie peeking in on the chickens.
Once this coop frame was complete, we moved them outside and they lived in the unfinished coop for sometime since they had out grown the cardboard box. As you can see, we put down linoleum on the floor and up half the wall to make cleaning easier. I highly suggest this for any coop, as the wood will be protected from chicken and water damage. The roosting bar is made from closet rod brackets and an actual closet rod:
Next using a staple gun we attached chicken wire along the inside of the frame. A nylon string runs from the door to the outside of the run to allow the closing of the coop from outside. We chose hay for the run bedding since we compost. FYI: Wood shavings take longer to decompose than straw, though we do use wood shavings INSIDE the coop for better absorption:
Here is a picture of our DIY roosting boxes made out of 5 Gal. buckets and make-shift chicken feeder made from PVC. As you can see, we made one full side of the coop hinged, allowing for easy cleanup and coop access. 2x4s were secured to the floor as the bedding would fall out freely otherwise:
Finally, corrugated metal panels were attached to the top of the roof, finished Casa de Polo and our summer project for 2013:
I hope you enjoyed the small play by play of our humble little coop. At the end of the day, just remember to enjoy the process as a whole, from building the coop to waiting for your first egg. Which reminds me, here is our very first egg laid by none other than our spunky little alpha chicken, Ethel (A Leghorn):