My brother is 9 years older and has always taken the plunge first in life and my greatest gift is simply learning from his successes/failures. So, when we built his coop two years ago, I was able to get some valuable experience in coop-struction and his last two years of chicken ownership has given me even more second-hand chicken-telligence (sorry… but those puns are too fun to not make). I felt prepared to take the leap on my own this summer.
I do not have much land so space utilization is key. In addition, I travel a fair amount for work so wanted a setup that was low maintenance. Below was the original sketch that I made. There were several tweaks to the design but the best plans are flexible...

The plan was a roughly 12’ x 3.5’ coop with an elevated coop of roughly 4’x3.5’. I am tall so my goal was to try to eliminate ducking wherever possible so the coop is about 7’ tall in the front and about 7.5’ tall in the back to allow for the sloping roof. Having the coop elevated allows for more run room for the chickens as well as being at the same level as me for cleaning. The design called for the entire front of the coop to open up for complete access.
Construction started with 8 4”x4”X12’ posts as the supports. They were spaced to support the coop and serve as the frame for the main run door. We dug the holes roughly 30” deep, put in the posts, and poured the concrete to set the posts accordingly. Highly recommend setting one post and then lining up the remaining posts to the first guide post. As we got them spaced and leveled appropriately, we held them all together with 2” x 12” buried in the ground a bit. This is great for keeping the structure together, predator deterrent, and to create walls to hold the sand that will be in the run later. We then secured the roof line with 2”x4”s to hold the top part of the structure together as well. Using a sawsall, we then cut off the remaining 4”x4” tops and had a finished structure for the coop.
Once the concrete was set, we put the joists in the roof for support. Some OSB served as the roof and then tar paper was put on the roof. It was important to make sure that the room was not wider than the standard 48” width for the OSB board. Also an important thing to think about in terms of design. This is why the coop is 12’ long as that is a nice standard size to buy continuous pieces of wood for.
With the roof covered, we started framing out the coop with 2”x4” and used barn siding material (not sure of the name) which comes in nice 8’x4’ sheets. Again, important to design to typical wood sizes. With the coop complete with walls… it now needed shingles on the roof and a floor in the coop. This was a great learning experience in putting roofing up. Coops are definitely good for trying out things for the first time because it isn’t like it is my family’s home J With the roof shingled, complete with flashing (decently well for the my first time) I then put the floor inside the coop.
For the run door, a very close family friend was able to find an old exterior wood door and it was a perfect fit for the run door. It is so nice when things come together (for free). Thanks Mr. Tinker. He also had some extra stainless hinges that we used to hold the door to the coop. Nothing like using up some old inventory. For the run door, we used our free 1”x4” wood to put some trim around for some more aesthetics.
For the coop door, we needed some heavy duty hinges to hold the big heavy “wall” of the coop that opens. Being the son of a machinist, I know the importance of picking the right type of metal so getting a stainless steel continuous hinge was paramount. Thanks to Amazon, I was able to get a 4’ stainless continuous hinge for $28. I used 3’ of the hinge on the coop door – you will see where I used the remaining 1’ of hinge later.
With the big parts of the coop assembled, I had reached a new sense of self-enlightenment... or self-satisfaction... I couldn't tell which one:
As you can see from the pictures, we have a small wall that runs behind the coop. Rather than try to put chicken wire around that back part of the coop, we decided to work with the wall and just create some boxing with 2”x4” and 1”x4” to “seal” the spaces between the wall and the coop. That saves a lot of aggravation with wiring and provides better protection with a cinderblock wall instead of chicken wire. We had a bunch of 1”x4” wood that was salvaged from an old demolition project that came into great use when we were installing the chicken wire. We had an air-powered stapler that we used to put the chicken wire up and then cased the staples in with 1”x4” screwed in nice and tight. It provides better aesthetics as well as better support for holding the wire in.
We used more of the 1"x4" boards to create trim around the run door.
Now remember the extra 1’ of stainless continuous hinge we had? Well, this is the pièce de résistance: the ramp into the coop for the chickens. Now, the coop sits about 4’ up. That is high so the ramp needs to be gradual enough so that the chickens don’t feel like they are starring in Cliffhanger every time they get on it. Also, I want to be able to get in the run and do things as needed without having to worry about working around a huge ramp. Solution: collapsible ramp. We put 2 2”x4”s together and then attached 6” of hinge to the coop and then the other 6” of hinge was put in the middle of the ramp. We stripped down so 1”x4” boards to give the chickens something to hold on to when they were on the ramp. See the video to see the ramp in action.
The coop was pretty much structurally ready... but now needed some finishing touches...
To get ready for the chickens, I wanted to get a coat of primer on the inside and outside of the coop. The entire inside of the coop is covered with 2 coats of exterior Killz2 primer and a semi-gloss exterior paint for less maintenance down the road. It will help preserve the wood and make cleaning as easy as wiping down the walls.
Also – the importance of poop boards cannot be overstated – so I created a removable poop board that sits in the coop but can be taken out for cleaning, etc.
I also got some 12”x18” windows off of ebay for $25 each shipped. These are perfect for coops with windows that have three locking settings: fully open, 10% open, and closed. When we created the boxing for the windows, we set it up so that the roost itself would use the same supports and be totally removable. Again, having pieces that you can remove for easy, deep-cleaning is paramount.
As the coop was going to be filled with sand as well, I wanted to make a way of holding the sand in but being able to remove it as maintenance dictates. See the basic board that holds in the sand with basic slots.
We then got the construction sand put in the run and the coop. With all the pieces in place, we cut out the door from the coop to the run and our coop was now ready for the girls to move in.
I have put together a nice PVC gravity feeder that I think improves upon some other designs that I have seen on here and I am putting together a chicken nipple bucket as well. I will add that to the list once I have that ready.
We have several other enhancements that we need to do: finish painting the exterior of the coop, build a nest box, and have an artist friend of ours paint us a nameplate for the coop which we lovingly call “The Birdcage” in reference to the great comedy of the same name.
I will put a video walkthrough of the coop so you can see all the maintenance free options in action soon but wanted to get this write-up out there and checked off of my to-do list. I will also put a list of supplies and procurement strategies used to reduce overall costs.
As far as overall costs, I have attached a list of everything that I bought: http://www.portfoliostarter.com/other/Coop Costs.xlsx
I was able to save a lot of money because of some "inventory" donated by my brother and family friend including a ton of screws, hardware, and 1"x4" wood. I would also encourage anyone looking to build a coop to go and get as many 10% coupons as you can for Lowe's/Home Depot. As you start to buy more and more, you will easily spend a few hundreds bucks so those coupons really add up some savings.
I do not have much land so space utilization is key. In addition, I travel a fair amount for work so wanted a setup that was low maintenance. Below was the original sketch that I made. There were several tweaks to the design but the best plans are flexible...
The plan was a roughly 12’ x 3.5’ coop with an elevated coop of roughly 4’x3.5’. I am tall so my goal was to try to eliminate ducking wherever possible so the coop is about 7’ tall in the front and about 7.5’ tall in the back to allow for the sloping roof. Having the coop elevated allows for more run room for the chickens as well as being at the same level as me for cleaning. The design called for the entire front of the coop to open up for complete access.
Construction started with 8 4”x4”X12’ posts as the supports. They were spaced to support the coop and serve as the frame for the main run door. We dug the holes roughly 30” deep, put in the posts, and poured the concrete to set the posts accordingly. Highly recommend setting one post and then lining up the remaining posts to the first guide post. As we got them spaced and leveled appropriately, we held them all together with 2” x 12” buried in the ground a bit. This is great for keeping the structure together, predator deterrent, and to create walls to hold the sand that will be in the run later. We then secured the roof line with 2”x4”s to hold the top part of the structure together as well. Using a sawsall, we then cut off the remaining 4”x4” tops and had a finished structure for the coop.
Once the concrete was set, we put the joists in the roof for support. Some OSB served as the roof and then tar paper was put on the roof. It was important to make sure that the room was not wider than the standard 48” width for the OSB board. Also an important thing to think about in terms of design. This is why the coop is 12’ long as that is a nice standard size to buy continuous pieces of wood for.
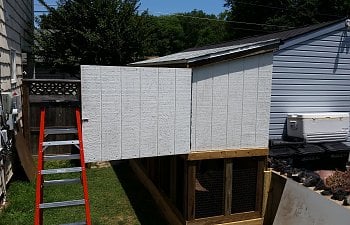
With the roof covered, we started framing out the coop with 2”x4” and used barn siding material (not sure of the name) which comes in nice 8’x4’ sheets. Again, important to design to typical wood sizes. With the coop complete with walls… it now needed shingles on the roof and a floor in the coop. This was a great learning experience in putting roofing up. Coops are definitely good for trying out things for the first time because it isn’t like it is my family’s home J With the roof shingled, complete with flashing (decently well for the my first time) I then put the floor inside the coop.
For the run door, a very close family friend was able to find an old exterior wood door and it was a perfect fit for the run door. It is so nice when things come together (for free). Thanks Mr. Tinker. He also had some extra stainless hinges that we used to hold the door to the coop. Nothing like using up some old inventory. For the run door, we used our free 1”x4” wood to put some trim around for some more aesthetics.
For the coop door, we needed some heavy duty hinges to hold the big heavy “wall” of the coop that opens. Being the son of a machinist, I know the importance of picking the right type of metal so getting a stainless steel continuous hinge was paramount. Thanks to Amazon, I was able to get a 4’ stainless continuous hinge for $28. I used 3’ of the hinge on the coop door – you will see where I used the remaining 1’ of hinge later.
With the big parts of the coop assembled, I had reached a new sense of self-enlightenment... or self-satisfaction... I couldn't tell which one:
As you can see from the pictures, we have a small wall that runs behind the coop. Rather than try to put chicken wire around that back part of the coop, we decided to work with the wall and just create some boxing with 2”x4” and 1”x4” to “seal” the spaces between the wall and the coop. That saves a lot of aggravation with wiring and provides better protection with a cinderblock wall instead of chicken wire. We had a bunch of 1”x4” wood that was salvaged from an old demolition project that came into great use when we were installing the chicken wire. We had an air-powered stapler that we used to put the chicken wire up and then cased the staples in with 1”x4” screwed in nice and tight. It provides better aesthetics as well as better support for holding the wire in.
We used more of the 1"x4" boards to create trim around the run door.
Now remember the extra 1’ of stainless continuous hinge we had? Well, this is the pièce de résistance: the ramp into the coop for the chickens. Now, the coop sits about 4’ up. That is high so the ramp needs to be gradual enough so that the chickens don’t feel like they are starring in Cliffhanger every time they get on it. Also, I want to be able to get in the run and do things as needed without having to worry about working around a huge ramp. Solution: collapsible ramp. We put 2 2”x4”s together and then attached 6” of hinge to the coop and then the other 6” of hinge was put in the middle of the ramp. We stripped down so 1”x4” boards to give the chickens something to hold on to when they were on the ramp. See the video to see the ramp in action.
The coop was pretty much structurally ready... but now needed some finishing touches...
To get ready for the chickens, I wanted to get a coat of primer on the inside and outside of the coop. The entire inside of the coop is covered with 2 coats of exterior Killz2 primer and a semi-gloss exterior paint for less maintenance down the road. It will help preserve the wood and make cleaning as easy as wiping down the walls.
Also – the importance of poop boards cannot be overstated – so I created a removable poop board that sits in the coop but can be taken out for cleaning, etc.
I also got some 12”x18” windows off of ebay for $25 each shipped. These are perfect for coops with windows that have three locking settings: fully open, 10% open, and closed. When we created the boxing for the windows, we set it up so that the roost itself would use the same supports and be totally removable. Again, having pieces that you can remove for easy, deep-cleaning is paramount.
As the coop was going to be filled with sand as well, I wanted to make a way of holding the sand in but being able to remove it as maintenance dictates. See the basic board that holds in the sand with basic slots.
We then got the construction sand put in the run and the coop. With all the pieces in place, we cut out the door from the coop to the run and our coop was now ready for the girls to move in.
I have put together a nice PVC gravity feeder that I think improves upon some other designs that I have seen on here and I am putting together a chicken nipple bucket as well. I will add that to the list once I have that ready.
We have several other enhancements that we need to do: finish painting the exterior of the coop, build a nest box, and have an artist friend of ours paint us a nameplate for the coop which we lovingly call “The Birdcage” in reference to the great comedy of the same name.
I will put a video walkthrough of the coop so you can see all the maintenance free options in action soon but wanted to get this write-up out there and checked off of my to-do list. I will also put a list of supplies and procurement strategies used to reduce overall costs.
As far as overall costs, I have attached a list of everything that I bought: http://www.portfoliostarter.com/other/Coop Costs.xlsx
I was able to save a lot of money because of some "inventory" donated by my brother and family friend including a ton of screws, hardware, and 1"x4" wood. I would also encourage anyone looking to build a coop to go and get as many 10% coupons as you can for Lowe's/Home Depot. As you start to buy more and more, you will easily spend a few hundreds bucks so those coupons really add up some savings.
")