YEA!!! FINISHED !! I'm so proud!!
My Ladies getting on roost.
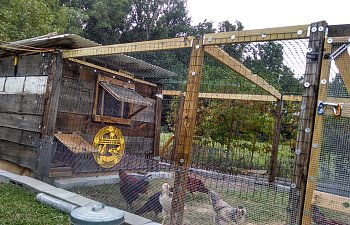
..Before run is done but pullets are now inside.
YEA!!! FINISHED !! I'm so proud!!
My Ladies getting on roost.
..Before run is done but pullets are now inside.Everything seemed to be perfect for me back in March!! Jennifer (dd), Maycee (gd) and I all decided to get some EE's at the TSC.. I had a friend who had said he had just taken down a shed and would be glad to build me a coop.! And to be fair...this young man had good intentions and a big heart. I made sure that he was serious and he assured me he was.....I reminded him that if I get little chicks, that he really needed to do it.. LOL.. I had been warned that he was not the best about following through with things. But right away, he brought over all of the wood he had. I was excited. "Wouldn't take too long. I really wanted a coop for about 4 hens but he wanted to build a bigger "walk-in" kind. It took all of March to get started.. After he said a "walk-in", I sat down and tried to sketch out a new coop...Here's the coop I designed and went over with him.
LOL....not sure he looked at it again!I had been gone to take care of grands and this is what was sitting in my yard when I got back. ...LOL...
NO, it already is different! But I was so excited about having something! Love the idea of recycling anything we could recycle! You just can't find "good" wood like people used to use!
My builder was doing so well that I immediately took the truck and went after 2 pieces of plywood for the flooring. I was getting anxious because I wanted 2 doors in it..one would be entered from outside the run...then the other door (which included the pop door) would allow me to go through to the run. My other smaller coop has an egg door on the back, which is facing this building. Since the plans for the run had been changed "for me", I needed some way to get to that egg door. If you look at this floor plan, you will see there is no door on this side. In fact, he decided to have the people door inside the run and have a short 4' gate at the back of the coop. My concerns with everything involved was how to adjust it to be predator proof..... I just had to keep going with the flow... I knew a 4' run with no netting, etc was far from predator proof. Started getting concerned but tried to keep my worry to a minimum. I had bought a $50 roll 1/4" hardware cloth to put under my flooring and to bring up the inside walls. Well, when I got back...again....the plywood floor was in place and so pretty, however, on a closer look..they had found some chicken wire coming from under my flooring! Geez! At this point, I started having a bad feeling about how this would turn out. 
I'm still excited and thinking how to adjust. On the front, bottom left...that's going to be the pop door I was told! But the siding is going on which to me was "almost finished enough for me to start making my plans ...like how/where to put up the roosts/ poop board,,how many egg boxes and where should I put them. I already knew that the inside is going too open (old boards do warp, leaving a lot of daylight showing through! Their knots are falling out and leaving holes,...they are not being screwed on.....and you know nails will work their way out! You see, I have read so many posts on BYC, I was focused on the coop integrity and predator proofing. At the same time, I'm dealing with 17 little chicks in the back bedroom....and my dh didn't know!!! LOL
 The run is nothing like I laid out an that $50 roll of hardware cloth is right behind the coop! But it sat here, like this for several weeks.. In all fairness, by now, it was getting really warm and he worked in an outside job. .I had learned my lesson! It was at this point that I began trying to figure out what to do first...I'm 65 yrs old, disabled, have a balance problem, Parkinsonism and have absolutely NO building experience! But I wasn't waiting any longer! I took down the chicken wire and put the linoleum on the inside floor, bringing it up the side about 10 inches. I will still have to secure the walls at some point. My first deed/mistake was concerning my window...My heart almost stopped at the thought of cutting a hole in a wall! LOL
Its still not right but it is secure.
My Virginia granddaughter, Scarlet and I made the people door twice before I realized it was not close to fitting an opening that was not square! This was the door before I had to go back and "uneven" it!! LOL
The run is nothing like I laid out an that $50 roll of hardware cloth is right behind the coop! But it sat here, like this for several weeks.. In all fairness, by now, it was getting really warm and he worked in an outside job. .I had learned my lesson! It was at this point that I began trying to figure out what to do first...I'm 65 yrs old, disabled, have a balance problem, Parkinsonism and have absolutely NO building experience! But I wasn't waiting any longer! I took down the chicken wire and put the linoleum on the inside floor, bringing it up the side about 10 inches. I will still have to secure the walls at some point. My first deed/mistake was concerning my window...My heart almost stopped at the thought of cutting a hole in a wall! LOL
Its still not right but it is secure.
My Virginia granddaughter, Scarlet and I made the people door twice before I realized it was not close to fitting an opening that was not square! This was the door before I had to go back and "uneven" it!! LOL
My tools of choice. except for using the reciprocating saw.... (cut the tops off of the 4x4 's in my run). Thats the tool someone described as the tool from "HELL".. Didn't take me long to find out why! LOLOL.
I had originally wanted my coop to be off the ground with double doors to make it easier for me to clean, etc. LOLOL If you have your plans worked out to meet your needs.....stand your ground because you know what your need more than someone else. I've learned to use my power tools with the exception of the reciprocating saw that I used to trim off the top of the post in the run...Standing on a 6' ladder, I cradled it in my arm as i cut...I don't think I have one level cut even after chalking it level!! Dang!! Please don't do this because I could feel just how huge the danger was in this situation.Another problem ended up being the pop door. Nope, there wasn't a squared off corner.. and for that I had gotten the man at the store to cut it only then I had to mark it and cut it again. I had a hard time figuring out where hinges had to go for stability. The pop door got them on and off of the bottom, the left side and then one on the top! None were right..needed 2 attached to the top.! Now on to the nest/egg Now on to the nest/egg box door in the rear .
Now on to the nest/egg box door in the rear
There were a couple of boards inside for the nest boxes but to be quite honest,,,the bucket boxes just didn't fit at all so they came out.This is where my grandson, Olen did such a good job. I had some crates so they went in next...I just didn't like the thought of having to drive around back to check the eggs...very isolated, no lighting. Sooooo, LOL, I made and "executive decision" and decided the coop could use some good ventilation anyway. I closed it all off with hardware wiring with the screws/washers. I can still close it off using the door, especially when the weather gets bad. This is the north side where the worst of the weather comes in. When I put the roof on, I left a good overhang on the north and south sides.
Went in to see what I could do on the inside. I covered the boxes with a slanted board but I found that as soon as the ladies got in there..they wanted to and did roost up there sooo.. I redid it and adjusted the hinges to the higher support and blocked off the nest just in case....this time it worked. Of course they had to try it out and looked like they were coming off a snow skiing ramp.. Of course I had to decorate it!
On to the run....too hot to be inside the coop. It was during this time that I was diagnosed with Rocky Mountain Spotted Fever... NOT GOOD!! if it hadn't been for my two grands coming down from Virginia (Olen and Scarlet)...I would not have made it through that part...Just didn't have the full gallon of energy to work with.. Wish they could have both been here longer !
The only way I could do the run was to tear out all the chicken wire and I tried to redesign the run and square it up.....didn't do that very well. I also didn't know how to use hole diggers so I used shovels. 2 foot down, set the post in the hole (thru the cement block)...used my level and the block while I poured 40 lb of quickcrete in the hole and just added water. Left it a couple of days and broke the block and filled dirt in. That tree line over there...has poison ivy in it!

Created a door....too wobbly...decontructed...redesigned...reconstructed..set it between gate poles, and
hung it.!! This has a layer of wire on both inside and outside. Took suggestion of BYC and put the diagonal board in. Sure helped sturdiness.. Next layer of wiring went up, post trimmed with "that" saw. Then 2/4's as cross beams to support netting. Used support brackets...loved them.
Laying pavers over my wire...physically could not do the digging to bury it.. They will be solid around the perimeter. Already lined the coop with these.
Netting up...pop door is POPPED !!! I still have green grass at this point! LOL
Very suspicious of having freedom !
Didn't take them long. My Older EE took the lead....as always.
And of course it started raining but they sure didn't mind!! In these picts I still have to put up the fencing boards to secure the wire levels to. How did it end up design-wise... Change of thought! I'm going to use strands of wire to weave/sew the wire layers together. My husband's idea! He even showed me how it should be done. LOL.... he didn't do it for me or help me! Wish he would because I could work on one section while he worked on another!
If you look closely you can see the RSL ladies all like to be together along with the BSL...But that EE roo (on the other end) is having a hard time deciding where he is going to stay for the night. He was so funny,,,walked back and forth on that roost. (He didn't know he would be rehomed soon anyway or he might not have too worried about being cozy with any of the ladies!) I really think he knew I had changed everything around for them (the 3 roosts).
Something new to the girls this weekend... first, I took out all 3 of the roosts. I had 3 because when they were young, they were unable to fly to one higher than my nesting boxes and I didn't want them sleeping in those boxes. I also had been knocking myself in the head every time I didn't pay attention! I readjusted the one long roost to parallel the long wall (about a foot from the wall.) That has given me a lot more head room as I clean. I'll post a redesigned floor plan shortly.
Next came some cleaning. Love my sand and here is the reason.... Doesn't take long and all I have to add is some PDZ when I finish.
Since it was cooler today, I slipped back out to the coop when my dh went to a church meeting and began little bits of work on the inside. When I laid my original plywood flooring, the guy who was helping me layered some chicken wire under it. Tonight I took my staple gun in there and secured the poultry wire to the beams/walls which wasn't done yet. I had measured and cut a few feed bags to put in between the framework of the walls. Had been thinking about the wintertime. Our worse weather comes from the north or the south. Since my coop is "well ventilated" due to the boards being old and slightly warped, I thought I would take a cheap way out when insulating. I know I need good ventilation but I didn't want their feathers blown off! LOL Sooooo,,, here is an example of my decorations/insulation..LOL


 They have a motion detector light which means that light will be going out any minute! I just put them to bed.
Here's hoping for an egg tomorrow!!
They have a motion detector light which means that light will be going out any minute! I just put them to bed.
Here's hoping for an egg tomorrow!!

here due to chicken math! Rehomed the 2 roos and Lordy....came back with 2 replacement pullets.....+ 2 extra!! Ok,,,,,had to add a P.S.

For all the work and rebuilding and that long learning curve....I loved every minute of this project..including all the sweat, bruises, etc...I can actually say that "I did it almost all by myself with my grands. What a trip!!". I never have taken on such a project and NEVER thought I could physically complete it without begging for help! Yes, I'm proud of me and so very proud of my grands for their help!

UPDATE WITH SURPRISES !!!
Within the last 2 weeks, all but one of my ladies have finally begun their laying....which in itself isn't a surprise is it? However, I thought I had only 2 EE's (older), along with 4 BSL's and 3 RSL's. Now this part of the real chicken math did NOT add up to me. I've been confused for the last 3 days. I'll show you a picture of the eggs gathered yesterday,,,,when you look at this, remember I dropped a brown egg and then there is one with arrows on it that got cracked at the same time. I should have (according to my expectations) 2 EE eggs, and the rest shades of browns.(remember that 1 pullet is not laying at the moment) WELL, HERE IT IS!
What a great surprise this is !!!!