The Winchester Chicken House
This is a story that has to start with a preceding story. It needs sort of a “prequel” so to say.
There's a big fancy house in the San Jose that was built in the late 1800s by a lady named Sarah Winchester. She was the daughter of Oliver Winchester of the Winchester rifle fame. She was quite wealthy.
She believed in the after life and of things in between. Once she went to a fortune teller who told her that she could see that Sarah was doing a lot of construction on her house and that was good. However there was a lot of bad to go along with it too. Sarah was told that, upon completion of the work, she was going to die!
Needless to say, Sarah didn't take this too well. So, she decided the safest path to take was to never finish the work going on. As a result the house had additional stories added, and then removed. Rooms added, just to be torn down. There's a stairway that just goes up into the corner of a room with no outlet. There's a door with a solid brick wall two inches on the other side.
How does this relate? Well my family is convinced that my chicken coop will never be complete although the work never ends! It has been named by them - “The Winchester Chicken House”.

The whole saga started off as a simple idea. Build a small chicken tractor and get 3 or 4 baby chicks. A trip to a local feed store in Auburn Alabama netted me four little peeps. Two Buff Orpingtons and two Black Australorps. I was on my way. Now I needed someplace to put them after they outgrew the cardboard box I brought them home in.
So I read and read on the BYC forums everything I could find on chicken tractors. Then I started building. Unfortunately, light weight and light duty are concepts I have never mastered. And after an attack on the tractor by a family of raccoons, The tractor started resembling Fort Knox.
Here's how it started out in my workshop.
As it lived outdoors and the raccoons showed up, it became heavier and more fortified.
With the final result being it was so heavy I had to move it with a real tractor. And I almost turned it over several times moving it. About this time the concept of it becoming a permanent, fixed mounted coop came to the surface. So I poured a 4” concrete slab and mounted the ex-chicken tractor in its permanent new home under some big shady trees.
So I set the new coop on the pad and felt much better. Nothing could tunnel under them now! However, I was still seduced by the concept of free ranging them. To make a long story short – after a month of free ranging, none of them came home one night! I never saw feather or fur of them ever again. I was heart broken.
So after a short while to recover from the loss, I decided to get more chickens. And I decided they had to be Orpingtons as I liked them so much. And they would never be let out in harms way again!
So I added a 10X10 play room for the newcomers. It has 2X4 field wire fence on all sides and the top with 1/2” hardware cloth and 1” chicken wire covering the bottom 2' to prevent reach-through attacks. It also extends two feet out to the sides to discourage tunneling. Corner posts are 4X4X8 foot and set into concrete. I have a 12” auger drill for the back of my tractor so the posts are solid!
I found a great BYC member, Kimberly 35042, who lives up near Birmingham Al and she had 8 hatchling Blue Orpingtons for sale. I jumped on the offering and drove up to her farm and brought home all 8.
They spent the first couple of weeks in the barn in a big plastic tub while I finished the addition to the coop.
I built it so there's a closeable door in between the coop and the play yard. This allowed more control and the ability to segregate them into groups if needed.
The upper part of the coop is about 3 feet wide and four feet long and two feet tall. Not big enough for all these Blorps when they grow up!
BTW – it gets really hot here in the summer. The coop has a double roof. There's a sheet of plywood with roofing felt and shingles on it. Over that are three 2X2s nailed down and then on top of that is a tin roof. This leaves a two inch airspace between the two roofs for air to circulate through. This dropped the inside temperature by 10 to 15 degrees. Ignore the junk sitting on top of the roof!
Since I decided the coop was too small, guess what I did? Yep – I poured another concrete pad. I hate raccoons! I just killed number eight today!
This one is in the south west corner of the play yard. In this view you can see a cedar trunk I added for the Blorps to climb on when they're bored.
The new addition was to be 4X4X8 tall. Like a guard tower. This was to be divided into two 4X4X4 cubes. The top one would be the new coop and the bottom would be a storage area and a “Chow Hall” for the Blorps.
There's also a two foot wide skirt of hardware cloth around the Play Yard with lots of concrete blocks sitting on it to discourage diggers.
Construction was standard tip-up wall frames covered in OSB board. This next photo shows the East wall, It will have opening doors both top and bottom. The top will be to clean out the coop and the bottom is for taking care of the girls dining room. I wanted them to have a sheltered, all weather area for eating.
The next photo is the North wall or front of the coop annex. It faces into the play yard and the upper opening will have a ramp board up to it. The upper area will be the roost coop. The old ex-tractor will become the nest box area and an area for quarantining birds for whatever reason.
There's no photos of the actual construction. We just got moving and by the time I thought of pictures, it was too late.
However, here are pictures of the almost completed Tower of Babble as I call it. This comes from the fact that I can't understand a word the chickens say!
Here's the west side showing the 16 inch deep storage section. In it are a bucket of scratch and a bucket of feed plus some jugs of water. This makes stocking the coop much easier.
This is the other side of the lower level - the Chow Hall! Here's the feeder, water and dispensers for grit and oyster shell. As the chicks are only 9 weeks old, the oyster shell dispenser is capped off.
Here we have the East view with the chow hall closed and the root area open. The roost area is unfinished at this point.
This is the North view. The lower door goes into the Chow Hall and the upper door is closed off. There will be a walk up ramp to it when it opens.
The Blorps have been growing so rapidly that I've been having to double up on my build time here. Here's a shot of the Penthouse with the doors finally on.
And one of the inside with the chicken ladder and two 4' roost bars installed. I also cut out the entryway door for them.
About all I have to do now is build the outside entry ramp and the Blorps can move in!
and now I have the "Stairway To The Stars" finished. It's move-in day for the Blorps.
So far, lots of walking up the ramp and peeking in. Nobody has braved actually entering yet!
Well - I've locked the Blorps out of the old (too small) coop portion. This morning I found a fair amount of poop in the new "Penthouse" so it looks like they are making the move. After a period of lock-out, and when they get old enough to lay, I'll open that part up and try to make it the nest box coop. Hope the Blorps see it that way!
To be continued!
This is a story that has to start with a preceding story. It needs sort of a “prequel” so to say.
There's a big fancy house in the San Jose that was built in the late 1800s by a lady named Sarah Winchester. She was the daughter of Oliver Winchester of the Winchester rifle fame. She was quite wealthy.
She believed in the after life and of things in between. Once she went to a fortune teller who told her that she could see that Sarah was doing a lot of construction on her house and that was good. However there was a lot of bad to go along with it too. Sarah was told that, upon completion of the work, she was going to die!
Needless to say, Sarah didn't take this too well. So, she decided the safest path to take was to never finish the work going on. As a result the house had additional stories added, and then removed. Rooms added, just to be torn down. There's a stairway that just goes up into the corner of a room with no outlet. There's a door with a solid brick wall two inches on the other side.
How does this relate? Well my family is convinced that my chicken coop will never be complete although the work never ends! It has been named by them - “The Winchester Chicken House”.
The whole saga started off as a simple idea. Build a small chicken tractor and get 3 or 4 baby chicks. A trip to a local feed store in Auburn Alabama netted me four little peeps. Two Buff Orpingtons and two Black Australorps. I was on my way. Now I needed someplace to put them after they outgrew the cardboard box I brought them home in.
So I read and read on the BYC forums everything I could find on chicken tractors. Then I started building. Unfortunately, light weight and light duty are concepts I have never mastered. And after an attack on the tractor by a family of raccoons, The tractor started resembling Fort Knox.
Here's how it started out in my workshop.
As it lived outdoors and the raccoons showed up, it became heavier and more fortified.
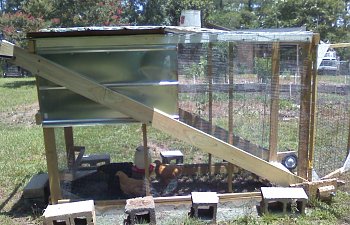
With the final result being it was so heavy I had to move it with a real tractor. And I almost turned it over several times moving it. About this time the concept of it becoming a permanent, fixed mounted coop came to the surface. So I poured a 4” concrete slab and mounted the ex-chicken tractor in its permanent new home under some big shady trees.
So I set the new coop on the pad and felt much better. Nothing could tunnel under them now! However, I was still seduced by the concept of free ranging them. To make a long story short – after a month of free ranging, none of them came home one night! I never saw feather or fur of them ever again. I was heart broken.
So after a short while to recover from the loss, I decided to get more chickens. And I decided they had to be Orpingtons as I liked them so much. And they would never be let out in harms way again!
So I added a 10X10 play room for the newcomers. It has 2X4 field wire fence on all sides and the top with 1/2” hardware cloth and 1” chicken wire covering the bottom 2' to prevent reach-through attacks. It also extends two feet out to the sides to discourage tunneling. Corner posts are 4X4X8 foot and set into concrete. I have a 12” auger drill for the back of my tractor so the posts are solid!
I found a great BYC member, Kimberly 35042, who lives up near Birmingham Al and she had 8 hatchling Blue Orpingtons for sale. I jumped on the offering and drove up to her farm and brought home all 8.
They spent the first couple of weeks in the barn in a big plastic tub while I finished the addition to the coop.
I built it so there's a closeable door in between the coop and the play yard. This allowed more control and the ability to segregate them into groups if needed.
The upper part of the coop is about 3 feet wide and four feet long and two feet tall. Not big enough for all these Blorps when they grow up!
BTW – it gets really hot here in the summer. The coop has a double roof. There's a sheet of plywood with roofing felt and shingles on it. Over that are three 2X2s nailed down and then on top of that is a tin roof. This leaves a two inch airspace between the two roofs for air to circulate through. This dropped the inside temperature by 10 to 15 degrees. Ignore the junk sitting on top of the roof!
Since I decided the coop was too small, guess what I did? Yep – I poured another concrete pad. I hate raccoons! I just killed number eight today!
This one is in the south west corner of the play yard. In this view you can see a cedar trunk I added for the Blorps to climb on when they're bored.
The new addition was to be 4X4X8 tall. Like a guard tower. This was to be divided into two 4X4X4 cubes. The top one would be the new coop and the bottom would be a storage area and a “Chow Hall” for the Blorps.
There's also a two foot wide skirt of hardware cloth around the Play Yard with lots of concrete blocks sitting on it to discourage diggers.
Construction was standard tip-up wall frames covered in OSB board. This next photo shows the East wall, It will have opening doors both top and bottom. The top will be to clean out the coop and the bottom is for taking care of the girls dining room. I wanted them to have a sheltered, all weather area for eating.
The next photo is the North wall or front of the coop annex. It faces into the play yard and the upper opening will have a ramp board up to it. The upper area will be the roost coop. The old ex-tractor will become the nest box area and an area for quarantining birds for whatever reason.
There's no photos of the actual construction. We just got moving and by the time I thought of pictures, it was too late.
However, here are pictures of the almost completed Tower of Babble as I call it. This comes from the fact that I can't understand a word the chickens say!

Here's the west side showing the 16 inch deep storage section. In it are a bucket of scratch and a bucket of feed plus some jugs of water. This makes stocking the coop much easier.
This is the other side of the lower level - the Chow Hall! Here's the feeder, water and dispensers for grit and oyster shell. As the chicks are only 9 weeks old, the oyster shell dispenser is capped off.
Here we have the East view with the chow hall closed and the root area open. The roost area is unfinished at this point.
This is the North view. The lower door goes into the Chow Hall and the upper door is closed off. There will be a walk up ramp to it when it opens.
The Blorps have been growing so rapidly that I've been having to double up on my build time here. Here's a shot of the Penthouse with the doors finally on.
And one of the inside with the chicken ladder and two 4' roost bars installed. I also cut out the entryway door for them.
About all I have to do now is build the outside entry ramp and the Blorps can move in!
and now I have the "Stairway To The Stars" finished. It's move-in day for the Blorps.
So far, lots of walking up the ramp and peeking in. Nobody has braved actually entering yet!
Well - I've locked the Blorps out of the old (too small) coop portion. This morning I found a fair amount of poop in the new "Penthouse" so it looks like they are making the move. After a period of lock-out, and when they get old enough to lay, I'll open that part up and try to make it the nest box coop. Hope the Blorps see it that way!

To be continued!