Most of us would agree that baby chicks are one of the cutest things on earth. We eagerly await hatch day so we can welcome little fuzzy bundles of life into our homes. The anticipation of seeing those new chicks after weeks of waiting often overrides our ability to think about anything else.
If you have hatched enough chicks, you know everything does not always go perfectly. Inevitably, the time will come when you have a chick that hatches with problems or defects. What do you do with the chick? Is it something that can be saved? How do you make the decision?
This is the story of an adorable little ball of fluff that hatched in 2015. Her mom is a Red Sexlink, who is one of the best laying hens I have ever owned. Her dad is an Easter Egger. She hatched in an incubator on day 22 just like many of her brothers and sisters. I had borrowed a hatcher from someone, and it didn’t hold the temperature consistently. As a result, some of the chicks hatched later than usual. I would later find out that this was only the beginning to my problems.
After moving the yellow chick to the brooder, it was noticed that she never tried to walk. The other chicks were running over the top of her while eating and chirping. Yellow chick would lift its head, but then put it back down again and never attempted to get up. Some chicks need a few hours to get their legs working correctly, so I let her rest.
As the day progressed, I was convinced there was something wrong with the chick. I tried to make her stand, but she would collapse into the bedding of her brooder. Automatically we run through all the possibilities in our heads. What is wrong with this chick? Will she be able to learn to stand? What steps do I take to help her?
Slipped tendons
The most common form of leg problems in chicks is splay leg. Assuming this must be the culprit, I fashioned little leg hobbles out of Band-Aids and affixed them to baby chick’s legs. Still, she did not stand. “Maybe she needs more time,” I thought to myself.
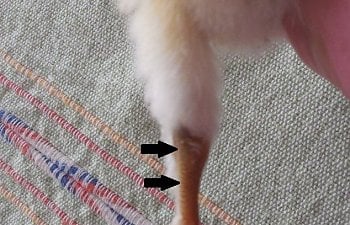
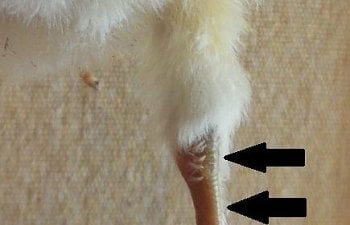
I asked a friend of mine who has experience with leg problems in chicks. She told me to check into slipped tendons. Perosis is the medical term for slipped tendons; it is fairly easy to diagnosis. If you straighten the chick’s leg, the Achilles tendon will run along the back of the hock joint. It is the structure that holds the chick’s leg straight when it is standing. In a bird with a slipped tendon, the tendon itself does not stay in place on the back of the leg, thus preventing the chick from straightening its leg or standing. If you straighten the leg, you can feel the tendon rolling around to the inside of the leg. It feels like a thick rubber band. When you put it back into place it will stay there temporarily, but it will roll off to the side when the chick bends its leg.

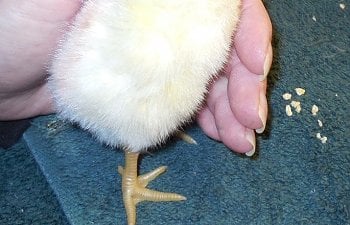
This is a normal chick showing correct placement of the Achilles tendons. (click on pics to see larger version)
Sure enough, my chick had slipped tendons. Not only did the condition affect one leg, but she had it in both legs. Off I went to Backyard Chicken Forum to find a solution to my problem. By this time it was the middle of the night; I was tired and had to get up early for work the next morning. The more I read on BYC, the more discouraged I became. There were stories of people rehabilitating chicks with one slipped tendon, but never two. The problem had to be correct in the first 24 hours or it would surely be too late. The chick hatched early in the morning, so I was already short on time.
The verdict was that I would need to splint both legs, and then the chick would have to live suspended in a sling, or chick chair, for five days while the legs had time to mend. I was fairly confident that I could splint the legs, but I wasn’t sure I could produce a chick-sized sling in the middle of the night.
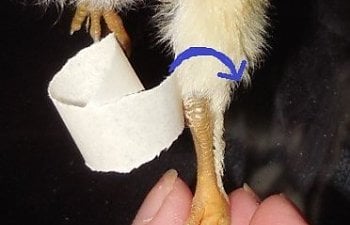
Using narrow strips of masking tape, I wrapped each leg in the same way you would apply a wrap to a horse’s leg. Holding each leg straight, I pushed the tendon up onto the back of the hock. Starting on the inside of the leg, I applied the masking tape fairly snuggly, going over the back of the leg, the outside, and then the front. The purpose of the wrap was two-fold: to keep the tendon in place, and to keep the chick’s legs in a straightened position.
Start the tape on the inside of the leg. Pull it around the back of the leg so it holds the tendon in place.
When applying the tape, wrap far enough above and below the joint to prevent the leg from bending. Some of the chick's feathers will be pulled out when you remove the tape, but that is a small price to pay for being able to walk later.
Designing a Chick Chair
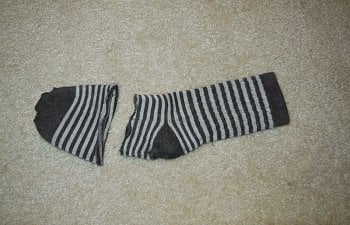
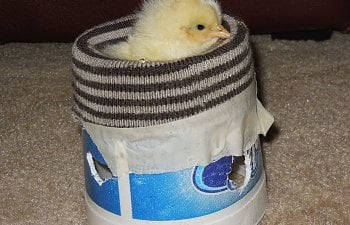
The next step was the chick chair, aka sling. I googled photos of ornate contraptions that surely were designed by skilled engineers. How was I ever going to come up with something suitable and safe? I started to think of fabric around the house that could comfortably support a newly hatched chick. Then I remembered one of my favorite wool socks that had developed a hole in the heel. Since I didn’t have the heart to throw it out just yet, it was tucked in the dresser drawer awaiting its final destiny. The sock was then cut in half, leaving just the toe and foot to serve as a base for the sling. In the toe of the sock two small holes were cut for the chick’s legs, and a third for its tail (even sick chicks have to use the bathroom). Now I needed a structure for hanging the sling. A Styrofoam drink cup from the local convenience store was perfect. The bottom of the cup was cut off to allow for good air flow and circulation. With the little chick placed in the sling, the top of the sock was stretched over the neck of the cup and secured with masking tape. The entire sling mechanism was then taped to the wall of the brooder so that it did not tip over.
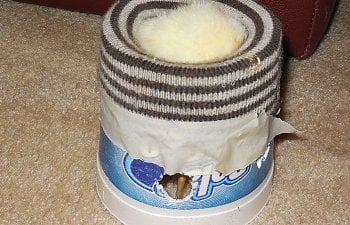
Old sock saves the day.
Two legs and a tail ready for the chick chair.
There are some variables to consider should you ever have to make a sling for one of your chicks.
1. 1, The sling must be tall enough so that the injured chick’s feet cannot touch the ground.
2. 2. The sling must also be tall enough so that other chicks do not jump up to bother or peck the immobilized chick.
3. 3. Since the chick needs an adequate amount of heat, the sling must be placed in the brooder so that the
chick is not too hot or too cold.
4. 4. The chicks should be able to reach food and water from the sling. (There are some great photos online showing
how to attach food and water cups to the chick chair).
5. 5. If your chick chair is top heavy like mine was, be sure to secure it so it does not fall over and injury the chick or
squish any of its hatch-mates.
First moments in the chair.
Taking a nap.
It is also very important to check the chick’s feet while the legs are splinted. If the toes are discolored, cold, or swollen, the wraps are too tight and must be removed. My chick’s toes were checked several times a day and I made sure she was able to move them as well. During her checks I also offered her food and water and encouraged her to eat.
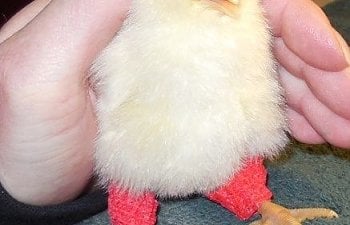
After more reading, I noticed people recommending the legs be wrapped in a slightly bent position. This allows the tendon to stretch while the legs are healing. Since I didn’t know if my wraps were working anyway, I decided to remove them after 24 hours. The chick lost some leg down while removing the tape, but in the end I was pleased that the tendons were in place and the chick seemed to be on the mend. The second time I wrapped the chick’s legs in vet wrap since it would be less damaging to the skin and feathers when it was removed. The legs were in a slightly bent position; the chick could not bend them fully with the wraps on.
Able to stand after 24 hours in wraps.
New wraps with vet wrap.
The recommendation for slipped tendons is to keep the chick in the sling for five days. My original sling was already too short to work properly. I made a taller one out of another Styrofoam cup. Before I knew it, she was climbing out of the cup and tumbling to the brooder floor below. I tried to tape her in the sling, but nothing worked. I finally decided that if she was fit enough to escape from the sling, she was well enough to be in the brooder with other chicks. She was only in the sling for three days, but she was able to stand and walk on her own so it seemed she didn’t need to be in there anymore.
I was thrilled that the chick was apparently healing and was going to live. Now she needed a name. Since she needed braces on her legs to be able to walk, the name Forrest Gump seemed fitting.
Not eating - what now?
At this point I moved most of the chicks to a different brooder so they wouldn’t be bothering Forrest. She was still very small for her age and the other chicks easily knocked her over. I kept her in the original brooder with some chicks that were small and docile.
While Forrest was walking well already, I noticed she had not picked up the knack of eating on her own. She would eat if I put food in her beak, but would not seek it out on her own. Now I wondered if I had somehow messed her up developmentally. Did she miss a crucial time in her life where she needed to learn to eat? Would it be too late for her to learn?
For days I brought Forrest out to the living room with a specially prepared bowl of food. She would peck at the air, or the table, but never seemed to connect with the food. It was touch and go for about 10 days while she failed to gain weight. She was being force fed rice, vegetables, egg and bits of chick starter, but it was impossible to get enough food down her daily so she would gain sufficient weight. At this point we weren’t sure if Forrest was “special” or if she was blind, but her chances of survival were not looking bright.
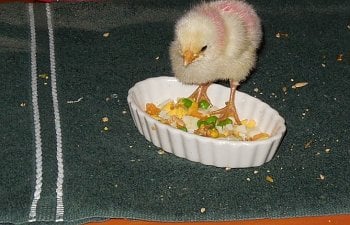
Forrest and her bowl of food.
Finally, one day Forrest learned how to scratch the ground. This seemed to trigger something inside her soul that made her peck and eat from her bowl full of treats. After this day, she became a voracious eater and began gaining weight rapidly.
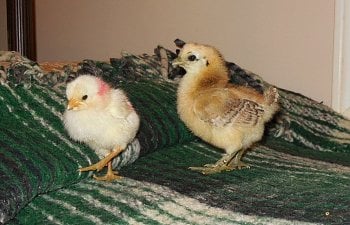
Still a lot smaller than her hatch-mates. Forrest at 10 days old with a silkie cross chick.
Raising a blind chick
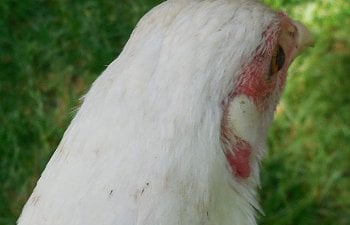
Although she was eating, it became obvious that Forrest was not developing normally. She did not fly like other chicks, or flap her wings, or move around very much like her brothers and sisters. Despite all our work to allow Forrest to survive, we determined that she was almost completely blind. She could see a tiny bit out of her left eye, which allowed her to follow movement and see bright colors like red and orange, but everything else was a blur to her. As she grew larger, it became more noticeable that her eyes actually bulge from her head in an abnormal fashion. Now we wondered how we would be able to keep a blind chicken in the flock (back to BYC I went to find some answers).
Forrest’s eyes are abnormal and bulge out from her head.
As a teacher, I was sure there would be a way to help Forrest prosper. She had daily time out of the brooder with her sisters as a form of occupational therapy. She would have to climb up and down the back of the couch and navigate the edges of the coffee table. She learned to follow the voices of her sisters, and to check with her feet and beak before falling off of the edge of the furniture. Their food was always placed in a ceramic dish so Forrest could hear the sound of her sisters’ beaks tapping on the bowl.
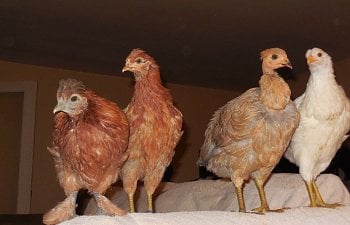
The Fabulous Four on the back of the couch.
Forrest did so well that pretty soon she was almost five months old and it was time to move her outside. Would she learn how to free range and live outdoors? How would she react to having a rooster around? When Forrest and her sisters first went outside, it was obvious that she enjoyed it. For whatever reason, she loved tarps. She would walk on them, crawl under them, and peck them to make all sorts of noise.
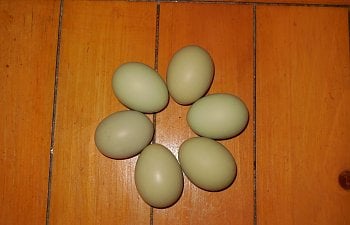
A new coop was constructed for Forrest, complete with low roosting bars and handicapped accessible nest boxes with a ramp. After some coaching, she learned how to navigate the coop with ease. Forrest also found her favorite nest box and started laying the most beautiful green eggs I’ve ever seen.
Gorgeous green eggs.
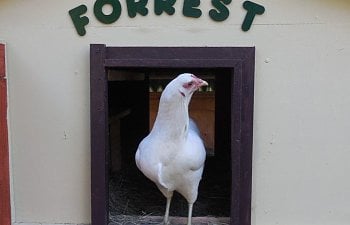
Forrest in her coop.
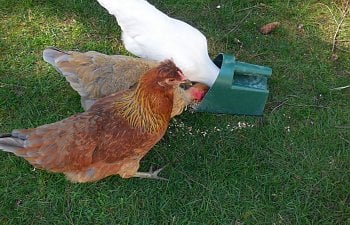
Outside, Forrest is almost like a normal chicken. She free ranges, nibbles on grass, and digs in the moss for invertebrates. Extra time had to be taken to show Forrest how to do things that most chicks learn to do on their own, such as climbing a ramp or eating off the ground. It helped to have her sisters there to show her new things when she was unsure. Over about a two week period, she learned how to eat scratch grains off the ground. We started by putting the food in a plastic grain scoop. We would tap on it (or one of her sisters would do it for us). Forrest could hear them eating and would come over to peck at the grain scoop. After a few days, we would lay the scoop on the ground while she ate. Eventually the scoop was moved away, and Forrest realized she could eat directly from the ground. She does need to have her food in a pile or in a dish since she can’t see to eat individual pieces of food off the ground.
Eating scratch out of the gain scoop with her sisters.
Forrest loves to roam around the yard and will visit the neighbor’s house as well. She even enjoys flapping her wings as she scurries around the yard while we yell “Run, Forrest, run!”
Forrest’s future
Having a special needs chicken can be very rewarding, but it isn’t for everyone. Raising a chick that has physical limitations takes time and dedication from day one. If I had thought at any point that Forrest's quality of life would be poor, we would have culled her. Looking out in the yard today, you wouldn’t notice Forrest is any different than any of the other chickens (except for the fact that she is constantly under your feet trying to trip you).
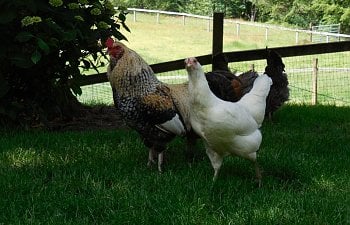
Forrest has made new friends in her coop, which she shares with a rooster and seven other hens. We worried that she would be picked on by the older hens because she is different. Since Forrest and her sisters occupied the coop before we added the older birds, the younger pullets had already established it as their territory. With a little bit of forethought and planning, birds can be introduced to the coop with little or no drama.
Forrest’s rooster helps protect her and finds food to share with her.
I would also like to note that since we don’t know the cause of Forrest’s problems, her eggs will never be used for hatching. If the root is genetic, we wouldn’t want to pass her disabilities on to other chicks. Forrest will live out her life as a layer on the farm and have as much fun as she possibly can.
2018 update: While it was a truly invaluable experience having Forrest in the flock, we all know that chickens have an expiration date that is often much sooner than we would like. In 2017 Forrest's eyes experienced significant changes and I could tell her limited vision was becoming worse. In June, she stopped free ranging with her sisters and eventually she wouldn't come out of the coop at all. It seemed that the lights had gone out completely and she thought it was night all the time. She was unable to eat since she couldn't see her food. The difficult decision was made to have Forrest cross the rainbow bridge peacefully. In the end, it was probably for the best since a big move was coming up, and I don't think she would have adjusted well to a new environment. The move was completed last fall, and sadly Forrest's coop was disassembled and re-purposed.
Forrest didn't quite make it to her second birthday, but the time she had with us was priceless. Currently there is a new baby in the brooder with a crooked leg that i'm hoping can be fixed as a result of everything Forrest taught us. Her message would be to always try to help, but be humane and compassionate in the end.
If you have hatched enough chicks, you know everything does not always go perfectly. Inevitably, the time will come when you have a chick that hatches with problems or defects. What do you do with the chick? Is it something that can be saved? How do you make the decision?
This is the story of an adorable little ball of fluff that hatched in 2015. Her mom is a Red Sexlink, who is one of the best laying hens I have ever owned. Her dad is an Easter Egger. She hatched in an incubator on day 22 just like many of her brothers and sisters. I had borrowed a hatcher from someone, and it didn’t hold the temperature consistently. As a result, some of the chicks hatched later than usual. I would later find out that this was only the beginning to my problems.
After moving the yellow chick to the brooder, it was noticed that she never tried to walk. The other chicks were running over the top of her while eating and chirping. Yellow chick would lift its head, but then put it back down again and never attempted to get up. Some chicks need a few hours to get their legs working correctly, so I let her rest.
As the day progressed, I was convinced there was something wrong with the chick. I tried to make her stand, but she would collapse into the bedding of her brooder. Automatically we run through all the possibilities in our heads. What is wrong with this chick? Will she be able to learn to stand? What steps do I take to help her?
Slipped tendons
The most common form of leg problems in chicks is splay leg. Assuming this must be the culprit, I fashioned little leg hobbles out of Band-Aids and affixed them to baby chick’s legs. Still, she did not stand. “Maybe she needs more time,” I thought to myself.
I asked a friend of mine who has experience with leg problems in chicks. She told me to check into slipped tendons. Perosis is the medical term for slipped tendons; it is fairly easy to diagnosis. If you straighten the chick’s leg, the Achilles tendon will run along the back of the hock joint. It is the structure that holds the chick’s leg straight when it is standing. In a bird with a slipped tendon, the tendon itself does not stay in place on the back of the leg, thus preventing the chick from straightening its leg or standing. If you straighten the leg, you can feel the tendon rolling around to the inside of the leg. It feels like a thick rubber band. When you put it back into place it will stay there temporarily, but it will roll off to the side when the chick bends its leg.
This is a normal chick showing correct placement of the Achilles tendons. (click on pics to see larger version)
Sure enough, my chick had slipped tendons. Not only did the condition affect one leg, but she had it in both legs. Off I went to Backyard Chicken Forum to find a solution to my problem. By this time it was the middle of the night; I was tired and had to get up early for work the next morning. The more I read on BYC, the more discouraged I became. There were stories of people rehabilitating chicks with one slipped tendon, but never two. The problem had to be correct in the first 24 hours or it would surely be too late. The chick hatched early in the morning, so I was already short on time.
The verdict was that I would need to splint both legs, and then the chick would have to live suspended in a sling, or chick chair, for five days while the legs had time to mend. I was fairly confident that I could splint the legs, but I wasn’t sure I could produce a chick-sized sling in the middle of the night.
Using narrow strips of masking tape, I wrapped each leg in the same way you would apply a wrap to a horse’s leg. Holding each leg straight, I pushed the tendon up onto the back of the hock. Starting on the inside of the leg, I applied the masking tape fairly snuggly, going over the back of the leg, the outside, and then the front. The purpose of the wrap was two-fold: to keep the tendon in place, and to keep the chick’s legs in a straightened position.
Start the tape on the inside of the leg. Pull it around the back of the leg so it holds the tendon in place.
When applying the tape, wrap far enough above and below the joint to prevent the leg from bending. Some of the chick's feathers will be pulled out when you remove the tape, but that is a small price to pay for being able to walk later.
Designing a Chick Chair
The next step was the chick chair, aka sling. I googled photos of ornate contraptions that surely were designed by skilled engineers. How was I ever going to come up with something suitable and safe? I started to think of fabric around the house that could comfortably support a newly hatched chick. Then I remembered one of my favorite wool socks that had developed a hole in the heel. Since I didn’t have the heart to throw it out just yet, it was tucked in the dresser drawer awaiting its final destiny. The sock was then cut in half, leaving just the toe and foot to serve as a base for the sling. In the toe of the sock two small holes were cut for the chick’s legs, and a third for its tail (even sick chicks have to use the bathroom). Now I needed a structure for hanging the sling. A Styrofoam drink cup from the local convenience store was perfect. The bottom of the cup was cut off to allow for good air flow and circulation. With the little chick placed in the sling, the top of the sock was stretched over the neck of the cup and secured with masking tape. The entire sling mechanism was then taped to the wall of the brooder so that it did not tip over.
Old sock saves the day.
Two legs and a tail ready for the chick chair.
There are some variables to consider should you ever have to make a sling for one of your chicks.
1. 1, The sling must be tall enough so that the injured chick’s feet cannot touch the ground.
2. 2. The sling must also be tall enough so that other chicks do not jump up to bother or peck the immobilized chick.
3. 3. Since the chick needs an adequate amount of heat, the sling must be placed in the brooder so that the
chick is not too hot or too cold.
4. 4. The chicks should be able to reach food and water from the sling. (There are some great photos online showing
how to attach food and water cups to the chick chair).
5. 5. If your chick chair is top heavy like mine was, be sure to secure it so it does not fall over and injury the chick or
squish any of its hatch-mates.
First moments in the chair.
Taking a nap.
It is also very important to check the chick’s feet while the legs are splinted. If the toes are discolored, cold, or swollen, the wraps are too tight and must be removed. My chick’s toes were checked several times a day and I made sure she was able to move them as well. During her checks I also offered her food and water and encouraged her to eat.
After more reading, I noticed people recommending the legs be wrapped in a slightly bent position. This allows the tendon to stretch while the legs are healing. Since I didn’t know if my wraps were working anyway, I decided to remove them after 24 hours. The chick lost some leg down while removing the tape, but in the end I was pleased that the tendons were in place and the chick seemed to be on the mend. The second time I wrapped the chick’s legs in vet wrap since it would be less damaging to the skin and feathers when it was removed. The legs were in a slightly bent position; the chick could not bend them fully with the wraps on.
Able to stand after 24 hours in wraps.
New wraps with vet wrap.
The recommendation for slipped tendons is to keep the chick in the sling for five days. My original sling was already too short to work properly. I made a taller one out of another Styrofoam cup. Before I knew it, she was climbing out of the cup and tumbling to the brooder floor below. I tried to tape her in the sling, but nothing worked. I finally decided that if she was fit enough to escape from the sling, she was well enough to be in the brooder with other chicks. She was only in the sling for three days, but she was able to stand and walk on her own so it seemed she didn’t need to be in there anymore.
I was thrilled that the chick was apparently healing and was going to live. Now she needed a name. Since she needed braces on her legs to be able to walk, the name Forrest Gump seemed fitting.
Not eating - what now?
At this point I moved most of the chicks to a different brooder so they wouldn’t be bothering Forrest. She was still very small for her age and the other chicks easily knocked her over. I kept her in the original brooder with some chicks that were small and docile.
While Forrest was walking well already, I noticed she had not picked up the knack of eating on her own. She would eat if I put food in her beak, but would not seek it out on her own. Now I wondered if I had somehow messed her up developmentally. Did she miss a crucial time in her life where she needed to learn to eat? Would it be too late for her to learn?
For days I brought Forrest out to the living room with a specially prepared bowl of food. She would peck at the air, or the table, but never seemed to connect with the food. It was touch and go for about 10 days while she failed to gain weight. She was being force fed rice, vegetables, egg and bits of chick starter, but it was impossible to get enough food down her daily so she would gain sufficient weight. At this point we weren’t sure if Forrest was “special” or if she was blind, but her chances of survival were not looking bright.
Forrest and her bowl of food.
Finally, one day Forrest learned how to scratch the ground. This seemed to trigger something inside her soul that made her peck and eat from her bowl full of treats. After this day, she became a voracious eater and began gaining weight rapidly.
Still a lot smaller than her hatch-mates. Forrest at 10 days old with a silkie cross chick.
Raising a blind chick
Although she was eating, it became obvious that Forrest was not developing normally. She did not fly like other chicks, or flap her wings, or move around very much like her brothers and sisters. Despite all our work to allow Forrest to survive, we determined that she was almost completely blind. She could see a tiny bit out of her left eye, which allowed her to follow movement and see bright colors like red and orange, but everything else was a blur to her. As she grew larger, it became more noticeable that her eyes actually bulge from her head in an abnormal fashion. Now we wondered how we would be able to keep a blind chicken in the flock (back to BYC I went to find some answers).
Forrest’s eyes are abnormal and bulge out from her head.
As a teacher, I was sure there would be a way to help Forrest prosper. She had daily time out of the brooder with her sisters as a form of occupational therapy. She would have to climb up and down the back of the couch and navigate the edges of the coffee table. She learned to follow the voices of her sisters, and to check with her feet and beak before falling off of the edge of the furniture. Their food was always placed in a ceramic dish so Forrest could hear the sound of her sisters’ beaks tapping on the bowl.
The Fabulous Four on the back of the couch.
Forrest did so well that pretty soon she was almost five months old and it was time to move her outside. Would she learn how to free range and live outdoors? How would she react to having a rooster around? When Forrest and her sisters first went outside, it was obvious that she enjoyed it. For whatever reason, she loved tarps. She would walk on them, crawl under them, and peck them to make all sorts of noise.
A new coop was constructed for Forrest, complete with low roosting bars and handicapped accessible nest boxes with a ramp. After some coaching, she learned how to navigate the coop with ease. Forrest also found her favorite nest box and started laying the most beautiful green eggs I’ve ever seen.
Gorgeous green eggs.
Forrest in her coop.
Outside, Forrest is almost like a normal chicken. She free ranges, nibbles on grass, and digs in the moss for invertebrates. Extra time had to be taken to show Forrest how to do things that most chicks learn to do on their own, such as climbing a ramp or eating off the ground. It helped to have her sisters there to show her new things when she was unsure. Over about a two week period, she learned how to eat scratch grains off the ground. We started by putting the food in a plastic grain scoop. We would tap on it (or one of her sisters would do it for us). Forrest could hear them eating and would come over to peck at the grain scoop. After a few days, we would lay the scoop on the ground while she ate. Eventually the scoop was moved away, and Forrest realized she could eat directly from the ground. She does need to have her food in a pile or in a dish since she can’t see to eat individual pieces of food off the ground.
Eating scratch out of the gain scoop with her sisters.
Forrest loves to roam around the yard and will visit the neighbor’s house as well. She even enjoys flapping her wings as she scurries around the yard while we yell “Run, Forrest, run!”
Forrest’s future
Having a special needs chicken can be very rewarding, but it isn’t for everyone. Raising a chick that has physical limitations takes time and dedication from day one. If I had thought at any point that Forrest's quality of life would be poor, we would have culled her. Looking out in the yard today, you wouldn’t notice Forrest is any different than any of the other chickens (except for the fact that she is constantly under your feet trying to trip you).
Forrest has made new friends in her coop, which she shares with a rooster and seven other hens. We worried that she would be picked on by the older hens because she is different. Since Forrest and her sisters occupied the coop before we added the older birds, the younger pullets had already established it as their territory. With a little bit of forethought and planning, birds can be introduced to the coop with little or no drama.
Forrest’s rooster helps protect her and finds food to share with her.
I would also like to note that since we don’t know the cause of Forrest’s problems, her eggs will never be used for hatching. If the root is genetic, we wouldn’t want to pass her disabilities on to other chicks. Forrest will live out her life as a layer on the farm and have as much fun as she possibly can.
2018 update: While it was a truly invaluable experience having Forrest in the flock, we all know that chickens have an expiration date that is often much sooner than we would like. In 2017 Forrest's eyes experienced significant changes and I could tell her limited vision was becoming worse. In June, she stopped free ranging with her sisters and eventually she wouldn't come out of the coop at all. It seemed that the lights had gone out completely and she thought it was night all the time. She was unable to eat since she couldn't see her food. The difficult decision was made to have Forrest cross the rainbow bridge peacefully. In the end, it was probably for the best since a big move was coming up, and I don't think she would have adjusted well to a new environment. The move was completed last fall, and sadly Forrest's coop was disassembled and re-purposed.
Forrest didn't quite make it to her second birthday, but the time she had with us was priceless. Currently there is a new baby in the brooder with a crooked leg that i'm hoping can be fixed as a result of everything Forrest taught us. Her message would be to always try to help, but be humane and compassionate in the end.