(mostly finished...need to decorate, but that comes later.)
Our chick story began when my son's preschool attempted to hatch a dozen eggs. They had absolutely no idea what they were doing and only one hatched. They promptly picked up 2 more chicks at the feed store to keep the sole hatchee company. The kids studied them and loved them and absolutely hated "that lady that took our chickens" when the time came.

The three chicks (a Production Red, a black Cochin and a Blue Cochin) came home and we added four others (two EEs and 2 Brahmas) from the feed store. Two of the school chicks were roosters. So we added three more chicks (2 Welsummers and a buff Orpington). Currently the count is at 8 chicks. Mr. C started the coop when the first set of chicks were 6 weeks old.
Our challenges were:
1. Limited space - we have a regular size suburban lot and the coop needed to fit into a particular space
2. Budget - although we would love to go all out, we can't have this costing more than our house
3. Number of birds - our city laws allow so many birds per SF of coop space
4. Insulation for the heat - the main wall (the front) is facing such that it gets boiling hot on that side of the house.
Our coop is 4' x 5' with the entire foot print at about 4' x 9'.
It started with a foundation, buried hardware cloth and such. See the level...we are professionals!

Framing etc going up. What you can't see here, is that the floor can support an elephant dance party...seriously. Mr. C doesn't mess around when he builds. Some of the wood was repurposed, as you can see by the water staining. This was part of the reason that everything was painted with an exterior (UGLY) paint before it was put together. That and the colony of termites that has claimed our house. And see, mom said kegs were only good for frat parties...They make perfectly good supports for coop building!
I was told this is a "jig". I didn't see any dancing, but Mr. C assures me that he's right on this.
Apparently, it was used to cut the pieces for the roof.
He used these metal thingys to connect the roof pieces.
Getting fancy with tie-downs.
Roof wood up. This was some kind of fancy board with metal foil on the bottom. It was very heavy but apparently it will help keep the girls cool. Mr. C also used insulation in the walls to keep the front side of the coop cool on hot summer days.
Window and pop door hole. The window has hardware mesh sandwiched between the layers of the build so our raccoon friends can't help themselves to a midnight snack.
Next box attached.
Mr. C then lengthened the roofline to add the run and added sand for the run floor.
Here's the foreman (our giant mutt), making sure all work is up to code. After this pic, the tar paper was attached and the corregated metal roofing will be put on soon.
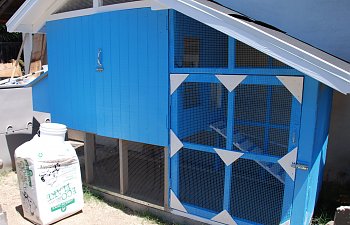
Here is the coop without the final paint:
Roost and poop board with sweet PDZ
Pop door and window. There is no pop door yet, will be coming soon. The run is completely predator proofed with hardware cloth wrapped into the framing and nailed in place.
Watering system. Tank is from The Tank Source. There is a shut off valve at the tank and another at the end of the pipe for flushing the whole system.
Inside the coop. Chicken nipples mounted under poop board.
Girls in the run. Chicken nipples mounted under the coop for access from the run.
Things I would change/do differently IF there was ever a next time:
1. Paint ALL the pieces of the coop the final color before assembly or adding hardware cloth. Painting through hardware cloth is a pain in the A**!
2. Even though Mr. C had a plan (he drew it on graph paper and everything) there was still some engineering on the fly, which was a pain.
3. This took longer than I though it would. I would definitely build most of the coop BEFORE getting the chicks next time. (Love you honey!)
4. This cost more than I thought it was going to. See #2 above. If I were to do this again, I would plan/buy everything at the same time. The many trips to Home Depot definitely added up.
And the part I was always interested in when I was reading about other people's coops.
How much did it cost?
The cost of building materials (some we had on hand), sand, paint, plumbing etc was nearly $1200. This was *much* more than I thought we would be spending, but my husband does nothing "halfway". He will readily admit that he overbuilds as he doesn't want to have to redo something in a few years. I just wanted a cute coop in a fun color.
")
Thanks for checking out our labor of love and for all the help and inspiration! Now if we can just keep chicken math in check, we will be good.