This little coop has been a long time coming! Well, it feels like a long time. Before launching into the chick club last summer after my husband and I decided they would be the perfect pet for our family, I spent the last 10 months working to get the ordinance changed to allow chicks in Rockledge, FL. Thanks to help from Avid Homestead and many open-minded and diligent civil servants, the ordinance was officially changed Feb 6, 2013. I started construction a week later ")
I wanted to use materials we already had or could get on the cheap (uh hum, free), even if it meant building slowly while gathering materials. I also have a small fear of my husbands skill saw, so I've been cutting all the pieces of wood with my hand saw.

Here's my two boys testing out the sturdiness of the walls. Looks good! They're good at helping with the drill driver.
The coop is something like 34" x 31". I just went with the size of the pallet wood I was using for the floor to make the size of the walls in a very "make it up as I go" method. I had 2"x4"s left over from building the lovely new fence in the background, old studs from a closet in the house, old shelving materials, and some pallet wood.
I got the trusses finished today and am happy with how they turned out. Since the coop is pretty small, I'm thinking of making the roof lift completely off so I can clean everything really good and check the peak for wasps, which we have in abundance round here. The whole front side will be a hinged door using gate hinges scrapped from my old fence. A pop door will be cut into it.
Here's another view.
This is the nest box. I'm going to hinge the lid and leave the box without dividers. After doing a bit of reading, I decided to make it a community nest box. It's 11" x 29" I think. Should be enough for the four girls we'll be getting. Gotta give a shout out to my little sister (thanks!) for doing the math on the side pieces of the box so I could use the 1"x12"s I had. Been a while since I've had to solve "x=?" for the missing side of a pentagon
What's next this week:
-take apart some more pallets to make the siding for the roof and walls
-build the roof
-cut a 4x4s for the legs
-source some lawnmower wheels to make the coop movable
-build the front door
-decide on windows, or no windows
--------------
Got over my fear of the circular saw. Turns out the thought of spending a week taking apart 4 more pallets with a hammer and crowbar was more terrifying than potentially losing a finger. And after a few youtube videos, I had all the pallets taken apart, the nails removed, and the wood neatly stacked in an afternoon. That was yesterday. Today I did this...
I got the window framing cut today and tomorrow I'll be putting it up and hopefully the walls too. And the side supports for the roof.
------
May 10, 2012
Here is where I'm at now:
Door is made, pop door is cut, windows are framed and screened, sides are in place, and as of today, the legs are installed.
I have some decisions to make about the roof still, but the next step will be sanding in prep for the paint, then hardware. I have vinyl flooring to lay in the bottom to cover the wood to make cleaning easier down the road. The whole setup stands about 5ft tall at the peak and is approximately 3'x3'x2' for the walls with the roof being another 2' at the peak and the legs are 15". I have two sweet tires I bought at harbor freight to mount with an axle on the back legs to make the whole thing movable. But next will be sanding.
-----------------------------------------
So, now the coop is in position. Vinyl floor is in, front and pop doors are on, and the nest box lid is together. I realized it would be easier to hose the whole thing out if the nest box opened from not just the top, but from the middle back side. So, now I have to put locks on the top and middle of the nest box, locks on the pop and front doors, and hang the shutters.
Paint is done on the inside and outside walls, but the roof still needs to be painted, insulation finished, and trim put on. As well as some sort of lock or hinge for the roof.
I decided that plywood was going to be the easiest for building the roof instead of pallet wood slats. So I went for convenience.
Still need to get that axle an wheels for the back legs, and I guess paint the legs too. Sheesh. I think I'm almost done and stuff just keeps popping up! If I ever build another coop, it may be made in the shape of a box with hardware cloth sides--simple!
And as you can see, drainage and decomposition of the manure in the run became a concern, so my hubby decided to jackhammer out the unnecessary back patio. Who lays concrete that thick?! Hopefully we'll be hauling that out soon and bringing in mulch or sod for the run. I'm not sure which yet. Sand isn't really an option and I want something that will decompose and use the manure quickly.
We're thinking about doing a picket fence around the run.
------------------------------------------------------------------------------------------------
June 2013
So here is the detailing on the roof. I used 1x3s (because they didn't have any 1x4's in stock that day) to make an edge to hang one piece of the roof that I wanted to open on the fixed piece. The fixed piece of roof is screwed to the 2x4 frame in every place there was room. The 1/4" plywood is glued and nailed to the 2x3" pallet wood pieces and the 1/2" plywood is glued and screwed to the 2x3. I made the movable roof piece (while watching Thor in my living room one night) in the same way, but also with the 1x3s screwed and glued on to the 2x3.
I don't have a picture yet, but I added four thin 2" hinges along the lip of the movable piece so that I can raise the roof (ha ha!) whenever I want. It is the smartest thing I did on the whole project in spite of the headache it was to design and build.
You might be wondering why I made the roof with a 1" gap. I did that so I could slip pieces of foil backed polystyrene foam board insulation into the roof to help with the extreme Central Florida heat. We had some small pieces leftover from a building project, and at my husband's urging, I cut them to size and slipped them in once the roof was built.
The coop is shaded most of the day from direct sun. I have a thermometer hung on the inside of the door and the coop usually stays at 80 and spikes to a high of 90 in the late afternoon sun. The chickens are never in there at that time of day, so I consider 80 a good temp for the times they are in there.
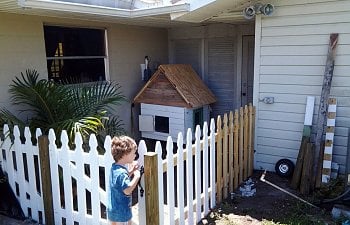
I built a 3.5' picket fence around the coop and run area, something I never EVER want to do in the summer again! and then rolled and carried the coop back into the run once I built the fence. Yep. After all the stress of finding wheel, axle, and caps for the axel, the whole thing was a bit of a flop. I suppose I could still salvage it, but I need to cut the axle down to the right size and I don't have a hack saw or the desire to figure out that project right now. So it's on hold and I might just scrap the whole Idea and use the parts for a different project. Like a movable square foot garden or something.
I was screwing the last of my pickets in place the morning of my inspection by Rockledge Code enforcement. Our CE officer was very nice and liked the whole project. She also told me I am allowed to "backyard free range" my chicks since the yard is fully enclosed in a 6' privacy fence which I was happy about.
Also, I used inexpensive locking hook and eye hardware as locks on the pop door and nest box. The front wall/door is on two hinges and locks with suitcase/trunk latches. I still have to put the shutters on and finish the roof with trim to seal up the insulation and paint the coop and fence. I also plan on planting Mandevilla vines along the fence and/or sunflowers along the outside. Some more aesthetic touches on the coop and herb baskets are also in the future. I'm not planning on this stuff until the winter though when the weather is cooler and it isn't raining all the time!
So here it is, my permit. I'm official! Well, at least until Feb 2014 when the code goes up for review.
First egg! I have a golf ball in there to show the girls where to lay. I've since added another and enjoy teasing them by puttin the golf balls on opposite ends of the nest box. All the eggs and golf balls end up in a pile in the same place in this picture when I collect the eggs.
This is my nightly check to make sure all four girls have made it into the coop. Like I said, I LOVE my hinged roof. They roost on a 1x2 quite happily. If they get much bigger, I may upgrade them to something larger. But they don't seem to have any problems with this. So that's what it's gonna be for now.
And here are the two black sexlinks fighting over the corner spot. This is the ONLY time I've ever seen more than 1 chick in the box.
So for the next few months, my project is mostly done and in use! I plan on inviting our city council out or at least sending them pictures before the code goes up for review in Feb, so everything will need to be finished by December. Check back then and see how I've finished up the Cross Cozy Coop!
I wanted to use materials we already had or could get on the cheap (uh hum, free), even if it meant building slowly while gathering materials. I also have a small fear of my husbands skill saw, so I've been cutting all the pieces of wood with my hand saw.
Here's my two boys testing out the sturdiness of the walls. Looks good! They're good at helping with the drill driver.
The coop is something like 34" x 31". I just went with the size of the pallet wood I was using for the floor to make the size of the walls in a very "make it up as I go" method. I had 2"x4"s left over from building the lovely new fence in the background, old studs from a closet in the house, old shelving materials, and some pallet wood.
I got the trusses finished today and am happy with how they turned out. Since the coop is pretty small, I'm thinking of making the roof lift completely off so I can clean everything really good and check the peak for wasps, which we have in abundance round here. The whole front side will be a hinged door using gate hinges scrapped from my old fence. A pop door will be cut into it.
Here's another view.
This is the nest box. I'm going to hinge the lid and leave the box without dividers. After doing a bit of reading, I decided to make it a community nest box. It's 11" x 29" I think. Should be enough for the four girls we'll be getting. Gotta give a shout out to my little sister (thanks!) for doing the math on the side pieces of the box so I could use the 1"x12"s I had. Been a while since I've had to solve "x=?" for the missing side of a pentagon
What's next this week:
-take apart some more pallets to make the siding for the roof and walls
-build the roof
-cut a 4x4s for the legs
-source some lawnmower wheels to make the coop movable
-build the front door
-decide on windows, or no windows
--------------
Got over my fear of the circular saw. Turns out the thought of spending a week taking apart 4 more pallets with a hammer and crowbar was more terrifying than potentially losing a finger. And after a few youtube videos, I had all the pallets taken apart, the nails removed, and the wood neatly stacked in an afternoon. That was yesterday. Today I did this...
I got the window framing cut today and tomorrow I'll be putting it up and hopefully the walls too. And the side supports for the roof.
------
May 10, 2012
Here is where I'm at now:
Door is made, pop door is cut, windows are framed and screened, sides are in place, and as of today, the legs are installed.
I have some decisions to make about the roof still, but the next step will be sanding in prep for the paint, then hardware. I have vinyl flooring to lay in the bottom to cover the wood to make cleaning easier down the road. The whole setup stands about 5ft tall at the peak and is approximately 3'x3'x2' for the walls with the roof being another 2' at the peak and the legs are 15". I have two sweet tires I bought at harbor freight to mount with an axle on the back legs to make the whole thing movable. But next will be sanding.
-----------------------------------------
So, now the coop is in position. Vinyl floor is in, front and pop doors are on, and the nest box lid is together. I realized it would be easier to hose the whole thing out if the nest box opened from not just the top, but from the middle back side. So, now I have to put locks on the top and middle of the nest box, locks on the pop and front doors, and hang the shutters.
Paint is done on the inside and outside walls, but the roof still needs to be painted, insulation finished, and trim put on. As well as some sort of lock or hinge for the roof.
I decided that plywood was going to be the easiest for building the roof instead of pallet wood slats. So I went for convenience.
Still need to get that axle an wheels for the back legs, and I guess paint the legs too. Sheesh. I think I'm almost done and stuff just keeps popping up! If I ever build another coop, it may be made in the shape of a box with hardware cloth sides--simple!
And as you can see, drainage and decomposition of the manure in the run became a concern, so my hubby decided to jackhammer out the unnecessary back patio. Who lays concrete that thick?! Hopefully we'll be hauling that out soon and bringing in mulch or sod for the run. I'm not sure which yet. Sand isn't really an option and I want something that will decompose and use the manure quickly.
We're thinking about doing a picket fence around the run.
------------------------------------------------------------------------------------------------
June 2013
So here is the detailing on the roof. I used 1x3s (because they didn't have any 1x4's in stock that day) to make an edge to hang one piece of the roof that I wanted to open on the fixed piece. The fixed piece of roof is screwed to the 2x4 frame in every place there was room. The 1/4" plywood is glued and nailed to the 2x3" pallet wood pieces and the 1/2" plywood is glued and screwed to the 2x3. I made the movable roof piece (while watching Thor in my living room one night) in the same way, but also with the 1x3s screwed and glued on to the 2x3.
I don't have a picture yet, but I added four thin 2" hinges along the lip of the movable piece so that I can raise the roof (ha ha!) whenever I want. It is the smartest thing I did on the whole project in spite of the headache it was to design and build.
You might be wondering why I made the roof with a 1" gap. I did that so I could slip pieces of foil backed polystyrene foam board insulation into the roof to help with the extreme Central Florida heat. We had some small pieces leftover from a building project, and at my husband's urging, I cut them to size and slipped them in once the roof was built.
The coop is shaded most of the day from direct sun. I have a thermometer hung on the inside of the door and the coop usually stays at 80 and spikes to a high of 90 in the late afternoon sun. The chickens are never in there at that time of day, so I consider 80 a good temp for the times they are in there.
I built a 3.5' picket fence around the coop and run area, something I never EVER want to do in the summer again! and then rolled and carried the coop back into the run once I built the fence. Yep. After all the stress of finding wheel, axle, and caps for the axel, the whole thing was a bit of a flop. I suppose I could still salvage it, but I need to cut the axle down to the right size and I don't have a hack saw or the desire to figure out that project right now. So it's on hold and I might just scrap the whole Idea and use the parts for a different project. Like a movable square foot garden or something.
I was screwing the last of my pickets in place the morning of my inspection by Rockledge Code enforcement. Our CE officer was very nice and liked the whole project. She also told me I am allowed to "backyard free range" my chicks since the yard is fully enclosed in a 6' privacy fence which I was happy about.
Also, I used inexpensive locking hook and eye hardware as locks on the pop door and nest box. The front wall/door is on two hinges and locks with suitcase/trunk latches. I still have to put the shutters on and finish the roof with trim to seal up the insulation and paint the coop and fence. I also plan on planting Mandevilla vines along the fence and/or sunflowers along the outside. Some more aesthetic touches on the coop and herb baskets are also in the future. I'm not planning on this stuff until the winter though when the weather is cooler and it isn't raining all the time!
So here it is, my permit. I'm official! Well, at least until Feb 2014 when the code goes up for review.
First egg! I have a golf ball in there to show the girls where to lay. I've since added another and enjoy teasing them by puttin the golf balls on opposite ends of the nest box. All the eggs and golf balls end up in a pile in the same place in this picture when I collect the eggs.
This is my nightly check to make sure all four girls have made it into the coop. Like I said, I LOVE my hinged roof. They roost on a 1x2 quite happily. If they get much bigger, I may upgrade them to something larger. But they don't seem to have any problems with this. So that's what it's gonna be for now.
And here are the two black sexlinks fighting over the corner spot. This is the ONLY time I've ever seen more than 1 chick in the box.
So for the next few months, my project is mostly done and in use! I plan on inviting our city council out or at least sending them pictures before the code goes up for review in Feb, so everything will need to be finished by December. Check back then and see how I've finished up the Cross Cozy Coop!